This tutorial shows you how to work with the Print Production features in Acrobat 9. See what the all-new Acrobat DC can do for you.
Download a free trial of the new Acrobat.
Prepare, preflight and print using Acrobat 9
Learn how to use the preflight tools and fixes in Acrobat 9, including how to utilize the Preflight panel.


Prepare, preflight and print
By Donna L. Baker, ACE, Baker Communications
Some Acrobat users spend their days wrestling with the intricacies of halftone dot angles. For the rest of us, printing may range from a casual, automatic action to a calculated application of standards-compliant features. In this article, I’ve brought together a collection of tips on using pre-flight tools and fixes tailor-made for the basic Acrobat user.
If you’re like many people who don’t send documents to a print shop, you may think you’d never have a cause to check out the Preflight panel in Acrobat. You’d be wrong—and miss out on some great, timesaving options. Let’s take a quick tour of the Preflight panel, and I’ll point out some features (Figure 1). To open the panel, choose Advanced > Preflight and give the program a few seconds to load the profiles.
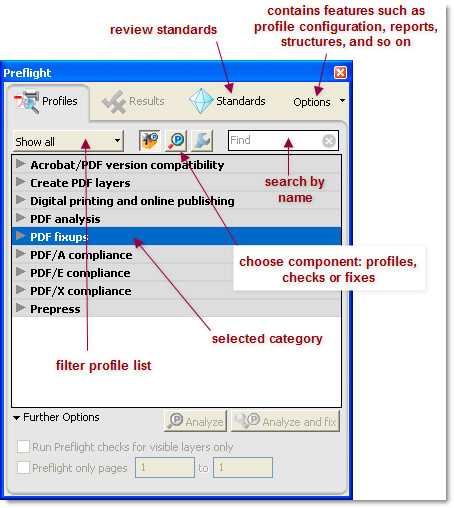
Figure 1: The Preflight dialog box lists profile categories.
The Preflight panel opens listing the Profiles, arranged in categories (described later in Table 1).
With reference to Figure 1, here’s what you see:
- Click a category to open a list of its constituent profiles
- Click Show all to open a menu you can use to sort the Profiles list according to frequency of use, defined favorites or by a single category
- Click the appropriate icon to Select Profiles (default), Select Single Checks and Select Single Fixes
- Type a name of a profile, check or fix in the Find field to filter the content of the dialog box
- Click Standards to display a description of the current PDF standards, including PDF/X, PDF/A, and PDF/E
| Profile Category | Features | Example |
| Acrobat/PDF version compatibility | Makes document compatible with selected Acrobat version. For example, for Acrobat 5 compatibility, layers are flattened, image bit depth decreased to 8-bit, file saved using PDF 1.4 | Compatible with Acrobat 5 |
| Create PDF layers | Separate document content into layers according to object types or settings | Choose Create separate layers for vector objects, text and images to move each type of object to its own page object |
| Digital printing and online publishing | Optimizes the document for printing according to color status or by quality/size | Digital printing (color) optimizes the document for printing by converting all colors to CMYK, including spot color |
| PDF analysis | Evaluates and reports on a range of objects that may be present in the document | List all hairlines to identify lines in the document that may not print properly due to their size |
| PDF fixups | Convert color space, modify image resolutions, flatten items like annotations, overprints and transparency | Embed fonts automatically embeds all fonts used in the document, provided their licenses allow embedding |
| PDF/A compliance | Convert to the standard, verify compliance or remove information specific to the standard | Convert to PDF/A-1a (sRGB) to make changes in the document allowing its compliance with the standard |
| PDF/E | Convert to the standard, verify compliance or remove information specific to the standard | Verify compliance with PDF/E-1 (sRGB) to ensure the document complies with the standard’s requirements |
| PDF/X | Convert to the standard, verify compliance or remove information specific to the standard | Remove PDF/X information to change the document’s metadata specifying its identification as a standards-compliant file |
| Prepress | Evaluates the document and applies fixes to make it comply with a selected specification | Sheetfed offset (CYMK) verifies compliance with Ghent PDF Workgroup recommendations |
Table 1: Preflight Profile Categories in Acrobat 9 Professional
Of course, Table 1 merely lists the Profiles categories you can select. As you’d expect, the Single Checks and Single Fixups contain their own category lists.
Checks and fixups
The array of options listed in the Preflight dialog box throws off many a user. For the remainder of this article, I’ll explain how and why you’d want to embark on a journey into the innards of Preflight. I promise you won’t need a trail of breadcrumbs to find your way out!
Each profile comprises a collection of checks and fixes. For example, if you look at the Magazine Ads profile under the Prepress category, you’ll see its short description identifies the profile as a collection of tasks that verify compliance with the Ghent PDF Workgroup’s specification and apply necessary fixups. Click Edit above the profile’s description to display the full particulars of the profile in the Preflight: Edit Profile dialog box (Figure 2).
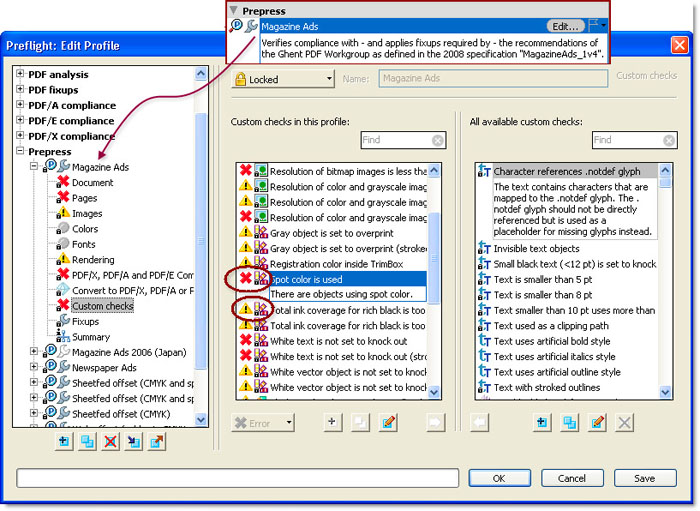
Figure 2: View complete details of a profile’s components.
When the dialog box displays the profile, you see a variety of representative icons. The “Magazine Ads” title in the left column is prefaced by both Checks and Fixups icons, meaning both types of actions are part of the profile. Through the list, notice that some file components show a cautionary yellow triangle icon (as shown to the left of Images) indicating there may be issues that prevent compliance.
On the other hand, items marked with a bright red “X” aren’t open to interpretation. If you look at the central Custom Checks column, you’ll see the checks are again prefaced by caution or error indicators. In the Prepress Magazine Ad profile, for instance, using a spot color prevents compliance with the profile, while having overly high total ink coverage for rich black is an expensive practice, but doesn’t preclude compliance.
Check it out
Collections of checks and fixups make up each profile. If you don’t need any standards-compliant documents, why would you bother with Preflight? Simply because you can save time constructing your own sets of checks and fixes.
In the Preflight dialog box, click Select Single Checks to open the list shown in Figure 3. From all these categories, you’ll find many options for items that you do check on a regular basis, such as whether fonts are embedded (under the Font category), if your document originated in a program that allows for artificial bold or italics styles (both in the Text category) and so on.
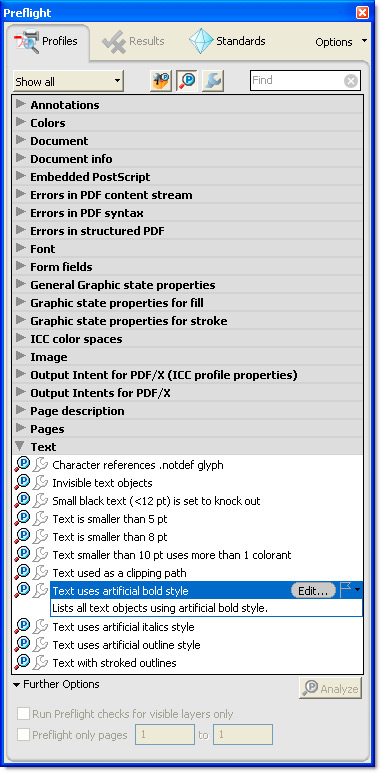
Figure 3: Hundreds of document items can be evaluated.
Fix it up
Click Select Single Fixes in the Preflight dialog box to list the categories of fixes. Again, you’ll see the options cover the gamut from Color Spaces to Layers and Pages. Click a heading to open a list of fixes, such as removing empty pages (Figure 4).

Figure 4: Choose from many fixups to repair document features.
Make your own repairs
Suppose you characteristically receive documents from outside sources that need the same changes before you can incorporate them into your workflow. Depending on your relationship with your sources, you might convince them to formulate documents according to your needs. A more likely scenario is that you’ll have to make changes yourself. If that’s the case, look to the Preflight panel for help.
Here are some tips to keep in mind, should you venture into automating your workflow using your own Preflight profiles:
- Study your usual workflow for good ways to lighten the load using custom profiles. It takes a few minutes to set one up, but then only a mouse click to run it in the future.
- Write a list of what you’d like to check, and the fixes you’ll need to include.
- Don’t reinvent the wheel. Rather than starting from scratch, start from an existing profile to which you can add and remove items. For a less-involved process, start with an existing check or fix to which you can add additional tasks.
- Give your profile a meaningful name. 2009_Johnston_newsletters makes a lot more sense than 20090401.J.N or something similar.
- Look for a few generic items you might not think of, but that can enhance your documents. For example, you could include Discard document structure or Optimize PDF for fast web view from the Document category in the Fixes. Neither of these examples is necessary for the most part, but both can help optimize your document for quicker distribution.
- Don’t add more to one profile than you need. It’s simple to build a number of profiles with fixes for different sorts of issues, and then apply them sequentially. You’re not as likely to get confused or forget the parameters of a profile if you confine it to a subset of your workflow, such as images or text evaluations and fixes.
Spend some time looking through the lists of options—perhaps on your next working vacation or a rainy day. You’ll be surprised at what you might come across! Here’s one of my favorites: A custom fix (named db) that I apply to material for submission to an editor in one of my workflows. With a single click, I can set several items in the Document Properties without opening the dialog box. I add a notation that the file has been through the Preflight process, insert my name as author, and add my ongoing Subject. One click does it all.
Products covered: |
Acrobat 9 |
Related topics: |
Print Production |
Top Searches: |
Create PDF print production tools overview |
Try Acrobat DC
Get started >
Learn how to
edit PDF.
Ask the Community
Post, discuss and be part of the Acrobat community.
Join now >
1 comment
Comments for this tutorial are now closed.
Lori Kassuba
6, 2015-01-29 29, 2015Hi George,
Try running the Repair command under the Help menu to fix some of these problems. You use Acrobat as your viewer in FireFox, you can try these instructions:
https://support.mozilla.org/en-US/kb/disable-built-pdf-viewer-and-use-another-viewer
Thanks,
Lori
George
3, 2015-01-28 28, 2015I own the install disk version of Adobe Acrobat 9 Standard and have had it work perfectly on this computer for years. Recently, I had to install a new hard drive and am currently running the computer’s original Windows Vista Premium 64-bit OS. I had my Acrobat 9 running perfect with my Windows 7 upgraded OS, but can’t get Acrobat 9 to work smoothly in Vista. It installed correctly, but my saved pdf documents still have the Firefox icon (not the PDF icon). When I try to double-click a saved pdf (with firefox icon) it opens in a firefox version of reader, not my Acrobat 9. I can open my Acrobat 9 software, then open these firefox docs to display as PDFs, but my adobe printer will only print firefox versions, not Adobe versions. What is going on?
Comments for this tutorial are now closed.