How to reduce PDF file size using Acrobat 9
By Adobe – July 20, 2009
In this tutorial, learn how to reduce a PDF file size (sometimes called optimize PDF or compress PDF) without having to regenerate the PDF file, regardless of the preset used to create a file. The size of a PDF file can vary tremendously depending on the Adobe PDF settings used to create the file. For example, files created using the High Quality Print preset will be larger than files created using the Standard or Smallest File Size presets. Regardless of the preset used to create a file, you can often reduce the file size without having to regenerate the PDF file.
In this section, you'll use the Reduce File Size command to dramatically reduce or compress the size of a PDF file.
- In Acrobat, open a PDF file.
- Choose Document > Reduce File Size.
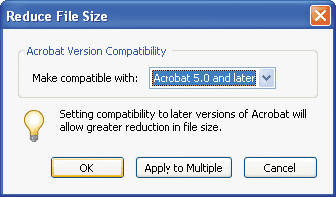
- Select Acrobat 8.0 And Later for file compatibility, and click OK.
- Name the modified file. Click Save to complete the process.
- Minimize the Acrobat window. View the size of the reduced file. The file size is smaller.
- Choose File > Close to close your file.

When you choose the compatibility level, be aware that the newer the version of Acrobat that you choose, the smaller the file. If you choose compatibility with Acrobat 9, however, you should be sure that your intended audience does indeed have version 9 installed.
It is always a good idea to save a file using a different name so that you don't overwrite an unmodified file.
Acrobat automatically optimizes your PDF file, a process that may take a minute or two. Any anomalies are displayed in the Conversion Warnings window. If necessary, click OK to close the window.
You can repeat steps 1-5 using different compatibility settings to see how they affect file size. note that some settings might actually increase the file size.
PDF Optimizer offers more opportunities to control quality trade-offs.