![]()
Acrobat 8: Image editing 101
By Donna Baker – August 31, 2007 Donna Baker
Here's a common situation: You're working on a company newsletter and need to have it distributed by the end of business today. At the last moment, the boss decides to take a look, then asks for a number of image changes, including crops, replacements and effects. What to do?
You could modify the images in your image-editing program, re-open your original layout program, make the changes, and finally recreate the PDF file. Or you can make the modifications directly from Acrobat 8, meet your deadline and be the hero of the moment.
Devise a game plan
You don't have to be a graphic designer to use the tools Acrobat offers for image editing, as you'll see from the examples included in this article.
Choose the right method for the job
Not every image modification or correction is a good candidate for using the Acrobat tools. Although you can make changes to anything in a document, consider the method that is most useful to you in the long term:
-
If a project is on a deadline and the image or layout changes are one-off, save time by working from Acrobat
-
If the changes affect the layout of the finished product (such as resizing an image) and you need to re-use any of the material at a later date, consider making the revisions in the source file and recreating the PDF version
-
If you need to make changes to an image (such as correcting color or contrast) and intend to re-use the image in the future, make the revisions in the source image files and then recreate the PDF file
-
If you need to make changes to an image or the layout, and the tags and other accessibility structures are important to the document, make the changes in your source programs and regenerate the PDF file
Adjust program settings
Here are a few tips on program settings and features to get the most out of Acrobat-centric editing:
Simplify image selections
Layouts often have multiple stacks of images, text and background objects. If you are trying to select an image, but end up selecting text repeatedly, change your preferences.
Choose Edit > Preferences or Acrobat > Preferences (Mac) and click General in the left column of the dialog box to display the General preferences. Select the Make Select tool select images before text option. The images in your stacked object will be easier to select.
Use grids and guides for assistance
Sometimes it is difficult to determine the exact placement for content on a page, particularly if you have been adjusting image sizes. To help in your quest for placement perfection, display the Acrobat grid and use guides to pinpoint locations.
Choose View > Grid to display the grid overlay on your page (Figure 1).
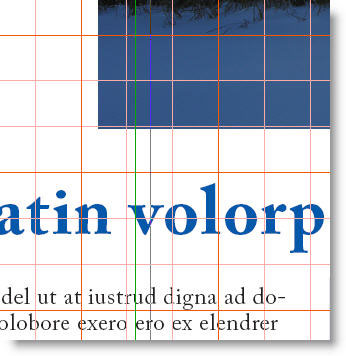
Figure 1: Use grids and guides to assist in page edits
The default color for gridlines and guides is blue. As you see in Figure 1, the grid lines are orange and guide lines are green to make it simpler to see over a page containing predominantly blue content. Set the colors and other grid features--such as dimensions--in the Units & Guides panel of the Preferences.
Note: If using grids and guides isn't precise enough for your tastes or purposes, choose View > Navigation Panels > Info to display the Info panel. As you move the mouse over the page, you'll see x- and y-axis coordinates display on the panel.
How to modify images
Use the TouchUp Object tool on the Advanced Editing toolbar for making image changes ranging from basic image adjustments on the page to image replacements to editing the source file.
Make simple image adjustments
To make a basic image adjustment—such as changing the size or location of an image on a page—select it with the TouchUp Object tool and manipulate the corner handles to resize the image, or drag it with the tool to reposition it on the page (Figure 2). For pixel-by-pixel positioning of the selected image, use the arrow keys on your keyboard.

Figure 2: Make simple adjustments to an image
Tip: Constrain resizing or repositioning by pressing the Shift key as you drag the image or its handles.
Select an image with the TouchUp Object tool, and choose other simple image-adjustment commands from the shortcut menu, such as rotating or flipping the image.
Edit accessibility features
Make your document more accessible by using these features, available from the TouchUp Object tool's shortcut menu:
-
Choose Create Artifact to remove an image from the document reading order. That way, every instance of a decorative corner graphic isn't read by screen readers or the Read Out Loud feature.
-
Choose Properties to open the TouchUp Properties dialog box, and click the Tag tab. Type a description of the image in the Alternate Text field. That way, when a screen reader or the Read Out Loud feature encounters the image, the text description can be read.
Place images on the page
You can replace an existing image or add a new image to a page. Follow these steps to add a new image to the page:
1. Right-click/Control-click the page with the TouchUp Object tool and choose Place Image from the shortcut menu.
2. In the Open dialog box, locate and select the file.
3. Click Open; the dialog box closes and the image is automatically placed at the center of your document page.
What's your color?
Suppose you have a document that you plan to send to your print shop and realize that a couple of the images use RGB color rather than the specific color space your printer needs.
Here's an easy fix: Select the image with the TouchUp Object tool, and choose Properties from the shortcut menu. Click the Color tab in the TouchUp Properties dialog box. The existing color space is shown at the top of the dialog box shown in the figure; click the drop-down arrow to choose another color space and specify an intent, if necessary.

If you want to replace an existing image, select the image for replacement rather than the page with the TouchUp Object tool.
Round-trip image editing
For the ultimate in inter-program cooperation, Acrobat lets you edit images in an image-editing application of your choice, all from the comfort of your Acrobat document pane. How handy!
Specify an editing program in the Acrobat preferences if you plan to use an image editor other than Photoshop, which is assigned by default. Choose Edit > Preferences/Acrobat > Preferences to open the Preferences dialog box and choose TouchUp from the left column. Click Choose Image Editor to open a dialog box. Locate and select the editing program you want to use. Click Open to select the program and close the dialog box; click OK to close the Preferences dialog.
Edit the image
Follow these steps to edit an image using Photoshop from a document in Acrobat 8 Professional:
1. Select the image using the TouchUp Object tool. Right-click/Control-click to display the shortcut menu and choose Edit Image.
2. Photoshop opens and displays an information dialog box explaining that new vector or text layers are flattened automatically. Click OK to close the dialog box and view the image in Photoshop. Acrobat assigns a name to the image automatically.
3. Make the modifications to the image as desired. The example shown in Figure 3 includes additional layers along with the original image.

Figure 3: Edit and manipulate the image in Photoshop
4. Close the image window in Photoshop. A dialog box opens asking whether or not to save the changes. Click Yes. The file is processed and you see the image replaced in the Acrobat 8 PDF file.
Tips for round-trip editing
Round-trip editing isn't all-encompassing. Here are some tips on what to watch out for when using Acrobat and Photoshop:
-
If your image won't open in Photoshop, make sure the program is installed and configured correctly
-
If you see a transparent image window in Photoshop that shows a checkerboard by default, the image's data couldn't be read in Photoshop
-
Transparency information is preserved only for masks that are specified as index values in an indexed color space-like specifying a transparent color in a GIF image
-
Image masks are not supported
-
If you change image modes while editing the image, you often have to save the file to your hard drive and then replace the original with the edited version
-
If the image is in a format supported by Photoshop 6.0 or later, the edited image is embedded into your original PDF file
-
If the image uses an unsupported format, the edited image must be saved rather than embedded; you simply replace the original with your edited version manually
-
If you insert layers in your image in Photoshop, return to Acrobat and then decide to revise the image again, you are out of luck. The file has been flattened and there are no adjustable layers (Figure 4).
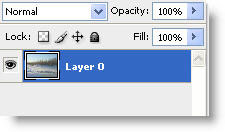
Figure 4: All layers were flattened in the initial save process
I'd like your feedback:
Have you tried any of the image editing features in Acrobat? Have they been useful? I'd like to hear your experiences. Feel free to add your comments or observations in the field below.
E-mail me!