![]()
The Acrobat X Suite and You
By Donna Baker – March 22, 2011 Donna Baker
You're great at your job, and enjoy communicating with your client base. You need to stay current in a fast-moving market. You want to grab your customer's attention with eye-catching content and follow that up with great customer service. The one thing you don't have is a designer ready and willing to bring your ideas to life. All you need is the Adobe Acrobat X Suite.
What's included?
The Acrobat X Suite helps you take that creative thinking to a new level, integrating tightly into your daily work. The two cornerstone products of the suite are Acrobat X Pro and Adobe Photoshop CS5.
Photoshop is the indisputable standard in image-editing software. The program performs many complex functions, and has an overwhelming abundance of panels and settings. But did you know that as its capabilities increased, so has its ease of use? Features like content-aware selections and simple corrections let you confidently do tasks like cropping or resizing an image, or even removing a clock from the wall (Figure 1). No designer required!
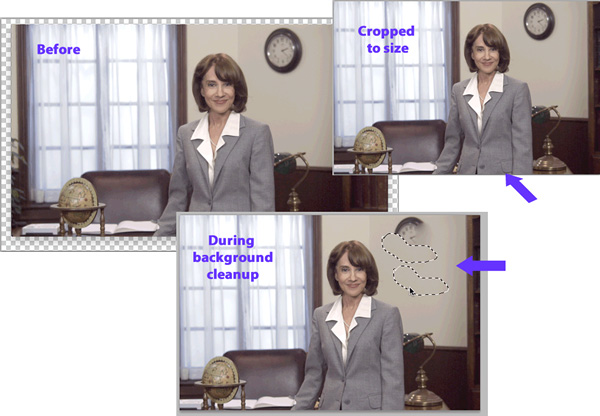
Figure 1: Photoshop examples.
Since you're reading this at Acrobatusers.com, you're familiar with how Acrobat X lets you generate, manipulate, distribute and display PDF files. Back in the day, a PDF file was a static, shareable document that viewed and printed like the original source document. Those days are past, and a document means anything from a fillable form to a branded PDF Portfolio to an online presentation (Figure 2).
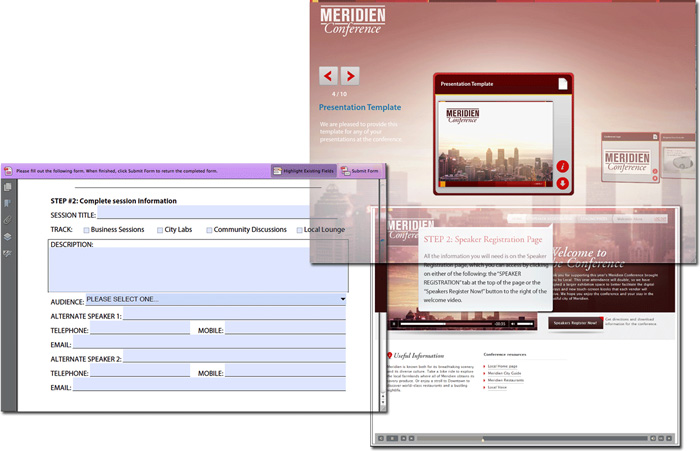
Figure 2: Types of Acrobat documents.
But why stop there? If you've already prepared a presentation outlining the benefits of a new product for client discussions, use the Adobe Presenter 7 program (installed into Powerpoint as part of the Acrobat X Suite) to repurpose your presentation and offer it to customers you can't reach in person (Figure 3). Along with offering a brandable interface, your Presenter 7 project can include other content -- like video narration or even an interactive quiz.
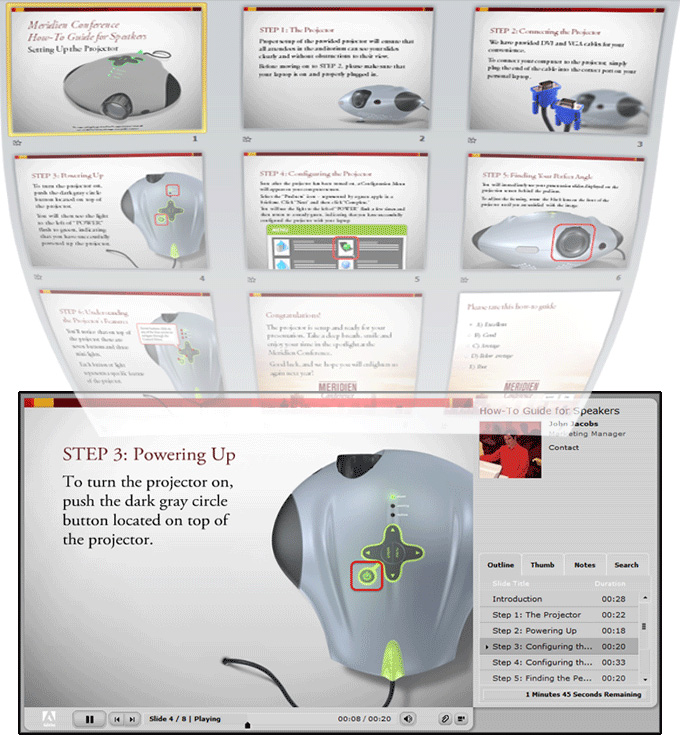
Figure 3: Convert a simple PowerPoint presentation to an interactive PDF file.
For more extensive training and presentations, be sure to check out Adobe Captivate 5. You can combine many types of media, including audio, video, screen recordings and even Powerpoint slides, into one publication (Figure 4). Then you can export the finished product in Adobe Flash or PDF formats.
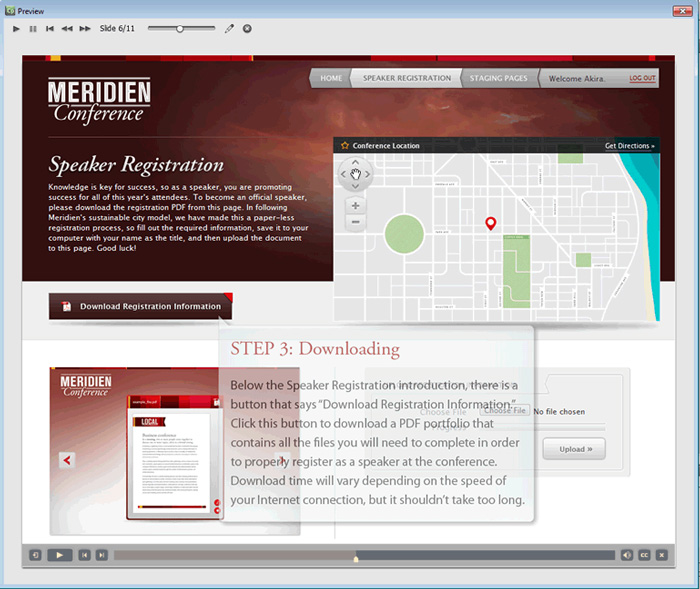
Figure 4: Produce customized demos and simulations.
Adobe Media Encoder CS5 is the final part of the Acrobat X Suite. You often have media in different formats from different sources (Figure 5). Use the Adobe Media Encoder to convert audio and video content in many forms to Adobe Flash Video and other common formats for easy and efficient distribution.
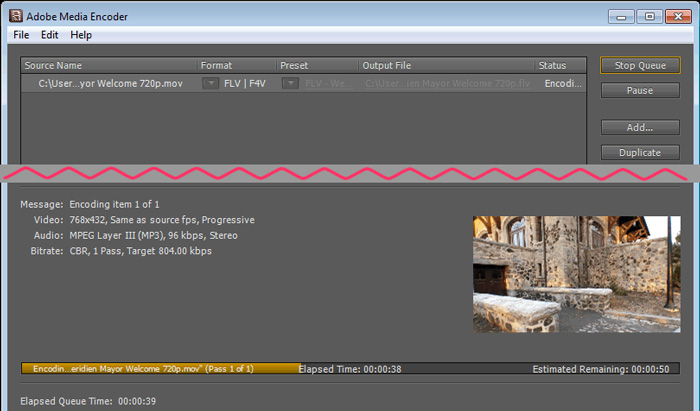
Figure 5: Change media formats (interface cropped).
What's in it for ME?
That's the million-dollar question, isn't it? Reading about the suite components and their features is one thing, translating that into your day-to-day life is quite another. To illustrate, let's consider a typical scenario.
Your mission
Your task is to take a range of documents and files for an upcoming conference and make them “pop.” Your consumers are potential speakers and sponsors. You need a final kit that's easy to use, engaging, unified, self-contained and appropriately branded throughout. By the way, it's due in a week, and you're working without any design assistance.
You're not starting from scratch, as the conference planning has been underway for some time. Here's some of your current inventory:
- Multi-page conference guide PDF
- Speaker-registration form in PDF
- Conference website and online registration
- QuickTime Welcome to the City movie from the mayor
- PowerPoint guide for using conference projectors
- Audio voiceovers for the PPT projector guide
Now what? Some documents are fine as is. Others need enhancements to offer the user-friendly, cohesive package we're looking for.
Deciding on enhancements
It's time to valuate the current content based on its usability. That is, can the reader understand and use the content as is, or should you include more instruction? If so, what adds optimal informational value?
You're including a PowerPoint guide to train speakers to run your projector system. Based on your experience, users understand more if the presentation includes audio narration. Rather than simply adding audio to the Powerpoint presentation, you decide to package the presentation with Adobe Presenter. Along with providing the information the users need, the wrapper lets you add your photo and contact information, a simple way to personalize the training piece.
Your conference registration process also concerns you. It's a secure process involving a number of steps and screens—and your problem now. The web folks tried pop-up messages, which seemed to make registration more confusing. You tried writing a list of steps, but that didn't help much either. It would be great to have something that shows the process step-by-step, wouldn't it? You decide to put together a simple Adobe Captivate demo showing the steps involved.
Preparing the interactive user guide publication
Work directly from PowerPoint to redefine the Projector User Guide as an interactive presentation using the Presenter 7 plug-in. Click the Adobe Presenter tab to open the ribbon, and follow these steps to prepare the publication in Office 2010:
- Add audio narration by recording and syncing audio to the slides or importing existing content (shown in Figure 6). Select a slide, then click Browse to locate and select the audio file. Add more audio clips as required and then click OK to close the Import Audio dialog box.
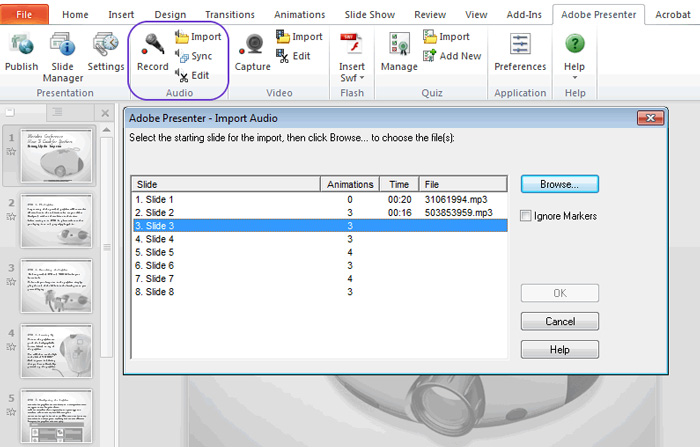
Figure 6: Locate and attach audio clips to the Powerpoint slides.
- Add other video content, including Adobe Flash output if desired.
- For reference and tracking purposes, add a user evaluation slide. Click Add New on the Quiz area of the ribbon to open the dialog boxes shown in Figure 7. Configure your choices as desired and click OK.

Figure 7: Insert a feedback slide.
- Click Settings on the ribbon to open the Presentation Settings dialog box. On these four panels, configure the appearance and labels for the presentation, apply and edit a theme, define playback settings and so on (Figure 8).

Figure 8: Configure the presentation's appearance and playback.
- Finally, click Publish to open the Export dialog box (Figure 9). Choose your export format and options, and click Save to export the presentation.
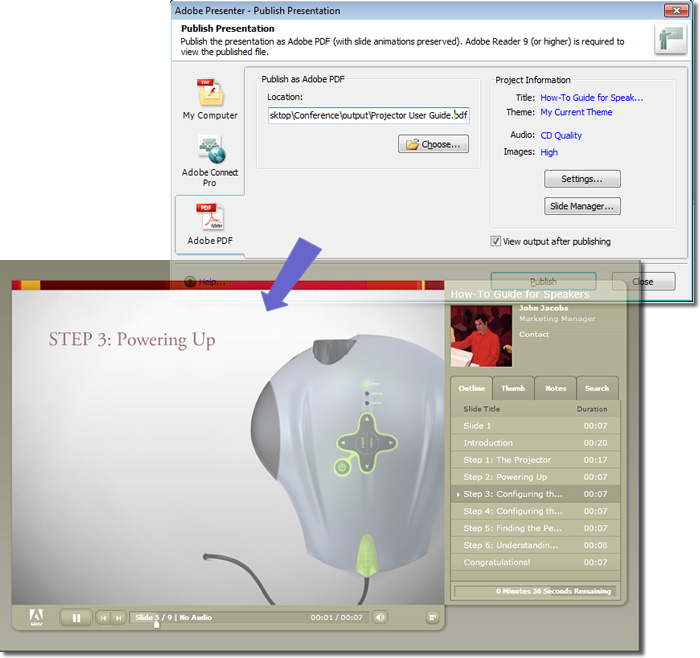
Figure 9: Export the presentation as Adobe Flash or embedded within a PDF file.
Next, it's on to Captivate 5 to build a demo for user registrations.
Creating the Captivate demo
Captivate 5 lets you capture content from the screen and configure it for output in a variety of formats. You can easily create a short demonstration to guide users on how to use the online registration for the conference. Here's a brief rundown of the process:
- Display the content you want to capture and size the program window.
- From Captivate, choose an option to start or record a new project (there are several variations available).
- Once the recording window opens, specify the capture settings including size and type of recording. Click Record to start the screen capture, which includes mouse actions and screen changes (Figure 10).
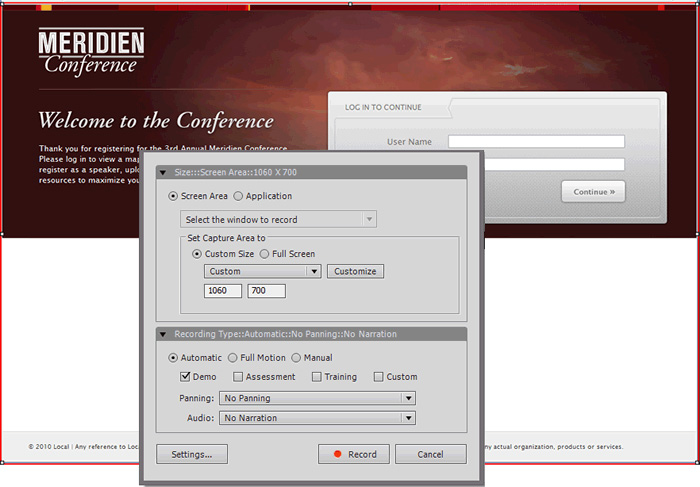
Figure 10: Capture screen actions and animations.
- When you've finished recording, the slides open in the Captivate program window, listed in the Filmstrip view. Adjust the slide characteristics such as slide length and transitions.
- Add text callouts or other information features, customized according to your branding requirements (Figure 11).
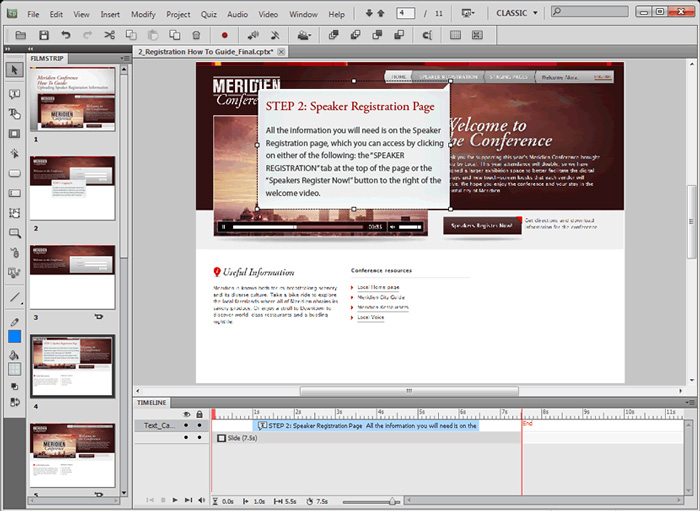
Figure 11: Insert information and instructions.
- When you're ready, choose one of several publishing options. In addition to exporting the content as a SWF file, you can export the file within an HTML or PDF wrapper, and even enable the SWF for iPhone applications (Figure 12).
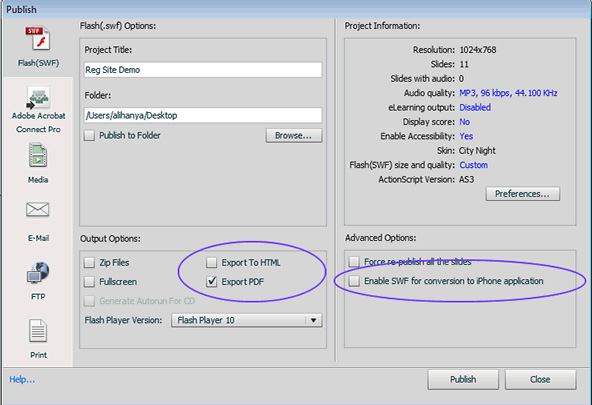
Figure 12: Insert information and instructions.
Packaging the publications
Based on the final-product requirements, the best way to present the package is using a PDF Portfolio created in Acrobat X. A Portfolio provides an easy-to-use interface that's branded for the conference. In response to sponsor or speaker queries, you can send one identifiable package—far superior to an email with a group of attachments (Figure 13).
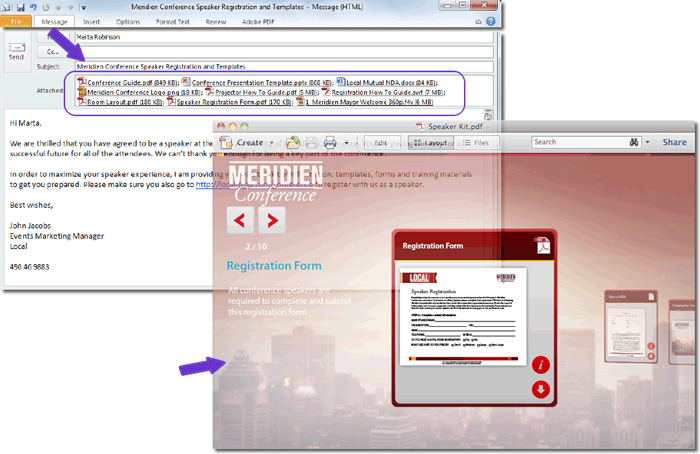
Figure 13: An email and attachments or a PDF Portfolio?
Not only does the PDF Portfolio include its own packaging and branding, you don't need to include instructions in the email to guide the reader on what to look at first or worry they won't have the appropriate software to view the attachments.
Final reviews
You'll probably need to circulate the content in the PDF Portfolio for review before releasing your masterpiece for distribution. Your reviewers can open files directly from the PDF Portfolio and add comments, like the one in Figure 14 requesting an image change.

Figure 14: The dreaded last-minute graphic change.
From your perspective, making last-minute changes could be a nightmare—begging a few minutes from your graphic designer to update or change images. Well, Acrobat X and Photoshop can take care of that problem in a snap. All you need is a Preference setting and a few minutes.
Follow these steps to make the image correction:
- In the document for editing, click Tools to open the panels and then click Content to display the list of tools. Click Edit Object .

- Right-click the image for correction to open the shortcut menu, and choose Edit Object.
- Photoshop CS5 opens, and displays a message explaining that any Photoshop automatically flattens the file before saving it if you add other layers. Click OK to close the message, and open your image in Photoshop.
- Zoom in to the area you need to work on. You can use the Zoom tool, Zoom setting on the Status Bar, or the CTRL + (+) shortcut keys.
- Press L to activate the Lasso tool, used to make selections on the page. The default Lasso tool draws a freeform shape, but since the area to select is linear, press L again to switch to the Polygonal Lasso tool.
- Click several locations around the text on the sign. Each time you click, Photoshop adds a line segment to the selection. When you return to the starting point, click to finish the selection, which you'll see around the text (Figure 15).
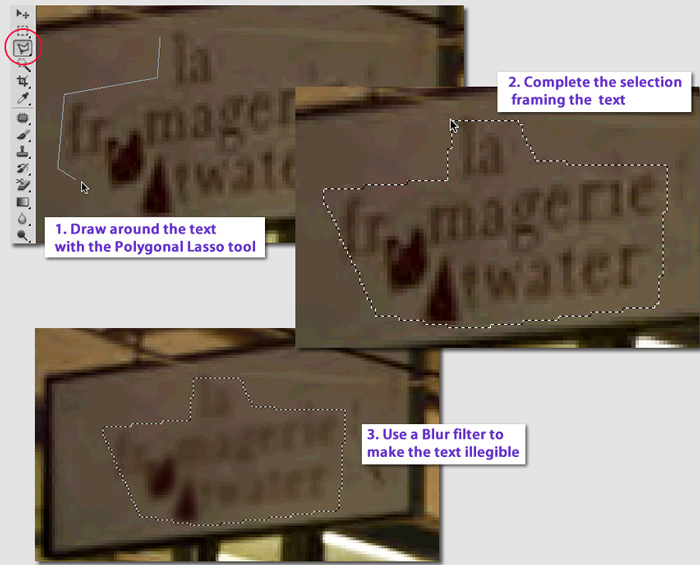
Figure 15: Select a geometric area quickly with the Polygonal Lasso and blur the text.
- To blur the text, click Filter to open the menu, then click Blur to open a submenu. There are many blur options (some with complex panels of settings), but any one will do the job. Click Blur or Blur More to apply a basic blurriness to the text.
Tip: The idea is to make the text illegible, without muddying the image. If it's not quite blurry enough, click Filter to open the menu, and you'll see the blur setting you just applied at the top of the menu. Click it again to apply more blurring.
- When the text has blurred sufficiently, click the X next to the image's name at the top of the tab. A pop-up message opens asking if you want to save the image. Click Yes to process the file, close it and make the update in your Acrobat X page (Figure 16).

Figure 16: The modified image!
The image is corrected, your files are in order and the content and appearance reflects your brand...mission accomplished.