![]()
Actions!! (Macros for Acrobat X)
By Thom Parker – March 10, 2011
If you use Acrobat for document production or workflow processing, then you probably have to spend a lot of time repetitively clicking on menu items and filling out dialogs. I have worked on processes where at least 10 different operations had to be applied to a PDF -- crop, rotate, add footers and a watermark, place specific annotations, and so on. It used to be that to get Acrobat to efficiently perform these kinds of multiple operations, you had to be a PDF Stud, or hire one. But that's no longer true. With the introduction of Acrobat X, Adobe has made Acrobat more powerful, efficient and much more accessible to ordinary users than ever before. Actions are a big part of how that has come to be.
What's an Action?
In Acrobat 5, Adobe introduced Batch Processing. A Batch Sequence was a series of standard operations that could be applied to a single PDF or to an entire folder of PDFs. When the sequence is applied to one or more PDFs, it's called a Batch Process. A great idea, but this feature involved several rather non-intuitive dialogs and has always been a bit clunky and inaccessible to most users, i.e. not for the faint-of-heart.
Acrobat X brings this same idea into the 21st Century, putting it front-and-center on the user interface and simplifying the dialogs, thus making it useful to anyone who can click a mouse.
To put it simply, an Action is a hands-free way to apply multiple operations to one or more PDFs at the same time. The operations that make up an Action are pretty much exactly the same operations available on the Acrobat Tools Palette. Actions are very similar to the concept of macros in other popular software applications.
Accessing Actions
Actions are available from two locations in Acrobat -- the File menu and the Tools Palette. Both contain an item called the Action Wizard (Figure 1), which displays a sub-menu of options for the Actions tools. Both locations display exactly the same options; they are just different locations for accessing the same thing. The first two items are for managing the Actions, "Create New Action" and "Edit Action." The following items are the names of Actions that have already been created. Acrobat comes with a number of useful Actions already built-in and new ones can be created from scratch, imported, or copied and modified from an existing Action.
Any number of Actions can be created, but only the seven most recently used actions are shown in the list. The other Actions are listed in the sub-menu under the "More Actions" option.
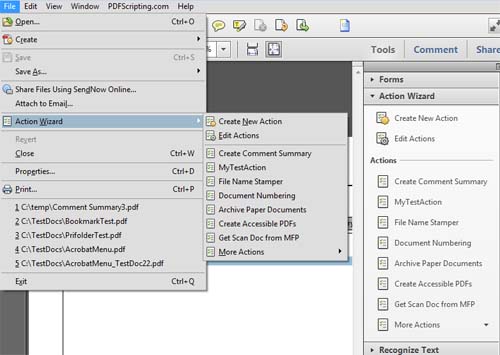
Figure 1 – Getting to the Action menus
Running an Action
To run an Action, just click on the Action's name in either the File Menu or the Tools Palette. The first thing displayed is a dialog for verifying the Action to be run (Figure 2).

Figure 2 – The first dialog displayed when an Action is run
The dialog shows everything about the Action. The best feature of this dialog is that it's optional. Use the checkbox on the bottom left to stop the dialog from popping up every time the Action is run.
Clicking on the next button starts the Action. What happens next depends entirely on how the action is set up. For example, the "Start With" entry on the dialog in Figure 2 shows that this action will operate on the PDF currently open in Acrobat. So when "Next" is pressed, each of the "Steps" listed is applied to the current PDF in the order listed. These steps can have preset values, in which case they are applied silently, or they can be marked as interactive, in which case the step would display an input dialog. As each step is processed, Acrobat displays a progress dialog at the bottom right of the page display area (Figure 3).

Figure 3 – Information on the Action's progress. Clicking on the "X" will quit the Action.
Some steps in an Action require user input to continue. For example, Step 3 for the Action shown in Figure 2 is an "Instruction Step." This step will display a small input dialog on the bottom right side of the page display (Figure 4). At this point, the Action is paused and the working PDF is displayed. The user can then work on the PDF to complete the task outlined in the step. In this case, the instruction is to add bookmarks to the PDF. However, the user can in fact perform any operation on the PDF. The instruction step is just a guide for the process.
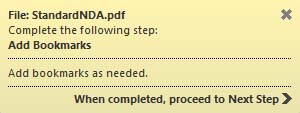
Figure 4 – Instruction step. The Action is paused until the user press "Next Step."
When the task is completed, the user clicks on "Next Step" to continue on to the next step in the Action.
Finally, when all the steps in the Action are complete, Acrobat will perform the "Save To" operation. As shown in Figure 2, the "Save To" for this action is set to "Ask When Action is Started," which displays the file "Save As" dialog. This text is a bit misleading since the user is actually asked at the end of the Action, not when it is started.
The process outlined here shows many of the possible interactions an Action can have. However, there are many more, and exactly what an Action does depends on how it was designed.
Creating and modifying Actions
Selecting the "Edit Actions" item from the "Actions Wizard" displays the dialog shown in Figure 5.
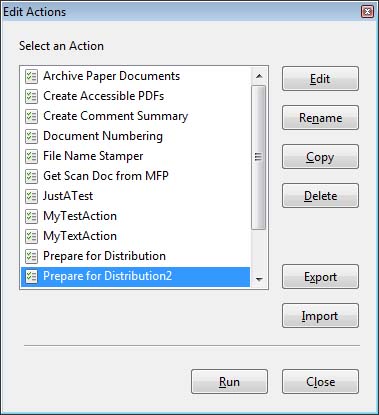
Figure 5 – The Actions list dialog. This is the control panel for manipulating the Actions.
From this dialog, any of the existing Actions can be edited, deleted, copied or exported. The copy option is very important because Acrobat's built-in Actions can't be edited directly. Instead, if a variation of a built-in Action is needed, it has to be copied first, and then the copy can be edited. An Action is edited by clicking on the "Edit" button, which displays the Action Edit dialog. This is the same dialog displayed when the "Create new Action" item is selected from the "Action Wizard" (Figure 6). Of course, when "Create new Action" is selected, the command list on the dialog is empty, as shown in Figure 6.
Figure 6 – The Action-editing dialog. This is where Actions are created and modified.
There are three parts to all Actions. They are labeled "Start with," "Steps" and "Save To." The "Start with" part determines the source of the files the Action will be applied to. This can be a single file, an entire folder of files, or it can be determined by the user when the Action is run. One of the most useful options is "Ask When Action is Started." This option displays a dialog for collecting files from the user. The big advantage to this option is that the file list is ordered, i.e., the Action is applied to each file in the order it appears in the list. Something not immediately obvious is that the input files do not have to be PDF. They can be any file format that can be converted to PDF. Acrobat will do the conversion before the Action is applied.
The last part "Save to," determines how a file is saved after the Action is applied. The options include not saving the file at all, saving back to the original file folder, saving to a target folder, and asking the user what they want to do. The "Don't save" option is used in a couple different situations. First, if the Action operates on a file already open in Acrobat, it may be desirable to allow the user to decide how and when the file will be saved. Another situation is when the Action only collects data on the files and does not make any changes.
The "Steps" are the real heart of the Action. This is an ordered list of commands that will be applied to the file, or set of files, specified in "Start with." The left side of this dialog shows a list of command categories. Notice that the category names are nearly the same as the names of the categories on the Tools Panel, and for the most part the commands that can be added to an Action are the same as the commands that can be run manually from the Tools Panel. There are, however, some differences. Not all tools in Acrobat are suitable for use in an Action, and conversely there are some commands that make sense for an Action that do not make sense as a tool.
To add a command to the "Steps," click on it (Figure 7). As many commands as necessary can be added, and the same command can be added more than once. Each command has a remove button on the far right, and the order can be changed by dragging and dropping individual commands already in the list.
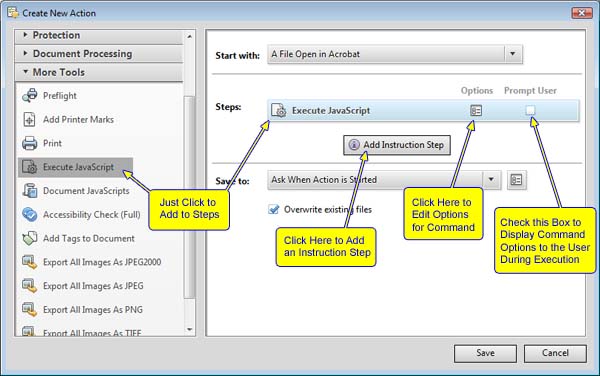
Figure 7 – Commands are added to the Action with a single click.
Many of the operations require some kind of input. For example, the rotate-pages command requires the amount of rotation and the page range where the rotation will be applied. Each command in the "Steps" includes a button for setting these options and a checkbox for prompting the user to enter this input data. If the checkbox is left blank, the command will run silently using the preset input values. But if it is checked, the input dialog will be displayed to the user at the time the Action is run.
Figure 7 shows the options under the "More Tools" category. This is where all the tools are placed that aren't available on the "Tools Panel" and don't fit neatly into the other categories. The one shown in the figure is "Execute JavaScript." This command is particularly useful for advanced Acrobat users. All the other commands are relatively static. Each command does one specific thing in a pre-programmed manner, whereas a script can be written to perform operations that are not on the list, and to apply operations in an intelligent way. For example, a script could use information stored on the document to control the operation, or to decide whether or not the operation is applied at all.
Sharing Actions
Not only are Actions a powerful productivity tool because they offer a way to group operations, they are also powerful because they can be shared easily with other users. The Actions list dialog (Figure 5) has buttons for both importing and exporting Actions. Sharing is simply a matter of exporting an Action to a ".sequ" file and then e-mailing the file to another user with Acrobat X. To import the Action, all the user has to do is double click on the file icon (Figure 8).

Figure 8
The ".sequ" file extension is exactly the same file extension used for Batch Sequence files in the previous versions of Acrobat. In fact, the file format is also exactly the same. If Acrobat X was installed over a previous version of Acrobat, then the old Batch Sequences will automatically appear in the Actions list. But, if Acrobat X is installed on a new system, then the old Batch Sequences can be imported into Acrobat X as Actions by copying them to the new machine and double clicking on them.
Give Actions a try and see how simple they are to use and how much time they can save you.