![]()
All together now — Making a cohesive PDF document
By Donna Baker – October 1, 2007 Donna Baker
by Donna L. Baker, ACE, Baker Communications
All together now—Making a cohesive PDF document
There is no reason to recreate content in source programs simply to combine it into a uniform PDF document. Here are some ways to save you time.
How often have you had to combine documents from multiple sources into a single PDF file? You might want to pull together information for a client from multiple sources, such as a Web page, a chart from an Excel spreadsheet, a product description in a Word document and so on.
You can copy and paste content from program to program, but why bother? Acrobat is designed to meet the need to combine material into a unified document, saving you from repurposing the material manually.
Not only can you pull together material from various sources, but you can then apply some features that make the document appear truly cohesive, including a consistent page size, headers and footers, and a background logo or image.
This article tracks a typical workflow for building a cohesive document that includes:
- Combining content into a single PDF file
- Adjusting page sizes using the Crop tool
- Applying a consistent footer
- Adjusting content on the page
Combining documents in Acrobat
You can easily convert many types of source documents, such as Word documents or Excel spreadsheets, from within Acrobat. In addition, Acrobat 8 lets you choose pages from a component file to include in your document.
Selecting and ordering files
You can add any number of files to a combination file, including those open in Acrobat. To assemble files for a combination document, follow these steps in Acrobat:
1. Click the Combine Files task button to open the Combine Files dialog box.
2. Click the Add Files button on the toolbar to display the Add Files dialog box. Locate and select the files you want to include.
3. Click Add Files to close the Add Files dialog box and add the selected files to the Combine Files dialog box. In the example shown in Figure 1, the files to be combined include PDF, Excel, Visio and JPEG formats.
4. If you have source material in multiple locations, repeat the process to assemble the component files.
5. To modify the order of the content, click the Move Up or Move Down button or click Remove to delete the file from the list.
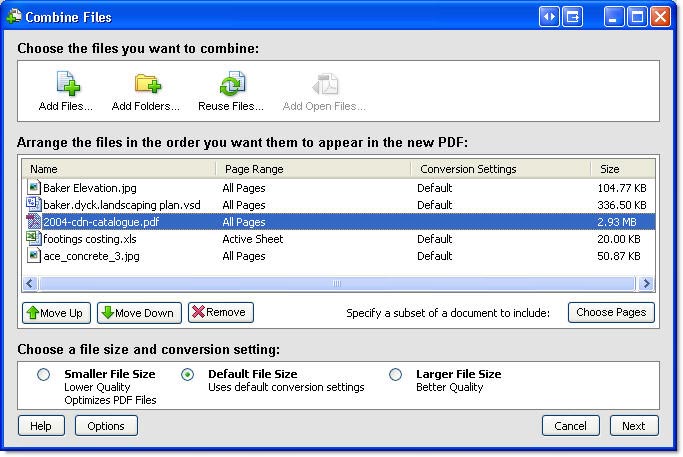
Figure 1: Select and order files to be combined into a unified document.
6. Rather than combining all the contents of a file and then deleting pages you don’t want to keep in your combination document, select the file’s name in the list and click Choose Pages to open the Preview and Select Page Range dialog box. Use the arrows below the preview image to scan the file and locate the pages you want to include (Figure 2).
Note: The resulting dialog box varies according to the type of file selected. For example, choose an individual sheet or sheets from a spreadsheet, a page from a Word document, and so on.
7. Type the numbers for pages and page ranges in the Pages field; click OK to close the dialog box and return to the Combine Files dialog box when you have made your selection.

Figure 2: Specify a selection of pages from an individual file.
8. Once the files and pages are in order, click Next. Choose to either merge the files into a single PDF file, or to combine the files into a PDF Package. My sample workflow merges the files into a single PDF file.
9. Check the order of the files one more time. By default, Acrobat assigns the files’ names as bookmarks. Select a file from the list, click Edit Bookmark for File, and type a new bookmark name, as you see in Figure 3.
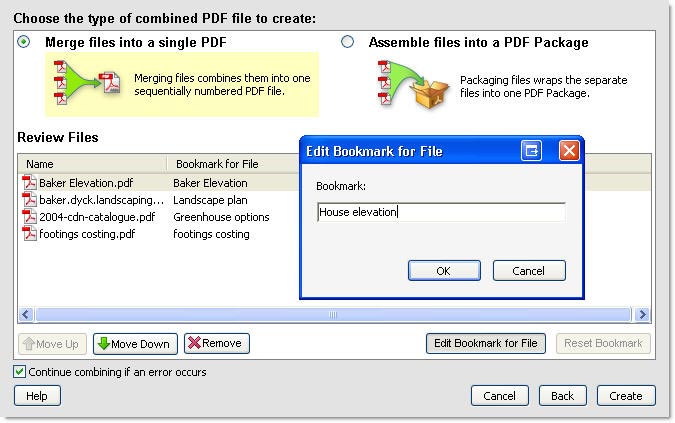
Figure 3: Modify bookmark names before producing the final PDF file
10. Click Create. The final pane of the dialog box shows the progress as the file is converted and assembled. Click Save to save the final product.
The new document opens in Acrobat. The first task is to unify the page sizes.
Resizing document pages
Sometimes files from different sources are of different sizes. If you are viewing an entire page on the Document pane, and aren’t sure about the page’s size, move your mouse to the bottom left of the Document pane to show the page dimensions in a tooltip (Figure 4).

Figure 4: View the page’s dimensions in a tooltip.
Adjust individual pages or the entire group of pages in the Crop Pages dialog box by following these steps:
1. Double-click a page with the Crop tool to open the Crop Pages dialog box, or choose Document > Crop Pages to open the dialog box.
2. To use a standard size, select the Fixed Sizes option in the Change Page Size section of the dialog box and choose a page size from the Page Sizes dropdown list (Figure 5). Use the Custom option and type page dimensions in the Width and Height fields. The contents are centered automatically, as shown in the Preview area, or you can specify the offset by typing values in the XOffset and YOffset fields.
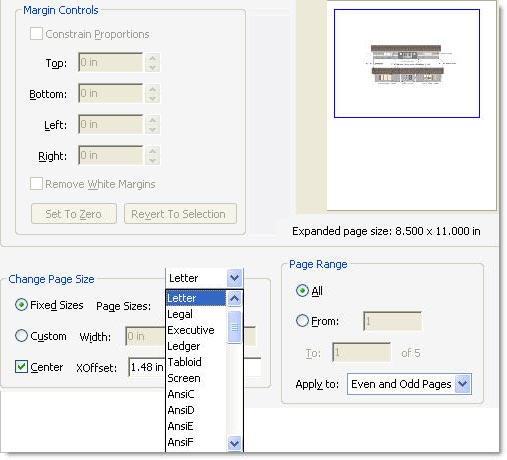
Figure 5: Modify the dimensions of one or more pages.
3. Specify a page or page range by choosing an option in the Page Range settings. By default, the page viewed in the preview is selected.
4. Click OK to close the dialog box and resize the pages.
Adding a common footer
Integrate the appearance of your document using a common element, such as a header, footer, watermark or background. Unifying elements can be applied either to an entire document or to selected pages and can include automatic content, such as the date, or custom content that you add manually.
Tip: If your component documents included footers, use the TouchUp Object tool to select the content on the page and delete it before adding the common element in Acrobat.
Choose options for the footers’ contents and placement following these steps:
1. Choose Document > Header & Footer > Add to open the Add Header and Footer dialog box (Figure 6).
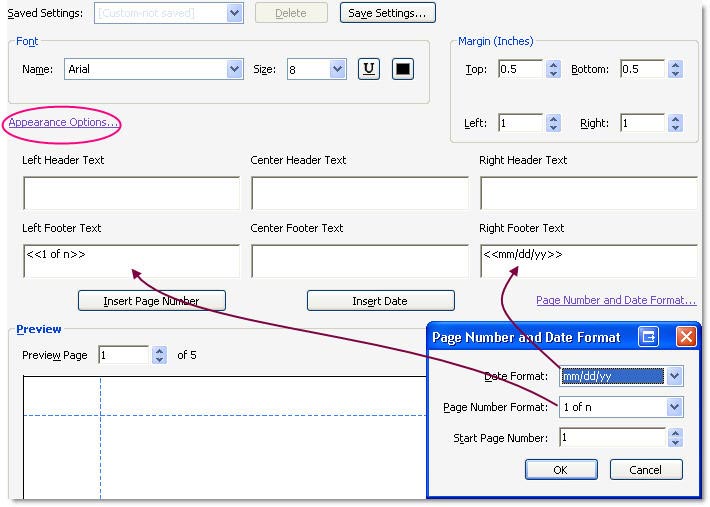
Figure 6: Specify content for custom footers.
2. Specify the font and size using the Font selections.
3. Make page-margin adjustments if you wish, or use the default 0.5 inch top and bottom, and 1 inch left and right margins.
4. Click one of the header or footer text fields to activate it and then insert the automatic text using one of these options:
- Click Insert Date to add an automatic date field; the default is <
>, which displays the month and day numerically - Click Insert Page Number to add the default number field shown as <<1>>
- Type text into a field; press Enter/Return to break the line.
Customizing the automatic fields
Rather than using the default options, specify custom appearances for the date and page number. As shown in Figure 6, click the Page Number and Date Format link to open a dialog box and choose an alternate format from the dropdown lists.
Tip: If you look through the document and find a typo or want to change the font size, choose Document > Header & Footer > Update to reopen the dialog box. Adjust the header or footer as necessary and click OK to close the dialog box to apply the update.
Previewing and adjusting the footer content
Click the arrows to scroll through the page previews, which display at the bottom of the dialog box (Figure 7). If you are pleased with the appearance of the footer, click OK to close the Add Header and Footer dialog box and apply the footer.

Figure 7: Review the header or footer content in the preview.
On the other hand…if you have ever had to tweak the position of content on pages manually to allow for proper display of a header or footer, you’ll appreciate the Acrobat 8 tool that automatically shrinks the page content to fit within your defined margins. As indicated in Figure 7, the left and right footers are overpowered by the page content.
To repair the page layout, click Appearance Options (circled in Figure 6) to open a dialog box. Select Shrink document to avoid overwriting the document’s text and graphics and click OK to close the dialog box. In the preview area, the image content that was shown beneath the footer is now gone (Figure 8). Click OK to close the Add Header and Footer dialog box and return to the document.
Figure 8: The page content is adjusted for proper display of the footer content.
Reusing header and footer content
If you find you are re-creating the same headers and footers repeatedly, save their definitions and apply them with a single command. Follow these steps:
1. Choose Document > Header & Footer > Add to open the dialog box.
2. Configure the content for the header or footer.
3. Click Save Settings to open a text field and type the name for the settings.
4. Click OK to close the dialog box and save the settings; click OK again to close the Add Headings & Footers dialog box and apply the header and footer to the PDF.
5. When it’s time to reuse the settings, open the dialog box, click Apply Settings and choose the custom settings from the dropdown list. Click OK to close the Headers & Footers dialog box, and your content is added automatically.
I’d like your feedback:
Do you regularly combine files? Did you know you can select components of different files? Or use different types of files? I’d like to hear your experiences.
E-mail me!