![]()
Handling batch sequences in Acrobat 8
By Donna Baker – October 19, 2007 Donna Baker
It’s interesting how often we perform the same tasks over and over, without realizing there’s a better way to do it. Sure, it takes time to find a solution and then unlearn your previous work habits, but it is well worth the effort.
Customize how Acrobat works for you by building and using batch sequences.
Acrobat includes eight default batch processes, including some for common tasks such as removing attachments, opening a number of files, or printing chosen files. You can start from one of the default processes, or from scratch. The default sequence names are self-explanatory (Figure 1).
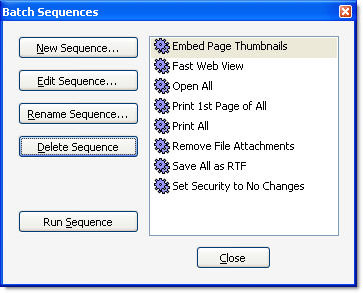
Figure 1: Acrobat offers several preconfigured batch sequences.
Designing the batch process
Before embarking on your advanced Acrobat adventure, plan what you need to do, what needs customizing and the best way to approach the problem. I said it would take some time!
The factors you need to consider include
- Evaluating your workflow
- Planning the batch sequence
- Choosing, ordering and configuring the sequence commands
- Defining the outcomes, including where to store files and how and when to run the sequence
The introduction to this article described a common scenario where an Acrobat user opens a sequence of files, performs the same functions and then saves the modified files. There are no hard and fast rules for evaluating a workflow. You could make a conscious effort to sit in front of the program, think of the types of work you have done recently and assemble some processes that way. It’s simpler to keep the concept of looking for efficiencies in your work as you are working.
Suppose your business has had a change of name. You don’t have to open all the marketing material you have prepared and make changes to the header in each file. Instead, apply the method described in the example, using this sequence:
Open file > Change header > Save to new location > Close file
Selecting batch commands
It may seem intimidating to program a sequence of commands, but the reality is that it only takes a few minutes, and the process is handled by a series of dialog box boxes. When you create a batch sequence, many of the commands you choose require configuration, which allows for an enormous amount of customization.
Follow these steps to configure a batch sequence:
1. Choose Advanced > Document Processing > Batch Processing to open the Batch Sequences dialog box, shown in Figure 1.
2. Click New Sequence to open a dialog box containing a text field. Type a name, such as “change_header” and click OK. The Edit Batch Sequence-change_header dialog box opens.
Tip: Using a meaningful name, such as the actions included or the client involved, helps to keep you organized. It’s not difficult to tell one sequence from another when you have two or three, but it’s much more difficult when you have dozens of stored sequences.
3. Click the Select Commands button to open the Edit Sequence dialog box.
4. Select a command, and then click Add to move the command to the list on the right. In the example, the Add Header and Footer command is selected in the left column and added to the list at the right (Figure 2). The categories of commands available and some example actions are listed in Table 1.
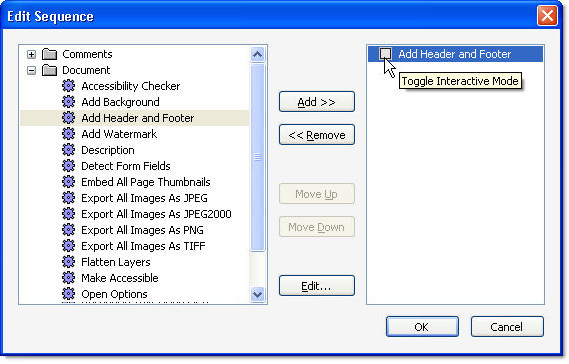
Figure 2: Choose the commands to include in the batch sequence.
See larger image
Note: You can use multiple commands from various categories. Once the list is assembled, reorder them by clicking the Move Up and Move Down buttons, or delete an action by clicking Remove.
Using the interactive mode
Sequence commands can be configured as a one-time customization, or allow for direct input each time the sequence is run. Figure 2 shows a tooltip related to the checkbox to the left of the command name. Click the checkbox to toggle the interactive mode for the command.
If you want to make a constant change to the documents when the sequence is run, there’s no need to make the command interactive. On the other hand, if I wanted to write new descriptions for some documents’ properties, I could add the Description command, make any constant changes and then toggle the Interactive Mode by clicking the box to the left of the command name (Figure 4).
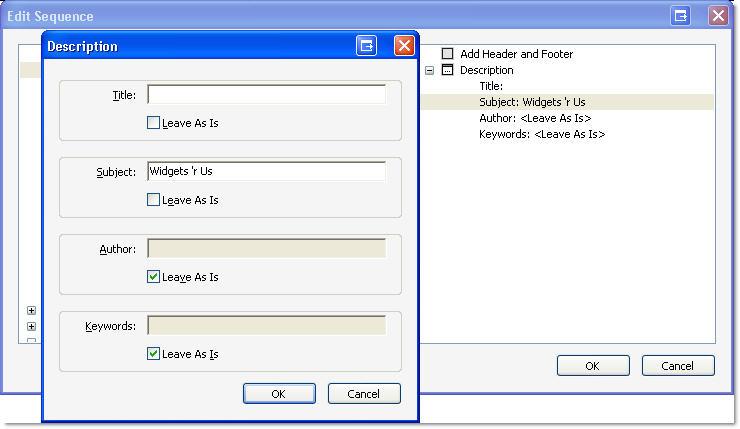
Figure 4: Configure the interactive components of the commands.
See larger image
When the configured sequence is run, the process includes:
- Opening the Description tab of the Properties dialog box
- Changing the Subject to Widgets ‘r Us automatically, and leaving the Author and Keywords fields as is
- Deleting content from the Title field, allowing me to make the change manually for each file.
Table 1. Batch sequence command categories
| Category | Types of commands |
| Comments | delete or summarize comments |
| Document | Many commands, ranging from running an accessibility check, to exporting images, to defining the open options, to using security |
| JavaScript | run a JavaScript |
| Page | basic page manipulations such as adding printer marks, cropping or rotating, and setting transitions |
| Preflight | run a Preflight sequence |
Configuring commands
Most commands that you add to a batch sequence are customizable, indicated by a checkbox to the left of the command name. Some commands, such as Delete All Comments, are an all-or-nothing option. If there are no configuration options, the command is listed in the Edit Sequence dialog box sans checkbox (Figure 3).
![]()
Figure 3: Some commands can’t be configured.
A command such as Add Header and Footer is configurable, following these steps:
- Double-click the Add Header and Footer command in the right column of the dialog box, or click the Add Header and Footer command and then click Edit to open the Add Header and Footer dialog box.
- Make the changes as desired, such as changing the business name.
- Click OK to close the dialog box and return to the Edit Sequence dialog box.
- Click OK again to close the Edit Sequence dialog box, returning to the Edit Batch Sequence - [name] dialog box.
When the batch sequence runs, the header is automatically adjusted in each document. The example also specified that the files are stored in another location, which isn’t part of the Edit Sequence process. Rather, the storage portion of the sequence is managed separately, as you see next.
Specifying how the sequence runs
The example’s configured command is listed in the Edit Batch Sequence - change_header dialog box (Figure 5).
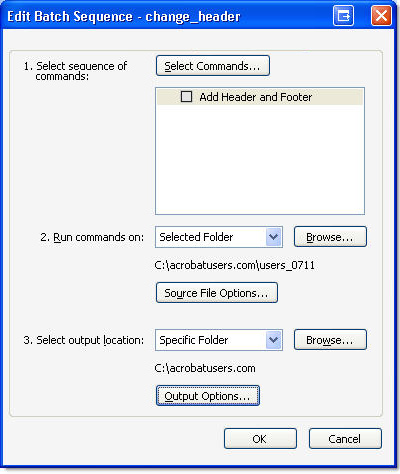
Figure 5: Specify how the commands are run and where the output is stored.
To specify features for running the batch sequence, follow these steps:
1. Click the Run commands on drop-down arrow and choose an option from the list for running the command based on your requirements. The options and examples of their use are listed in Table 2.
2. Click the Select output location dropdown arrow and choose an option for storing the processed files. The default is to store the processed output in the same folder as the original. You can also choose to save the modified files in a specified folder location, great when you are processing large numbers of files and want to keep track of what has or hasn’t been modified. Alternatively, if you may use the batch sequence for different projects, choose Ask When Sequence is Run to specify a location on the fly.
Note: There is one additional choice, Don’t Save Changes. I’m not sure why or when you would use this option, aside from testing a batch process.
3. Click Output Options to open a secondary dialog box containing choices to add prefixes and suffixes, and save files in a range of output formats (Figure 6). Click OK to close the Output Options dialog box.
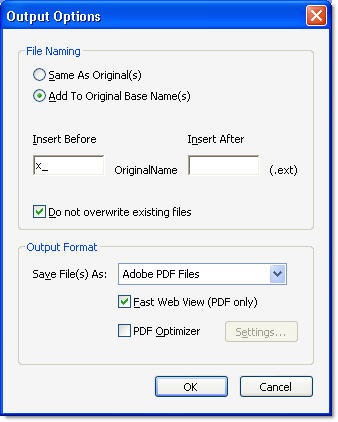
Figure 6: Configure the output options further as necessary.
4. Click OK to close the Edit Batch Sequence – change_header dialog box and return to the original Batch Sequences dialog box. The new sequence is added to the list (Figure 7).

Figure 7: The new sequence is ready for use.
Table 2. Options for running batch sequences
| Options | Action | Suggested Use |
| Ask When Sequence is Run | Prompts you for file selections each time you apply the sequence | Modifying files when you don’t have the source files in a constant location |
| Selected Files | Activates the Browse button; click to locate and select files | Modifying files that are in different locations |
| Selected Folder | Activates the Browse button; click to locate and select files. | Best for modifying files where you have placed the files in specific folder locations. Click Source File Options to view a list of file formats that can be converted to PDF and have the batch commands applied automatically |
| Files Open in Acrobat | Runs against open files | Use this option when you use files from various sources that require other changes in Acrobat as well as running a batch sequence, or those where you want to run multiple sequences |
Processing the files
The batch sequence is ready for use. To apply it, select the sequence and click Run Sequence. A confirmation dialog box opens listing information to confirm the sequence’s particulars, including the folder of files and location, the chosen and configured command, and the output location (Figure 8). Click OK to close the dialog box and run the batch.

Figure 8: The details of the sequence are shown in a confirmation dialog box.
The documents in the specified folder are processed and tested. The output options included storing the files in another location, and using a prefix as shown in Figure 9.
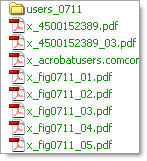
Figure 9: The output is stored in the chosen location using the specified prefix.
The new header content is displayed in the processed file (Figure 10).

Figure 10: The processed files include the new header.
The beauty of a batch sequence is that you can modify or run it as you like. At any time, if your circumstances or work habits change, open the Batch Sequences dialog box, select a command and click Edit to revisit the original settings and make updates.
I’d like your feedback:
Have you thought of your own workflow and processes that could be automated as you read this article? Have you used batch sequences in the past? Do you plan to give the process a try? I’d like to hear your experiences.
E-mail me!