![]()
Working with date and time in Acrobat JavaScript (part 2 of 3)
By Thom Parker – May 7, 2006
Part 2 of 3
Placing Dates in a Form Field
Dates and Times are used for a multitude of purposes in PDF documents. The simplest use is displaying a Date or Time in a Form Field. One issue that always comes up is deciding how the date should be formatted. The code below writes the current date into a form field using a simple date format.
var fld = this.getField("DateField");
fld.value = util.printd("yyyy/mm/dd",new Date());There’s a lot to these two lines of code so let’s look at it piece by piece. The first part, var fld = this.getField("DateField"),acquires the field object into which the date will be written. It is assumed there is a text field on the document with the name “DateField”. If this field does not exist the code will fail. The next line assigns a date string to the field’s value. Don’t forget the “.value” part. This field property represents the value displayed on the page. Forgetting it is a common mistake.
The other half of the line (the part on the right side of the equals symbol), is more interesting. This is where the actual text format of the date string is decided with the util.printd() function. This function is much better than the date string functions built into the Date Object because it allows us to create almost any custom date format we want.
The first argument to the util.printd() function is a string describing the format of the date and/or time. It’s composed of a series of symbols that represent the different parts of a date and time, like the year, month, day, hour, etc. In the example above, “yyyy/mm/dd”, has three parts separated by the “/” character. The “/” is a literal, it will be printed out verbatim to the string. Each of the three parts has a special meaning; “yyyy” means print the year out as 4 digits, “mm” means print the month as 2 digits, and “dd” means print the day of the month out as 2 digits. This format prints dates that look like “2005/10/15” for October 15th, 2005. Other symbols are available for printing out the month names, day of week names, and more. A complete listing is provided in the Acrobat JavaScript Reference. Look up the Util Object and then find the entry for the printd() method.
A date can be added to the form when it is opened, printed, saved, or at the user’s request. It’s all a matter of where the code is placed. These code locations and the Acrobat menu items for accessing them are listed below.
- When Opened – Place the code in a Document Script. These scripts are executed when the document is first opened in Acrobat.
- Menu : “”
Selecting this menu item will display the Document Scripts Dialog. Use this dialog to create and edit Document Scripts.
- Menu : “”
- When Printed – Place the code in the Document “WillPrint” Action. This action is executed just before a PDF is printed, so the date stamped on the PDF will reflect the time of printing.
- Menu: “” – Select “Document Will Print.”
- When Saved – Place the code into the Document “WillSave” Document Action. This action is executed just before the document is saved.
- Menu: “” – Select “Document Will Save.”
- At the User’s Request – Add a button field, a link annotation, or bookmark onto the form. For all of these items the code is place into a “Run a JavaScript” Action, accessed from the Actions Tab in the appropriate Properties dialog. For a button field, a trigger must also be selected, “MouseUp” is the best one to use.
The accompanying example PDF, “DatesExample1.pdf” contains sample code for all these situations. It also shows different date/time formatting strings.
Dates Built into a PDF
There are two Dates that come for free with every PDF, the creation date and the last modified date. These dates are provided by two properties of the document object, modDate and creationDate. Both of these properties are Date Objects. The following code formats and places these dates into form fields. This code is included in DatesExample1.pdf <?php makeFileTypeLabel("PDF","309 KB"); ?>in a Document Script named “Init”.
// Set the PDF creation date display
var strMsg = util.printd("ddd, mmmm dd, yyyy",this.creationDate);
strMsg += " at " + util.printd("h:MM:ss tt", this.creationDate);
this.getField("DateCreation").value = strMsg;

// Set the PDF modification date display
strMsg = util.printd("mmm dd, yy" h:M",this.modDate);
this.getField("DateModify").value = strMsg;
Using dates in a Form Calculation
In this section we’ll actually build a simple form that does some calculations using dates and times. The form is for calculating rental cost from a start date to an end date. The blank form is provided in DatesExample2_blank.pdf <?php makeFileTypeLabel("PDF","15 KB"); ?>. This file is just the background for the form and doesn’t contain any interactive form fields. An image of this file is show in Figure 2 below. Data has been entered into the form to help show the locations of the field positions.
Figure 2: Layout for the example Rental Form, note the locations of the date fields
Besides the start and end dates it contains an Order Date, a Due Date, and a time field that holds the number of days an item was rented. The Order Date, Start Date, and End Date are all entered by the user. The Due Date and the number of days rented are calculated from the Start and End Dates the user entered. The file DatesExample2_start.pdf <?php makeFileTypeLabel("PDF","234 KB"); ?>is the Rental Form with form fields added. This is really the starting point for the example. Since this article is about Dates we’ll only discuss the date related fields and scripts. The form is fully functional though, so feel free to examine or copy anything that catches your interest.
The first date field of concern is the Order Date. On this form the field is set to “read only” so that the user cannot enter it manually. In the example a button is used to set it to the current date. Using the button not only makes entering the date easy for the user, it also guarantees the date string format is known. We might need to use it later in a database, or in some other location where we need a known format. An alternative to this technique is to use a Document Script instead of a button. The Document Script is executed when the PDF is opened in Acrobat, so in this case, the date is set every time the document is opened, rather than at the user’s request.
The next two date fields are the Start and End Dates. These dates will be used in calculations so we’ll be converting them to Date Objects. The function that does this conversion requires the fields to be in a known format. We can’t let the user enter anything they want. For the calculation to work we’ll need to enforce a specific format. The easiest way to do this is by setting the field’s “Format” in the Properties Dialog.
First select the “Select Object Tool” from the Advanced Editing toolbar as shown in Figure 2 below.
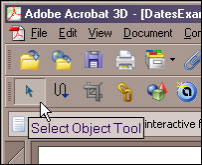
Figure 3: Activating the “Select Object Tool”
from the Acrobat “Advanced Editing” Toolbar
Double click on the Start Date field to Display the Field’s Properties Dialog, Figure 4 below. Then select the Format tab on the Properties Dialog.

Figure 4: Selecting a date format from the Field Properties Dialog
Select one of the "Date" format options. This formatting will force the user to enter the date in a specific way. To help the user along the field’s tooltip displays an example date like the one at the bottom of the Properties Dialog. As an extra measure it is also a good idea to add text somewhere on the form displaying this format as an example for the user.
The “Days” field is calculated from the time difference between the Start and End dates. The script for this is placed in the field’s Calculation Event (also on the field’s Properties Dialog, but select the “Calculate” tab, the code is in the window labeled “Custom Calculation Script”). The first part of the script is shown below.
var strStart = this.getField("DateStart").value;
var strEnd = this.getField("DateEnd").value;
if(strStart.length || strEnd.length) {
This part of the code grabs the start and end date strings from the fields and tests to see if either is empty. We don’t want to do the calculation unless both the Start and End have been filled out. The formatting guarantees that if anything is there, it will be a date in the correct format. The next two lines convert the date strings into Date Objects.
var dateStart = util.scand("mmm d, yyyy",strStart);
var dateEnd = util.scand("mmm d, yyyy",strEnd); The util.scand() function can convert any date string by using the date symbols discussed in the previous section, but it has to know the exact format of the date for this to work. That’s why we need to force the user to enter it in a certain way. The next line of the script calculates the difference between the start and end dates in milliseconds.
var diff = dateEnd.getTime() - dateStart.getTime();
Internally, the Date Object actually stores the date in the number of milliseconds from some arbitrary spot on the calendar, so all of the real date calculations will be done in milliseconds. For example, if we want to find the number of rental days we first need to find the number of milliseconds in a day, which is what the next line of code does.
    // One Day = (24 hours) x (60 minutes/hour) x
    // (60 seconds/minute) x (1000 milliseconds/second)
    var oneDay = 24 * 60 * 60 * 1000;
Now we are ready to do the real calculation. In the next line we divide the number of milliseconds between the rental dates by the number of milliseconds in a day.
var days = Math.floor(diff/oneDay);
“Math” is a core JavaScript object. It provides several useful math operators. In this calculation the floor function is used to round the calculation result down to the lowest integer (this is a very generous rental agency, i.e., they don’t charge for partial days). Finally, we finish off by assigning the number of days to the field.
    // event.value represents the data value that will be applied to
    // the field when the calculation is finished, never explicitly
    // set a field value from within a calculation event.
    // i.e., Never do this - this.getField("fldName").value = ... event.value = days;
The Due Date calculation starts in the exact same way as the number of days calculation: acquire the date string, test its length, and convert it to a date object. Except of course, we only use the Start Date.
    var strStart = this.getField("DateStart").value;
    if(strStart.length) {
         var dateStart = util.scand("mmm d, yyyy",strStart);
The next few lines do the date calculation.
             var oneDay = 24 * 60 * 60 * 1000;
             var dueMillis = dateStart.getTime() + 5 * oneDay;
             var dueDate = new Date(dueMillis);
The Due Date is 5 days from the Start date. We find this value by calculating the number of milliseconds in 5 days and adding it to the number of milliseconds in the Start Date. The last step is converting the result in milliseconds into a Date Object. We need the Date Object so we can print it in a nice format, which is what the last line does.
            event.value = util.printd("mmm d, yyyy",dueDate);
        }
In this example we’ve seen that we can display dates on a document in any desired format, control how the user enters dates, and convert the string representation of a date into a Date Object which can then be used in time calculations.
One thing that would really be nice on this form is a calendar popup so the user doesn’t have to manually enter any dates. Several developers have in fact created form field Calendars. A search on the web will turn up a pile of information on the topic. The problem all these implementations have is that they are slow. A calendar requires quite a few fields and a lot of script. The final example file, DatesExample2_extra.pdf <?php makeFileTypeLabel("PDF","302 KB"); ?>, adds one of these calendars to the Rental Form. Figuring it out is left as an exercise for the reader.
>> Go to Part 3