![]()
Finding page boundaries
By Thom Parker – September 9, 2006
by Thom Parker, Software Developer/Adventurer, WindJack Solutions, Inc.
Scope: All Acrobat versions
Skill Level: Beginner
Prerequisites: Familiarity with Acrobat Professional
To script activities such as creating form fields and resizing pages it is necessary to know the dimensions of a document page. In PDF this can be a bit confusing because pages are bounded by several different Page Boxes (Figure 1). Each Page Box has a special purpose, so which one is used depends on the purpose of the script.
Page Size Example
Download [PDF: 69 KB]
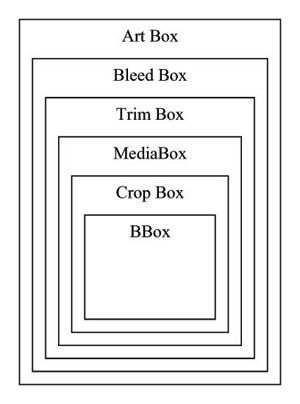
Figure 1: Rectangles bounding
each page in a PDF document
- Art, Bleed, Trim Boxes – Used only for printing
- Media Box – Target paper size, i.e., finished size of printed document
- Crop Box – Page visible in the viewer, i.e., what the user sees on the screen
- BBox – The bounds of the actual content on the page
All these rectangles can be acquired from JavaScript and all except for the BBox can be set from JavaScript. The BBox is automatically calculated from the actual content on the page, so it is a read only property.
Getting the Size of a Page
The Crop Box is the most useful for scripting purposes. It is the bounding box the user sees on the screen so it is also the bounding box used to position visible elements like form fields, annotations, and watermarks. To get the Crop Box for the current document page use the following code (see PageSizeExample.pdf):
var rCrop = this.getPageBox("Crop",this.pageNum);
The return value is an array of four numbers representing the edges of a rectangle in the order Left, Top, Right, Bottom. The values are in points and there are 72 points/inch. The rCrop for an 8.5 x 11 inch page would be:
[0,792,612,0]
The Crop Box has the special property of being the reference for a page’s coordinate system so it’s bottom left corner is always at the coordinates (0, 0). To acquire any of the other bounding boxes just substitute the word “Crop” in the code above with Art, Bleed, Trim, Media, or BBox.
Resizing a Page
There is also a function for setting the page box, Doc.setPageBoxes(). This function is useful for automating placement of the Art, Trim, Bleed, and Media boxes for printing and resizing the page on the screen, with the Crop Box. For example, the following code decreases the size of the current page by .5 inches on all sides. Try it out in the JavaScript Console.
var rCrop = this.getPageBox("Crop",this.pageNum);
rCrop[0] += 36; // Adjust Left Side
rCrop[1] -= 36; // Adjust Top Side
rCrop[2] -= 36; // Adjust Right Side
rCrop[3] += 36; // Adjust Bottom Side

this.setPageBoxes("Crop",this.pageNum,this.pageNum,rCrop);
There are a couple things to notice here. First, it was stated previously the Crop Box is always at (0, 0), but in this code we are changing the value of the bottom left corner. Not to worry, Acrobat readjusts all coordinate values based on the Crop Box so if you re-acquire the Crop Box its value will be:
[0, 720,540,0]
The second thing to note is the Doc.setPageBoxes() function uses two page number parameters. It has both start and stop page number arguments for setting a range of pages at the same time.
Placing a Field
Acrobat JavaScript can be used to automatically add a set of fields to a PDF, but to place the fields correctly it is important to know the locations of the page edges. The following code uses the Doc.getPageBox() function to place a custom print button in the upper right corner of a page. Run it from the JavaScript Console.
var rFld = this.getPageBox("Crop",this.pageNum);
// Button is 1/2 x 2 inches
// Button is anchored on the top right corner
rFld[1] -= 36; // 1/2 inch from top
rFld[2] -= 36; // 1/2 from right Side
rFld[3] = rFld[1] - 36; // Adjust Bottom Side
rFld[0] = rFld[1] - 144; // Adjust Left Side

this.addField("MyPrint", "button", this.pageNum, rFld);