![]()
Meeting online using Acrobat Connect
By Donna Baker – April 13, 2007 Donna Baker
Add Acrobat Connect to your arsenal of commenting and reviewing tools for easy, real-time Web conferencing. Meet online with coworkers to solve a problem, show clients products, discuss design details with your engineer; the applications are endless.
![]() Take a minute and create a trial account to try out the program before committing to it long term. Click Start Meeting (shown right) on the PDFMaker toolbars—in Acrobat 8 Professional or Reader as a task button and a menu item—to open the Welcome to Start Meeting dialog. Follow through the wizard to set up an account using your Adobe ID.
Take a minute and create a trial account to try out the program before committing to it long term. Click Start Meeting (shown right) on the PDFMaker toolbars—in Acrobat 8 Professional or Reader as a task button and a menu item—to open the Welcome to Start Meeting dialog. Follow through the wizard to set up an account using your Adobe ID.
Tip: Click “Remember me in Acrobat 8” at the end of the account signup to have the login details transferred to the program for quicker meeting startups
You can set up a meeting following these steps:
1. Click Start Meeting. Log into the meeting space as the host using your account and the URL of your personal meeting space.
The connection and your Acrobat Connect plug-in are checked before you can log in. If there are updates required, install them and proceed automatically.
2. Send the e-mail requests to your colleagues, including the meeting space’s URL.
3. Users type the URL into their browser and you are notified as host.
4. Grant the users permission to enter the space and the meeting begins!
The Acrobat Connect interface is composed of a number of segments called pods shown in Figure 108a:
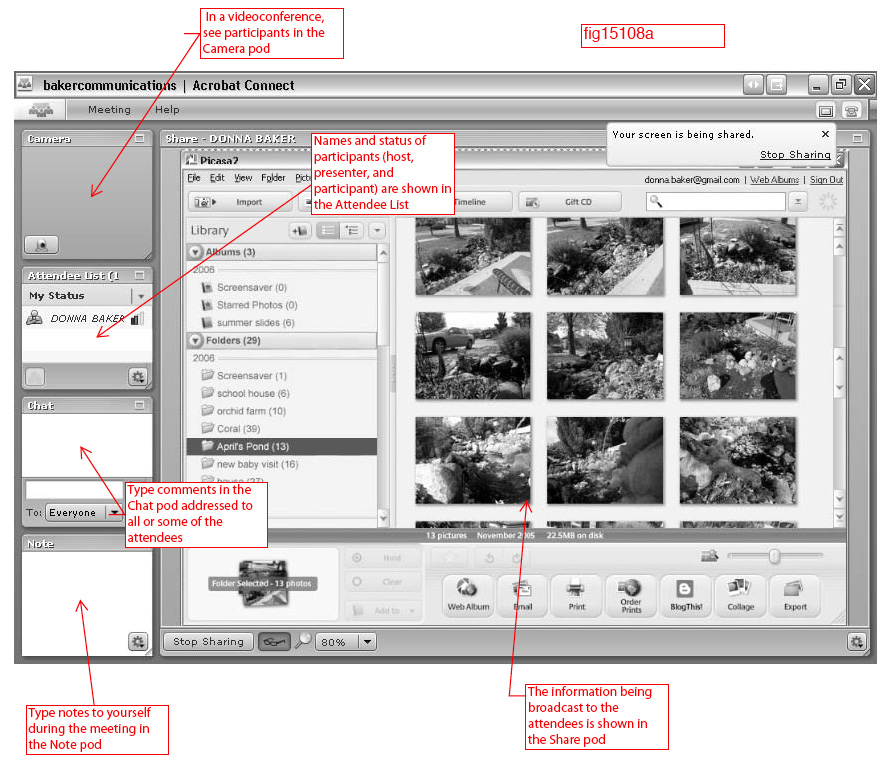
Figure 108a The Adobe Connect interface is made up of several pod segments.
Click the Participant view ![]() to see what the attendees are viewing on their screens. When the screen is being shared, you can pause the view to make annotations, following these steps:
to see what the attendees are viewing on their screens. When the screen is being shared, you can pause the view to make annotations, following these steps:
1. Click the Adobe Connect icon ![]() on the task bar or icon bar and choose Pause and Annotate. The shared screen content is shown on the Share pod along with a toolbar (Figure 108b).
on the task bar or icon bar and choose Pause and Annotate. The shared screen content is shown on the Share pod along with a toolbar (Figure 108b).
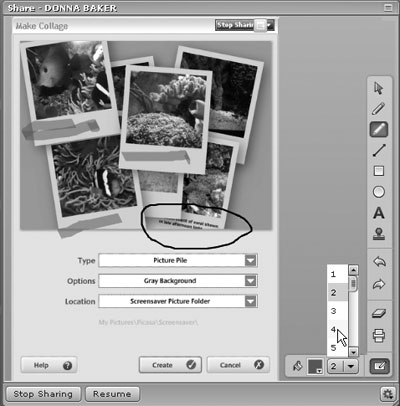
Figure 108b Pause your presentation to use a still screen for annotation and discussion—you can configure the tools, and even print the screen for reference.
2. Select a tool and apply it to the screen. Depending on the tool, configure the stroke, fill or other settings. The content can be printed along with its annotations for future reference.
3. Click Resume to remove the toolbar and return to the regular shared screen.
From the book “Adobe Acrobat 8 How-Tos: 125 Essential Techniques,” by Donna L. Baker. ©2007. All Rights Reserved. For more information, visit Peachpit at www.peachpit.com.