![]()
The skinny on scanning and touchups
By Donna Baker – March 5, 2007 Donna Baker
by Donna L. Baker, ACE, Baker Communications
You preserve written documents and images by scanning them into your computer and saving them as images. See how Acrobat 8 takes scans to the next level.
One of several methods for producing an Adobe PDF file is by scanning documents into Acrobat. Over the last few versions of Acrobat, we’ve seen a gradual improvement in the integration of scanner software with Acrobat and improvements in the accuracy of the text capture. Acrobat 8 Professional continues that trend, offering an improved OCR engine, easier file optimization and the ability to create a PDF/A standards-compliant document.
Note: I’m looking at scanning with a simple home or office scanner. For a large archival project, consider using high-speed scanners or dedicated scanning software for efficiency.
Scanning for capture
Acrobat works with your scanner software directly. Any scanner configured for use with your computer or network can be used with Acrobat.
Follow these steps to scan a document into Acrobat:
1. Choose Document > Scan to PDF or click the Create PDF button and choose From Scanner to open the Acrobat Scan dialog box (Figure 1).
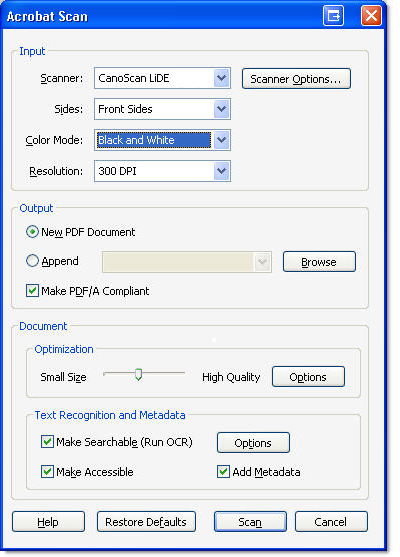
Figure 1 Specify scanner and capture settings in the dialog box.
2. Choose from the list of scanners configured for your system from the Scanner drop-down menu.
Note: Click Scanner Options to open a dialog box in which you can select a paper size, and whether to use the scanner’s interface or hide it and use Acrobat only. The defaults are to hide the scanner’s interface and use a USLetter-sized paper.
3. Choose Front Sides or Both Sides from the Sides drop-down menu. The default is Front Sides; choose Both Sides if you are working with two-sided documents and a duplex scanner.
4. In Color Mode, choose from Color, Grayscale or Black and White options. Black and White is optimal for capturing text.
5. Specify a resolution for the scanned PDF. A resolution of 300dpi has enough information for text capture, but not too much as to bloat the file size.
6. Specify an output destination for the scanned page. Choose either a new document or append the scan to an existing file.
7. Select the Make PDF/A Compliant check box to apply standards features to the captured file.
Caution: Choosing the Make PDF/A Compliant option disables OCR choices, described in the section “Choosing an output style”.
8. Balance the size and quality by dragging the slider between the Small Size and High Quality ends of the continuum.
9. Choose a Text Recognition option; the default is Make Searchable (Run OCR); choose whether to include metadata, and accessibility features.
10. Click Scan; a Save Scanned File as dialog box opens. Name the file and specify its location.
11. Click Save to close the dialog box and start the scan.
12. Once the page is scanned, the Acrobat Scan dialog box opens (Figure 2). Select Scan more pages to continue scanning or Scanning complete to finish and then click OK.

Figure 2 Respond to the dialog box after completing each page’s scan.
Note: If you choose options to add metadata or accessible features, the Document Properties dialog box opens. Add the content as desired.
Plain and simple is best
The quality of the text capture results are directly related to the clarity of the text on the scan. When possible, use black text on a white background. Colored or decorative fonts are difficult for the program to recognize and can lead to search and indexing errors.
A simple font at 12 points in size is optimal for capture. If your document’s text is smaller, increasing the scan resolution may provide enough additional data for interpreting the content reliably.
Working with a scanned image
Older versions of Acrobat, as well as image-capture programs such as Photoshop, create image PDF files. The text and content on the page can be read and printed, but the text on the page hasn’t been defined as text characters.
If you open a document and aren’t sure if it contains images and text or an image of the page, click the page with the Select tool on the Basic toolbar. Select the TouchUp Object tool on the Advanced Editing toolbar and click the text on the page.
If you click a text area in the document and a block is selected, you have an image of the text (Figure 3). If you see the content of each word selected, the page contains searchable text.
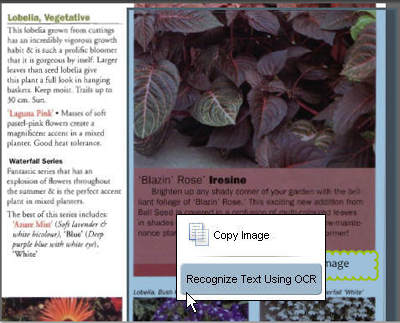
Figure 3 Click a page with the TouchUp Object or Select tool to see whether the content is text or image-based.
Tip: If you hold the tool over the image for a few seconds, the popup menu displays, shown in the figure. The only commands available are to capture the text or copy the image—clearly there isn’t any text on the page.
Follow these steps to capture the content of an image PDF page:
- Choose Document > OCR Text Recognition > Recognize Text Using OCR or select Recognize Text Using OCR from the popup menu shown in Figure 3 to open the Recognize Text dialog box.
- The capture options are shown in the active options in the Settings area of the dialog box (Figure 4).
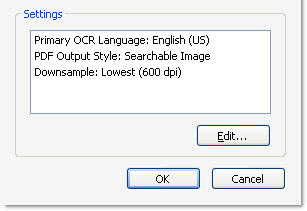
Figure 4 Current capture settings are shown on the dialog box.
1. Click Edit to open the Recognize Text – Settings dialog box. Choose options for OCR Language, Output Style, and Resolution and click OK to close the dialog box.
Tip: If you choose the Searchable Image (Exact) style, you can’t choose an image downsampling resolution.
2. Click OK to close the Recognize Text dialog box and start the capture process.
In Figure 5, it’s evident the content has been captured: Text has been selected with the Select tool, and the Text object popup menu is shown.
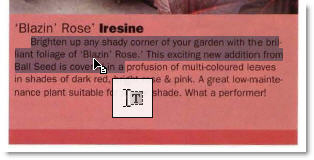
Figure 5 The converted content now includes selectable text.
Choosing an output style
The same three OCR settings are available in the PDF Output Style drop-down menu and the Acrobat Scan dialog box, shown in Figure 1. The options include:
- Searchable Image keeps the foreground of the page intact and places the searchable text on a hidden layer.
- Searchable Image Exact keeps the foreground of the page intact and the searchable text is on a hidden layer.
- Formatted Text & Graphics rebuilds the entire page, converting the content into text, fonts and graphics.
Both searchable image options leave the final PDF easy to read, as the captured page looks the same as the original. A formatted page, on the other hand, often results in character and font substitutions, as you see in Figure 6.

Figure 6 The formatted content differs from the original.
Characters that can’t be processed are called suspects. Choose Document > OCR Text Recognition > Find First/All OCR Suspect(s) commands to examine the converted page. The example document has no identified suspects, although there are a number of font discrepancies and misspellings.
Optimizing the file
The goal in scanning images is to produce a balance between quality and file size. To optimize a scanned page, click Options (next to the Optimization slider) on the Acrobat Scan dialog box shown in Figure 1, or choose Document > Optimize Scanned PDF to open the dialog box shown in Figure 7.
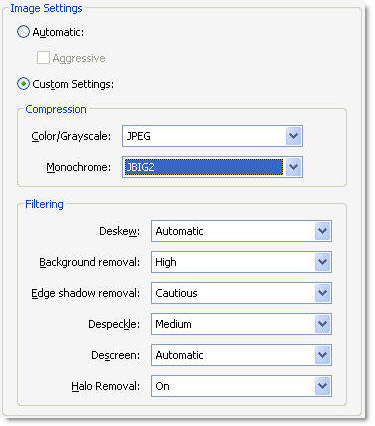
Figure 7 Adjust settings for optimal scan quality in the dialog box.
Choose the settings you want to apply to the scan and click OK. The options and their features are listed in Table 1.
Table 1. Image features to optimize
Options | Choices | Image effect or outcome |
| Deskew | Automatic or Off |
|
| Background removal | Off, Low, Medium, High | Increases contrast between letters and background for clarity |
| Edge shadow removal | Off, Cautious, Aggressive | Removes visible shadowing on letters; too much removal makes some letters indistinguishable |
| Despeckle | Off, Low, Medium, High | Smooths uneven color |
| Descreen | Automatic or Off | Removes the appearance of ink dots on the page |
| Halo Removal | On or Off | Removes the glow surrounding text characters |
Interestingly, I have experienced a significant difference in the ability of the OCR engines in Acrobat 7 and Acrobat 8. The image in Figure 8, for example, would have required a significant amount of tweaking to capture the text accurately in Acrobat 7. By contrast, capturing the text in Acrobat 8 is flawless.

Figure 8 Capturing text on a heavily colored background can be tricky.
Viewing document content
If you aren’t sure how well the content has been captured, choose Document > Examine Document to open the Examine Document dialog box. In a scanned and captured file, you see Hidden text is selected on the dialog box (Figure 9). Click Preview to open the display.

Figure 9 Access hidden text layers in the Examine Document dialog box.
Scroll through the preview pages to check out the content on the hidden-text layer. You can see the captured content on the preview window, and the actual captured text in the Hidden text field on the dialog box (Figure 10).
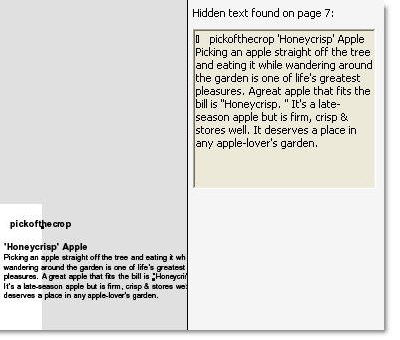
Figure 10 Examine captured text in the dialog box.
Note: You don’t want to delete the hidden text from the file! Read about the Examine Document process in my previous article.
I’d like your feedback:
Do you regularly scan documents into Acrobat for producing PDF files? Have you found any methods or tips that are especially useful? How about problems—have you run across any difficult scanning situations? How did you resolve the issue?
[email protected].