![]()
Removing hidden information from your Acrobat X document
By Donna Baker – July 20, 2011 Donna Baker
In this tutorial, learn how to protect PDF and the steps you can take to protect your file by removing hidden information. You may have used PDF passwords or even electronic signatures to add security to your document, protecting the content from unwanted changes or printing. But do you know what's actually in your document aside from the text and images you see on the page?
At the risk of sounding paranoid, do you realize how many objects can hide inside a PDF document? Although some objects are obvious, others won't show themselves without some digging. In this article, you'll see how to track down hidden items, and what to do about them.
NOTE: Download and open the sample file: Download [PDF, 5.7MB]
The single-page sample project includes some animated text, the sound of bongo drums and an image of said drums. It's the sort of document you might want to use for a theme-party invitation (Figure 1). Closing the file reveals a JavaScript message.

Figure 1: The simple invitation.
Types of hidden information
There are more items in the sample file than those you see or hear. Some came along with the converted PDF file based on the export settings chosen in Adobe InDesign, the source program. I added some objects in Acrobat as part of the document-development process, and others when simulating working with the file.
Use the Hidden Information command to list hidden content. Click Tools to open the panel and then click the Tools panel's drop-down menu to open a list of tool sets and click Protection (circled in Figure 2). Click Protection to display the tools.
In the Hidden Information section of the panel, click Remove Hidden Information. Acrobat X processes the file and shows the results in the panel (Figure 2).
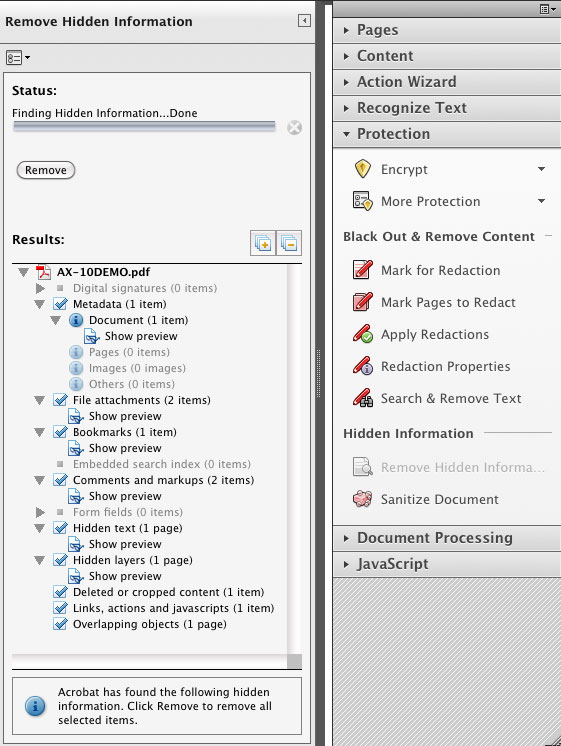
Figure 2: Run the command to examine the file.
The project has many types of hidden content, shown in the left panel. By default, all items show a check mark.
Tip: To see all the items Acrobat X checks, click the menu button (circled in Figure 2) and choose Show All Items to display the full list shown in Figure 2. Click the (+) icon to expand the list items.
With the exception of digital signatures, an index and form fields, the sample document has all types of hidden content. The expanded results list gives you tools to learn more about what's in your file. If you decide to keep an item, just deselect the check box.
Note: Acrobat X treats digital signatures and form fields the same way. If there are fields or signature fields in your document and you choose to remove them, Acrobat X flattens the fields, removing actions and calculations associated with the fields, too.
Some types of hidden information shows on the page when using specific tools, other types in various panels and some types are difficult to find.
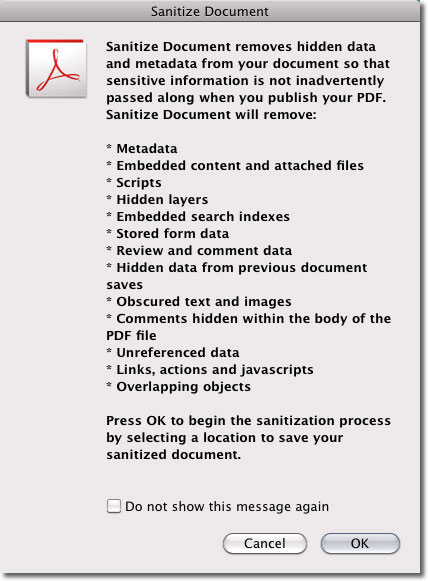
Clean and sanitize in one step
Reviewing results might seem like more work than you need to do. For an easier method, click Sanitize Document in the Protection tools. You'll see a long message open describing all the times for removal. By the way—the Sanitize Document process is the only way to strip links from your file automatically. Once you've read the message and clicked OK, name and save the file to process it.
Reviewing the results
To give you an organized overview of working with hidden information, let's go through the results from top to bottom.
Metadata: Acrobat X lets you preview some of the selected items before deleting them, such as Metadata. Click Show preview in the items details. Since the project started as an InDesign publication, the XMP metadata dialog box opens (Figure 3).
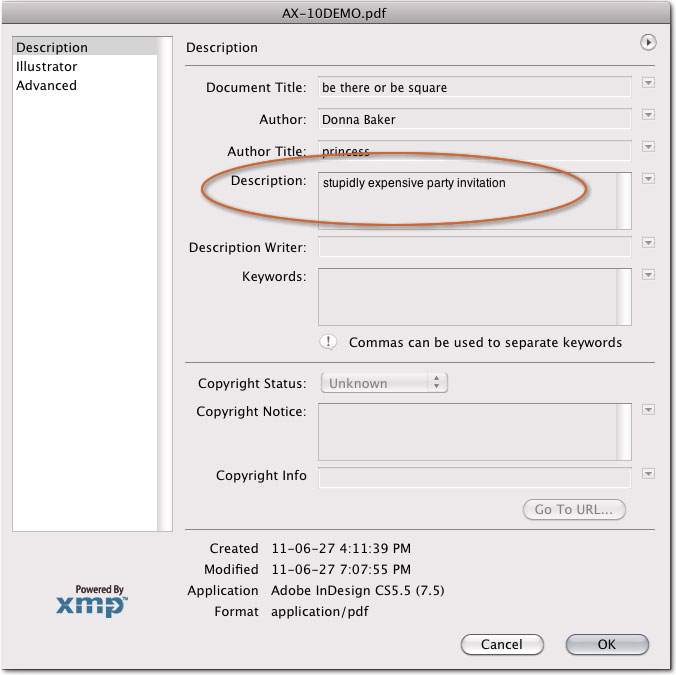
Figure 3: View imported metadata.
In some circumstances, you may want to keep identifying information about the project author. But you may not want to keep the document description circled in the figure!
To make changes to the metadata, choose File > Properties to open the dialog box (Figure 4). You'll see the same metadata as in the original document, but now the fields are active so you can make any necessary changes.
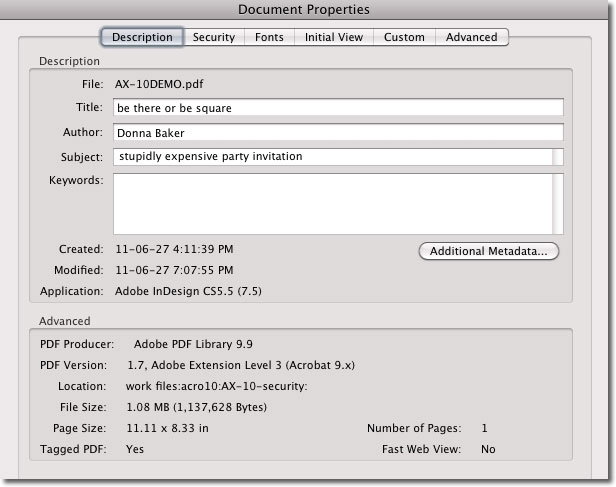
Figure 4: Modify metadata as required.
File attachments: I often work with file attachments when designing as a convenient way to organize assets for a project. There's no need for attaching files in the sample though. In the Remove Hidden Information tab, click Show preview nested below the File attachments (2 items) heading. You'll see a pop-up dialog box explaining how to proceed, and the Attachments tab opens (Figure 5).
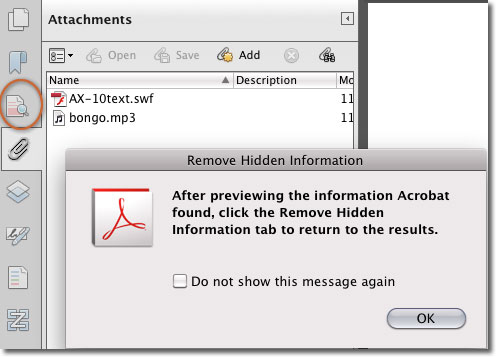
Figure 5: Review attached files.
You see copies of the embedded SWF and MP3 files, neither of which is necessary for viewing the document's animations. As the pop-up explained, click the Remove Hidden Information icon to return to the results tab.
Bookmarks: Clearly the designer got carried away with the New Bookmark command in InDesign. Aside from the main page bookmark, which merely resets the page size to a 100 percent magnification, there's no functionality at all. The bookmarks could safely be removed.
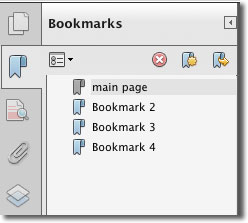
Figure 6: Check out the bookmarks.
Comments and markups: The results panel lists comment content in the document. There are circumstances in which you could click Show preview and find the Comments List displays the No Results message (Figure 7).
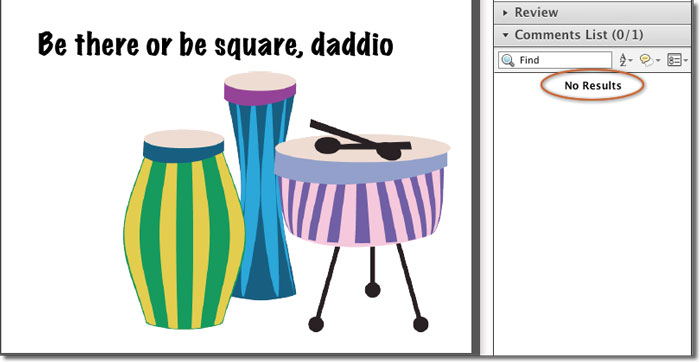
Figure 7: Where are the comments?
There isn't an error in the file. Instead, the Comments List has an applied filter. To show the comments, click Filter Comments on the Comments panel's toolbar and choose Show All Comments (Figure 8).
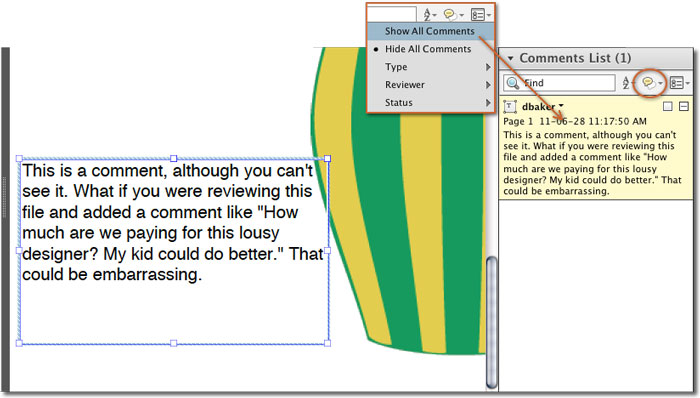
Figure 8: Check for an applied filter.
Hidden text: The project uses hidden text applied in different ways, but Acrobat X shows them all. Hidden text can be transparent, the same color as the background or stacked beneath other content. Click Show preview to open the Hidden Text found in [file name] dialog box (Figure 9).
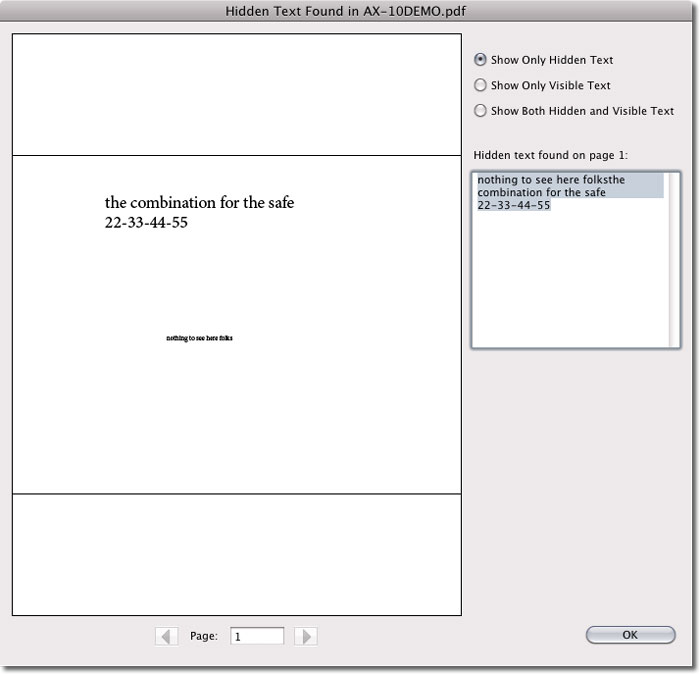
Figure 9: Review hidden text.
The upper block of text, showing the combination to the safe, sits on a hidden layer (more on that shortly) while the lower block of text sits behind the drum image on the document. Both cases illustrate the importance of checking the source document before converting to PDF. Fortunately, Acrobat X can handle the issue.
Without running the Remove Hidden Information process, you have to dig into the document to find hidden text. As you see in Figure 10, the hidden text shows in the Tags panel (left) and the Content panel (right). It isn't likely the average or new Acrobat X user will think to look in either tab.
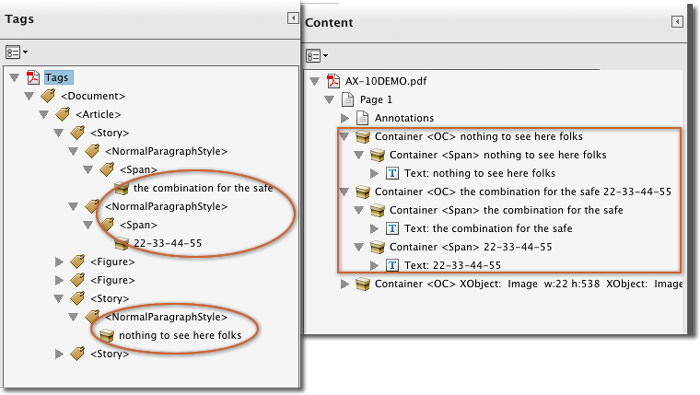
Figure 10: Find hidden text in other tabs.
Hidden layers: The sample includes several layers. Click Show preview to open the Layers panel. You'll see the layer configuration in place when the PDF file was produced, shown at the upper left of Figure 11. Toggling the layer visibility shows the hidden text on the Hidden layer.
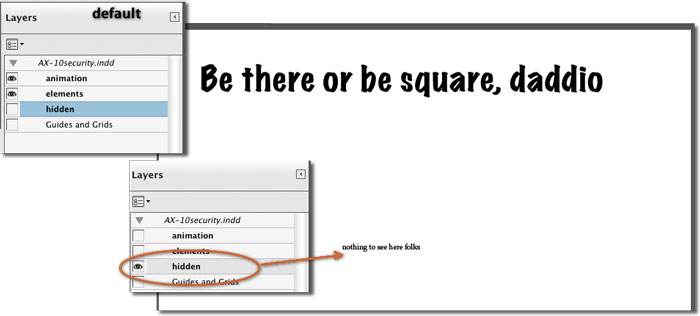
Figure 11: Hidden text on a hidden layer.
Links, actions and JavaScript: The Remove Hidden Information panel simply lists the presence of any actions or scripts. The label is a bit misleading as the Remove Hidden Information feature doesn't find the links themselves. You have to look in other program locations to find the content. The sample contains one link, and a document page JavaScript.
To view the link, use the Select Object tool  located in the Content section of the Tools panel. You'll see the link's frame highlighted on the panel (Figure 12).
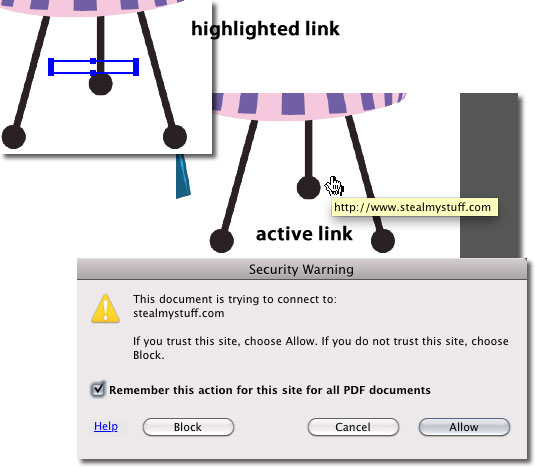
Figure 12: Look for links manually.
You wouldn't see the link unless you moved your mouse all over the page. Fortunately, even if you find and click the link, Acrobat X protects you with a security warning before connecting to a website (also shown in Figure 12).
Although the example link is harmless, that isn't always the case. The project also includes a JavaScript that displays when you close the file (Figure 13). A hidden link or action attached to your document could activate calls to sites or pages with malicious intentions.
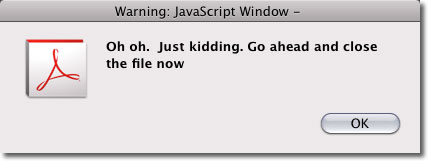
Figure 13: A benign document script.
To check out the scripts in your document, open the JavaScript tools in the Tools panel. You can see the contents of the script in two ways—click Edit All JavaScripts to display the JavaScript editor (top of Figure 14), or click Edit Document Actions to open the Document Actions dialog box (bottom of Figure 14).
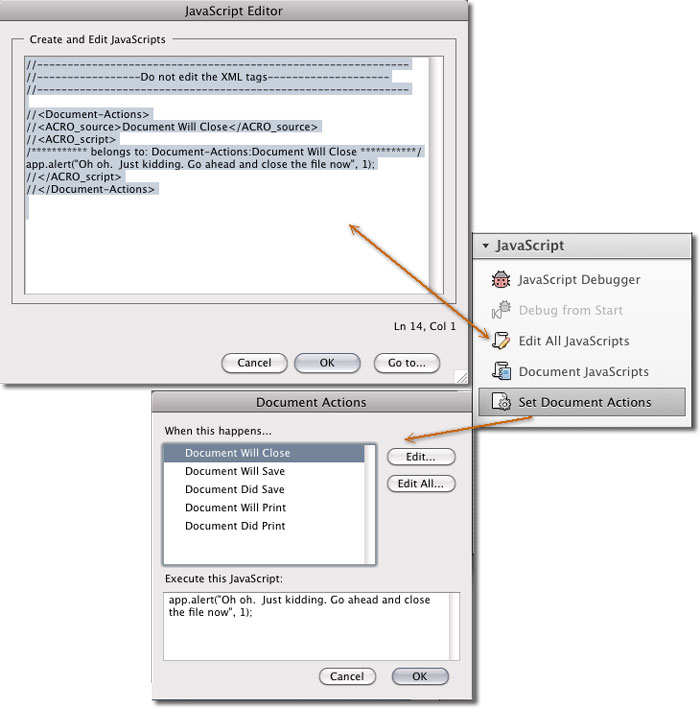
Figure 14: Review the script.
Overlapping objects: The final item on the list includes content that isn't of any value to the document or its use, such as overlapping content. Again, you can't see the item on the page. If you drag the main image on the page with the Edit Object tool  you'll see it on the page. You can also find and highlight the extra image from the Tags panel (Figure 15).
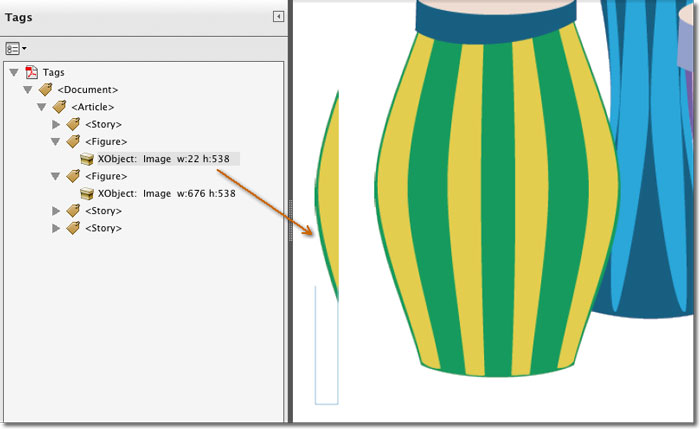
Figure 15: Extra image segment.
Once you've finished reviewing the hidden items, click Remove. Acrobat X opens a dialog box for you to save the file with another name. Name and save the file to process the document and finish the clean-up.
Automating the process
The sample project is an extreme case of what may hide in a file, but there are often elements that aren't necessary to store in a document. If you regularly save and share plain PDF files—that is, basic documents without any need for items like metadata—you can set program preferences to automate removal of the items described in this article.
Choose Acrobat > Preferences (Mac) or Edit > Preferences (Windows) and click the Document category. Select one or both of the Remove Hidden Information When Closing Document and Remove Hidden Information When Sending Document By Email check boxes.
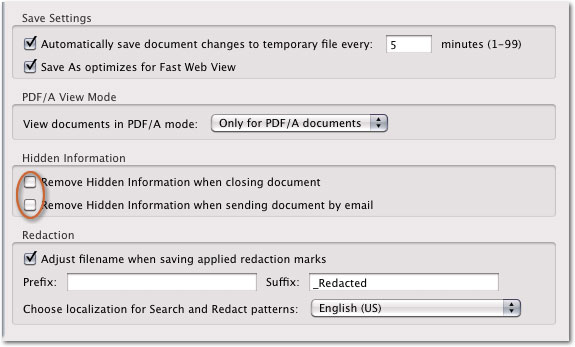
Once you've changed the preferences, every time you close or send a document by e-mail, Acrobat X searches the file for hidden information and displays the panel.