![]()
When the review is finished using Acrobat 9
By Donna Baker – January 30, 2009 Donna Baker
Donna Baker explains some of the lesser-known features of commenting and reviewing with Acrobat, including comment summary reports.
You’ve come to the end of another successful review process and your latest department report is ready to go. It seems like you have to repeat similar correction and modification workflows each time you prepare the reports. If only you could remember…
It takes time to integrate a different workflow like Acrobat’s comment and review into your daily operations. There are more Acrobat features you can use with reviews. Did you know, for example, that you could generate different types of reports? Or how about exporting a PDF snapshot from an ongoing review?
In this article, I’ll show you some of the lesser-known features of commenting and reviewing. Keep them in mind the next time you’re in collaboration mode—you never know what might become a new and useful tool for your workflow!
In the first part of the article, read about working with comment summary reports. After that, learn a few ways to tweak your commenting-and-reporting process.
Producing reports
Summarizing comments is a convenient way to get a synopsis of all the comments associated with a PDF. The summary is separate from the PDF source document containing the comments.
Once the review has finished, follow these steps to create a report:
- From the Comments panel, click Print Comments and choose an option (Figure 1). Choose Print Comments Summary to send a quick copy to your printer, or Create PDF of Comments Summary to store the comments in a file separate from your review document. Regardless of your selection, the Summarize Options dialog box opens.
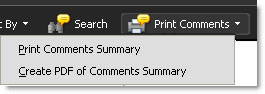
Figure 1: Choose an option for saving comments.
- Choose from one of the four preconfigured layouts for the document and comments. Your choice determines which options display. For example, you won’t have Connector Line options for the Comments Only layout choice (Figure 2).
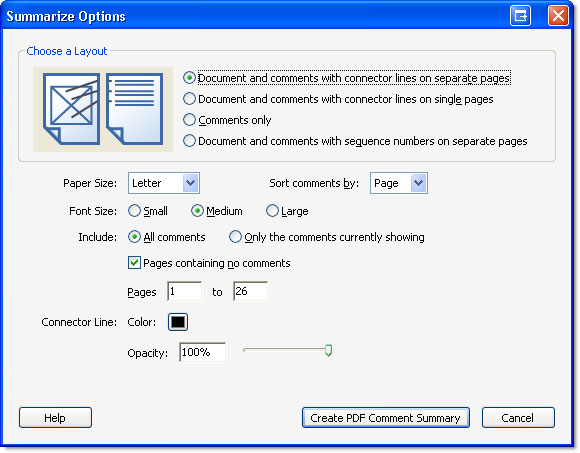
Figure 2: Specify options for the summary document’s appearance.
- Choose additional features for the summary document.
- Click Print Comment Summary or Create PDF Comment Summary (depending on the choice made in Step 1).
Select the appropriate layout
The Summarize Options dialog box gives you four choices for the summary document. Although you could achieve the same outcome regardless of which layout you choose, consider when or why you’d use each of the layouts. Figure 3 shows thumbnail examples of the four options.
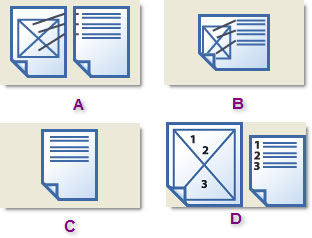
Figure 3: Match the layout to the purpose of the report.
Choose the first option, Document and Comments with Connector Lines on Separate Pages (Figure 3A) when you want to minimize the distraction of the page content. For example, if you’re dealing with a contentious issue or one in which several participants refer to particular words or phrases, physically separating out the comments may make it simpler to understand the flow of what you’re reading, while still pointing out the location on the page.
Choose Document and Comments with Connector Lines on Single Pages (Figure 3B) when you want some separation between the comments and document content, but can’t be bothered with corresponding items on a document page to a comments page. This is a format you might pack in your briefcase for some light reading on your next flight.
Choose Comments Only (Figure 3C) to print a simple comments list, commonly used to print comments contributed by one participant for review or to formulate a task list.
Choose Document and Comments with Sequence Numbers on Separate Pages when you’re trying to follow the flow of the discussion chronologically. Numbered comments show you the order in which participants added comments, which you won’t find with connector lines. Numbered comments are also convenient when you’re sorting comments by type. As you see in Figure 4, using connector lines (right) appears cluttered, when compared to numbered comments (left). Imagine how difficult it would be to follow intersecting lines in a complex review!
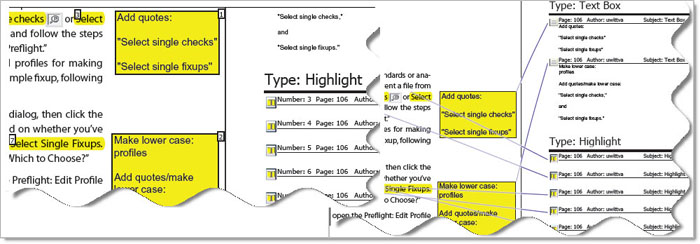
Figure 4: Use a number key (left) instead of connecting lines (right) for clarity.
Customize the summary according to your needs
Summary reports can help to track problems in your review cycles, determine what an individual contributed to the process, design task lists and so on. Regardless of your intent, here are a few customization examples you may want to try.
Decide on paper and font sizes
There are a couple of situations where you might want to use a page size other than the default Letter size. The summary reports print in Portrait orientation for all layout options aside from printing both the document and comments with connector lines on the same page. If you choose that option, you may want to use Legal paper size rather than the Letter size for more room on the page. If you’re using special paper sizes for your document, it’s simpler to manage a printout of your document and summary if you specify the same size paper.
Click a radio button to choose a Font Size. The default is Medium. Choose Small where you have a great deal of comment text or Large for enhanced readability.
Sort and select comments for different tasks
Acrobat lists comments page by page, from top to bottom. Aside from the default Page sort, you can click the Sort Comments By drop-down arrow and choose Author, Date or Type. Reasons for choosing different sort criteria vary according to the reason you’re generating the summary. For example, you may want to sort by Author to separate one review participant’s responses from the rest of the review. Or sort by Type to generate a list of corrections to be made in the source document.
By default, all comments in the document are included, but you can adjust the display in the Comments panel and print only those comments, or choose a page range. Be sure to make a selection, particularly if you plan to print the report. You don’t need to see notice after notice (Figure 5) as you work through the results.

Figure 5: Don’t include pages without comments, especially for printed output.
Once you’ve generated the report, print or save it as desired.
Some comments about commenting
There are other ways in which you can customize or tweak your report settings. Here are two more.
Report on comment subsets
Suppose your review has a few hundred comments, but you want to generate a report of a specific subset. You can produce your report using a combination of settings in the Comments panel and the Summarize Options dialog box.
Here’s what you do: First, filter the comments in the Comments panel as desired. Remember that the Comments panel offers more filter options than the Summarize Options dialog box. Notice that the comments shown in Figure 6 display checkmarks, indicating those I want to include in the report. To get the document ready for reporting, click the Show button on the Comment panel’s toolbar and choose Show by Checked State > Checked. Any comments not identified with a checkmark are hidden.
Once in the Summarize Options dialog box, choose the Include Only the Comments Currently Showing option and create the report. As you see in the example, only the comments identified earlier by checkmarks are included in the report.
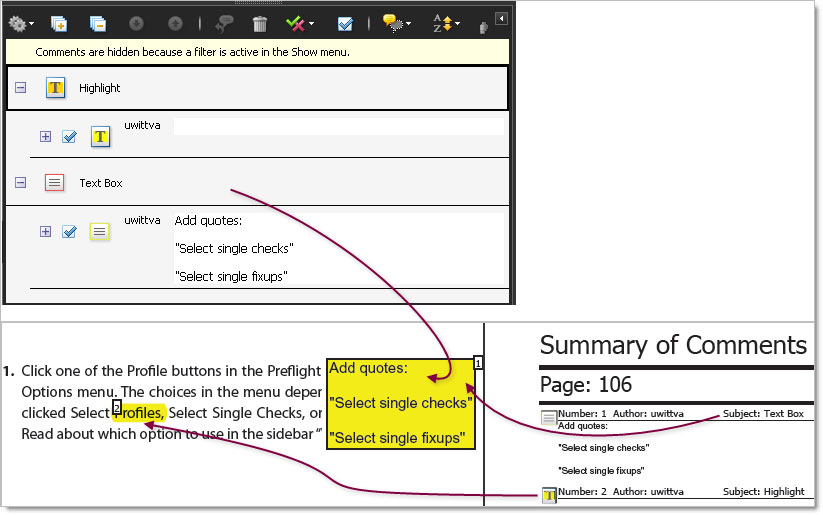
Figure 6: Apply filters in the Comments panel before choosing report settings for further customization.
Group like comments for efficiency
Have you ever grouped comments in a review? You might group comments to move them or modify properties rather than editing each item. You can also include grouped comments in a report document.
Caution: Any comment can be grouped with another of the same or different type with the exception of text edit markups, which can’t be grouped.
Select a comment with the Select tool or Hand tool, then Ctrl-click/Command-click to select the markups you want to group. Right-click within the selection, and choose Group. Organize your comments as required for your report. Once in the Summarize Options dialog box, choose the Include Only the Comments Currently Showing option and create the report.
In the generated report, you’ll see that each group has one identifier on the document page and in the report listing, just as it does in the Comments panel (Figure 7).
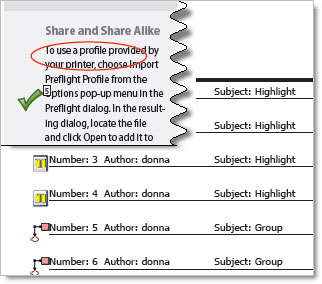
Figure 7: The report can include grouped comments.
For monitoring and controlling the collaboration process, consider comment reports. As I mentioned in the article’s introduction, sometimes you notice you’re repeating tasks, but can’t pin down the specifics. Generating summary reports for a few reviews might help you zoom in on a problem or issue.