![]()
“X” marks the spot in geospatial PDF maps
By Donna Baker – July 1, 2009
Acrobat 9 Pro Extended includes PDF mapping, the ability to use geospatial information as a document layer or embedded within a simple PDF document. Locations marked on a map include interactive coordinates. If you’re not involved in an industry dependent on geospatial data, you can still use PDF mapping.
There’s no doubt that including PDF mapping capabilities in the PDF 1.7 specification shook up traditional markets that use geospatial data, such as construction, surveying, public works projects and the like. Rather than working with flat images of map layers (that lose their data) or trying to manage enormous Geo TIFF image files, workers in the field can access map data directly from their sources, add markups as necessary, and interact with the PDF-based map just as they would with any other PDF file.
You may not think you'd ever have a need for creating or using a geospatial PDF map. But how about preparing a project for a geography class, or a map for customers showing properties for sale, and/or for locating local businesses and services?
There’s no reason you can’t use a georeferenced PDF map for any project where you’re using a map. If all you’re doing is identifying locations on a map, it’s far simpler to use a button or text of some sort—as you see in Figure 1.
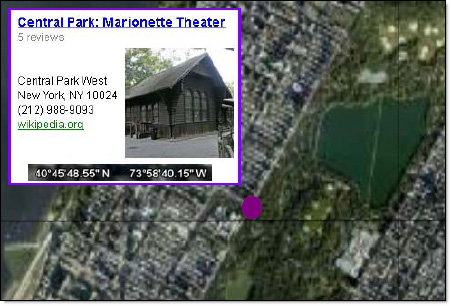
Figure 1: Add labels or buttons for quick location references
On the other hand, if you want to make any measurements—and increase the wow factor significantly—add the georeference data. The sample file includes several locations identified in Central Park. By adding the data identifying the locations, users can measure items like the perimeter of the lake, or the distance from one location to another.
Download [PDF: 144 KB]
The vast majority of PDF mapping pertains to industrial and government use. But how about these ideas? You could use a map—prepared like the sample PDF document—as a downloadable file from a realtor’s site listing current properties, to identify items of interest for tech-savvy visitors at your upcoming class reunion, or as the basis for geography discussions in a classroom.
Creating the map
Common types of maps on the market include Geo TIFF and JPEG2000 format files, both which open directly in Acrobat 9 Pro Extended. Or you can use the geospatial tools in Acrobat 9 Pro Extended (Windows only) to make your own maps by adding data to a raster-based PDF map.
Including geospatial data in a PDF file requires several steps. First, you need to convert your map image to PDF. The map used in the sample file originated from Google Earth.
Note: Fair-use policy on Google Earth requires that the copyright information for Google and the mapping source be included with the map.
Including the geospatial data
Once the map is a PDF file, add the data using the Analysis tools in Acrobat 9 Pro Extended. You need boundary coordinates, or latitude and longitude, in order to add georegistration information to the map. Additionally, you need the projection scale used to define the original map. Acrobat works with map information using the WGS 1984 standard, the standard reference frame for Earth.
Tip: Google Earth also uses the same WGS 1984 standard. If you work from a map originating in Google Earth, you’re already using the correct project scale.
To add the data, open the PDF map image file and follow these steps to georegister your map:
Choose Tools > Analysis > Geospatial Registration Tool. Or select the Geospatial Registration tool ![]() on the Analysis toolbar. In the resulting dialog box, type a name for the map, and click Next to activate the tool.
on the Analysis toolbar. In the resulting dialog box, type a name for the map, and click Next to activate the tool.
Draw a neatline identifying the perimeter of the map. Click the page at specific locations to draw a border for the mapped area (Figure 2).
Tip: You can click the Use Page Bounds As Neatline to use the entire page as the map.
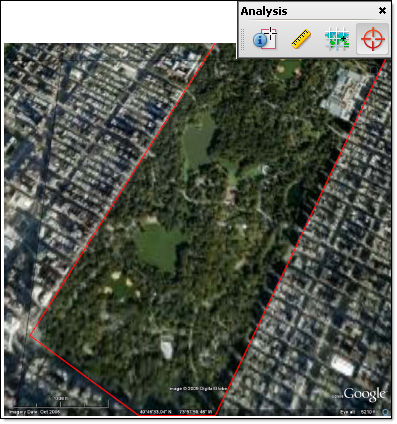
Figure 2: Draw the neatline identifying the map’s margins.
Click one map corner, and type the latitude and longitude coordinates for the first point in the Geospatial Registration dialog box to register the location.

Figure 3: Specify the coordinates for points on the map.
Repeat for at least two more corners and then click Next.
Select the coordinate system used for the map and specify the display units to use for displaying on the map. For example, a map originating from Google Earth uses U.S. feet as the projection scale.
Click OK to close the dialog box and embed the georegistration data in the map file. Acrobat displays a notice when the registration process completes.
Adding georegistration data to a PDF file doesn’t impact the file size appreciably. The sample-map file, including the data, is only 140kb.
Working with the map
Acrobat reads page and object information in an ordinary PDF file. In a georeferenced PDF file, Acrobat reads the geospatial information instead. Using the Geospatial Location Tool ![]() on the Analysis toolbar, move your cursor over embedded data on the map to see the latitude and longitude (Figure 4).
on the Analysis toolbar, move your cursor over embedded data on the map to see the latitude and longitude (Figure 4).
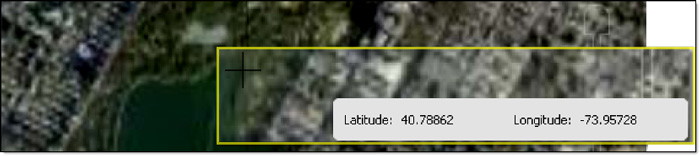
Figure 4: The cursor identifies latitude and longitude.
Identifying locations
The georegistered PDF can show locations and measurements. Add location markers to identify specific locations, as shown on the sample map. To add a location, right-click the map at the appropriate location to open the shortcut menu, then click Add Location. The location coordinates display in a Sticky Note comment. Customize the comment as you wish. In the sample map, the map name and information about the location markers are included on the comments.
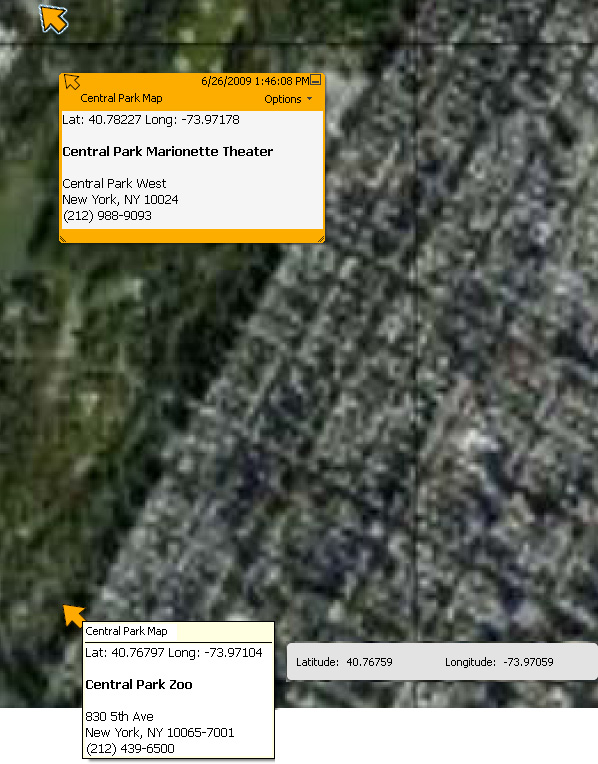
Figure 5: Add information about a location.
Finding locations
Use the Geospatial Location tool to find locations on the map. Right-click the tool within the map’s neatline and choose Find a Location from the shortcut menu. In the resulting dialog box, type the latitude and longitude values (such as Lat: 40.77245 Long: -73.97798, the coordinates for Tavern on the Green restaurant) and click Find Next.
You’ll see the location highlighted with a blue square and the page centered on the location (Figure 6).
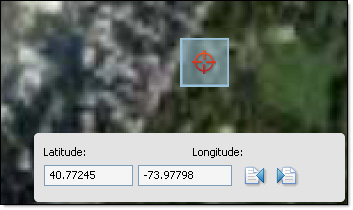
Figure 6: Search for a location using its coordinates.
Note: If your file contains multiple pages or multiple maps, you may have more than one result. Click Find Next or Find Previous to view the results.
Measuring distances
Use the Measurement tool ![]() on the Analysis toolbar to identify distance, perimeter or area. Work with a variety of measurement units ranging from inches to miles. Your map includes measurements as comments, as you see in Figure 7.
on the Analysis toolbar to identify distance, perimeter or area. Work with a variety of measurement units ranging from inches to miles. Your map includes measurements as comments, as you see in Figure 7.
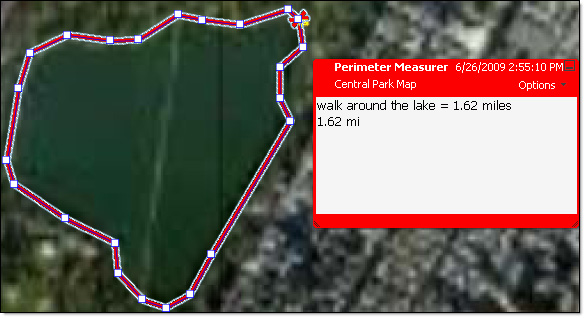
Figure 7: Plan a route, such as a walk around the lake.
Note: Refer to other Acrobatusers.com articles and tutorials for more information on measuring map structures.
Distributing the map
Once you’ve finished adding content to your map, you can distribute it for use in Adobe Reader 9.x or Acrobat 9.x. Choose Advanced > Extend Features in Adobe Reader. Click Save Now on the Enable Usage Rights in Adobe Reader dialog box to save the file with enhanced features. Your recipients using Adobe Reader 9 will be able to view, interact with and measure the contents on the map.