This tutorial shows you how to work with the Scan and Optimize features in Acrobat X. See what the all-new Acrobat DC can do for you.
Download a free trial of the new Acrobat.
Take the guesswork out of scanning to PDF in Acrobat X
Learn how to use the Scan dialog boxes to produce the best scan to PDF.
Learn how to Create PDFs


Looking for a quick tip on scanning to PDF? Check out these videos:
- Turn paper documents into searchable PDFs
- Edit scanned documents
- Export scanned PDF text from Acrobat to Word or Excel
Taking the guesswork out of scanning to PDF
In this tutorial, learn how to use the scan dialog boxes (both the Custom Scan and Configure Presets dialog boxes) in Acrobat X to produce the best scanned PDF. We'll start from the basics, and work our way up to more subtle settings and configurations.
Getting your scanner to play along
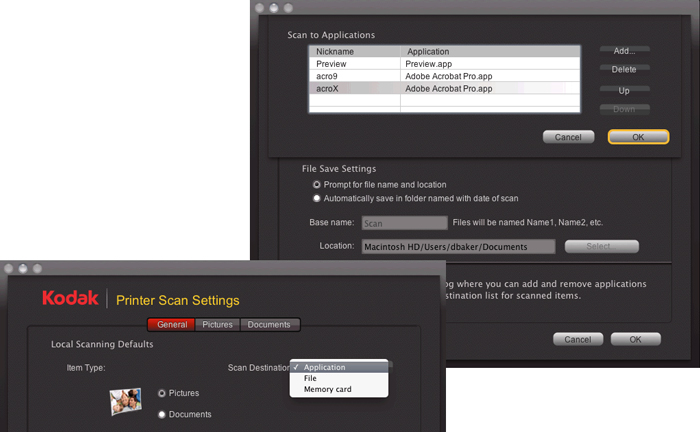
In some cases, you need to configure your scanner first. In the example showing a Kodak scanner, Acrobat X must be specified as the application to receive scanned content first, and Acrobat X added to the list. Then, in the Acrobat Scan dialog box, select a scanner and a document preset or Custom Scan.
In all cases, you should check your scanner's settings and make adjustments to the contrast and brightness. Try it with a white page with black text. You want the background to appear white, and the text to appear black, without showing any extra brightness around the edges.
What are the best settings?
Best for what? If you're scanning some Civil War currency, then you aren't concerned about capturing the text on the note. Instead, you want the best color definition and clarity you can get. If you're trying to scan an old house deed, and want to use the content in the document, then you need the best contrast in the scanned document to capture the content using OCR (Optical Character Recognition).
What are the presets, and do I need them?
Both Windows and Mac versions of Acrobat X produce scans, but in different ways. On Windows, Acrobat supports both TWAIN and WIA (Windows Image Acquisition) drivers. If you are on Windows, and your scanner supports the Hide Scanner's Native Interface mode, you can choose from a variety of scanning presets. If your scanner doesn't support that mode, or you're using Mac, you don't have any presets (Figure 1).

Figure 1: Select a scan preset in Windows.
In Windows, you can either use the Autodetect Color Mode and let Acrobat evaluate the content type, or pick a preset. The presets include Black & White Document, Grayscale Document, Color Document, and Color Image.
For the most part, the presets are as straight-forward as the names suggest. If you scan a basic printed document having black text on white paper, obviously you'd choose the Black & White document option. The only issue may arise with grayscale and color documents. The document needs enough contrast so Acrobat can define text from background based on areas of lightness and darkness.
If you're working on Mac, or working through your scanner's interface, you'll be able to pick from similar settings. Pick the option closest to your source document.
How come I never get a good enough scan?
What you get depends on what you start with. Acrobat X is a great program, but it can't perform magic. If you have a page with blurry text, decorative fonts or a colored (or worse—patterned) background, don't expect the program to fix it for you. When the content is an issue, prepare the source scan before trying to capture the text in Acrobat X.
Figure 2 shows an example. The page at the left shows the original scanned page; the page at the right shows the scanned page after making contrast adjustments in Photoshop, and removing the background image. At this point, the page is still an image of the text. That is, the content hasn't been captured as editable text.

Figure 2: Remove items that complicate the page's content.
If you want to simply scan a printed document to have as an online brochure, you can certainly use the left example shown in Figure 2. If you want to work with the text on the page, the closer you are to the example at the right, the better your results.
Note: You aren't left totally to your own devices. Acrobat includes a number of filters that can help with some of the contrast and visibility issues, as I'll cover later.
In some cases, you won't have perfect results regardless of how much you tweak a scan. Two types of documents are notoriously bad time-wasters: newsprint and low-resolution images.
A program using OCR needs enough data to intelligently decide if something on a page is a letter “l”, the number “1”, or a vertical graphic. A halftone image, as you see on a newspaper page, uses a series of ink dots applied at different angles (Figure 3, right image). If your scanned page starts from a low-resolution image or if you scan with a low dpi, there's simply not enough data for a reliable conversion to text (Figure 3, left image). It's that simple.
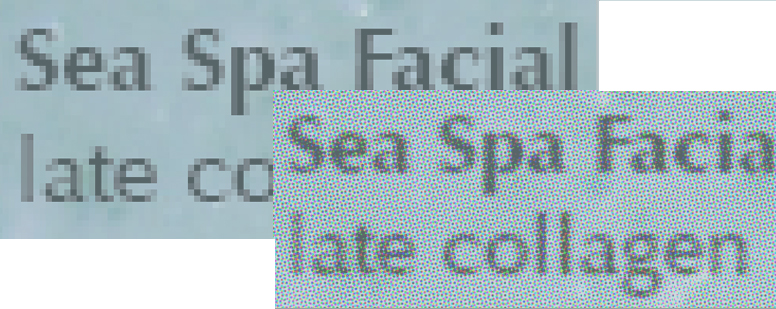
Figure 3: Not enough data is simply not enough data.
If you can't get a different version of the source document to use, you can try to scan the page at a higher resolution, try the Acrobat filters, or open the scanned page in an image-editing program and try to improve the contrast.
Shouldn't I scan at the highest resolution possible?
A common misconception is that the higher the resolution, the better the scan. That's only true to a certain extent. The best range for scanning a page where you want to capture the text is within the 300-600 dpi range. Anything below that doesn't offer Acrobat X enough information to translate the image to characters; anything much higher than 600 dpi wastes processor time. More image data won't produce better output, but may crash your system. By default, Acrobat X downsamples the file to 600 dpi.
If you have a basic page of text using about 12 pt. text, then scan at 300 dpi to capture the content. Here's a simple guideline: The smaller the text, the higher the scan resolution. Scan a page containing text smaller than 10 pt. at higher resolutions, such as 600 dpi for 8 pt. text.
Tip: On the other hand, if you're scanning a photo or high-quality image and want to use it as an image intended for print output, then the sky's the limit—scan at any resolution your printer can support.
What's the relationship between quality and file size? And what's optimizing?
You'll find the Optimize Scanned PDF slider on the Scan dialog box. The quality of the scan and the file size are proportional. In other words, the smaller the file size, the lower the quality. You don't need a high-quality (and large file size) scan if you're just scanning some receipts to submit for reimbursement.
To optimize the document’s content, particularly for images, drag the Optimization slider left (to decrease) or right (to increase) file size and quality (Figure 4). The default setting sits about one-quarter of the way from the left of the slider, and works well for basic scanning and OCR.

Figure 4: Choose a setting for scan optimization.
Will using filters actually make much difference?
Absolutely. Acrobat X applies some filters automatically, while others offer choices.
Choose filters from the Optimize Scanned PDF dialog box (Figure 4). Here are the choices, and when you'd use them:
- Deskew—On by default—squares up the contents on the page. Not only does it look better, but if you're capturing the text it's easier for Acrobat to read.
- Background removal—Off by default—works on grayscale and color pages. The filter brightens background areas to white, producing clearer scans. If you've tested and adjusted your scanner, you can leave the filter Off, or choose Low. If you're trying to scan newsprint or a colored background, try Medium or High.
- Descreen—On by default—removes halftone dots, like those from a scanned newspaper (shown in Figure 3). By default, Acrobat applies the filter automatically for grayscale and RGB images 300 ppi or higher. Choose Off if you're scanning at a high resolution or an all-text page.
- Text Sharpening—Low by default—increases the contrast between the edges of the letters and the background. If you're trying to get a good scan from slightly blurry text, try Medium or High.
Why use OCR?
Well, that's the big question, isn't it? If you need to use the content of your document, then you need to capture the text. A scanned page is simply an image of the text, and can't be searched, indexed or accessed by screen readers or other devices.
Acrobat X captures text from any document, whether you're scanning it or have it as an image from another application. You'll see the Make Searchable (Run OCR) checkbox selected by default in the Scan dialog box (Figure 5).
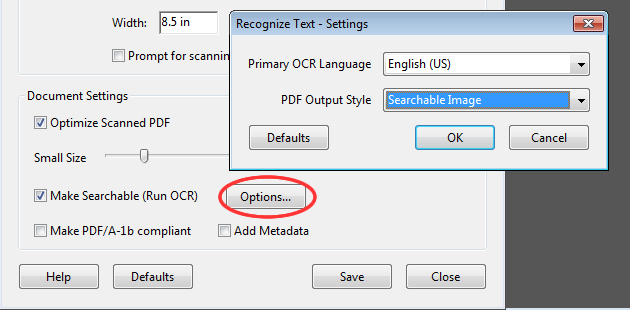
Figure 5: Pick an OCR type.
Click Options to open a dialog box and choose from one of two capture methods:
- Searchable Image compresses the foreground image and places the searchable text behind the image. Compression affects image quality.
- ClearScan rebuilds the page, defining the page content as discrete text, fonts and a low-resolution version of background graphics. Acrobat X creates a custom font to match the visual appearance of your text, embedded into the document. ClearScan produces smaller files than Searchable Image, and doesn't display suspects.
Searchable Image OCR files are generally larger than ClearScan files, but allow you to search for indefinable items, called suspects. For example, number “1” and the letter “l” look nearly identical, but are usually differentiated by surrounding characters.
To see all the suspect text highlighted on the page, click Find All Suspects in the Recognize Text tools panel. To review each suspect, click Find First Suspect. In the example shown in Figure 6, you see all suspects highlighted in the page section. Click Find First Suspect to open the Find Element dialog box where you can check and process each suspect. Click Accept and Find to go on through the rest of the page.
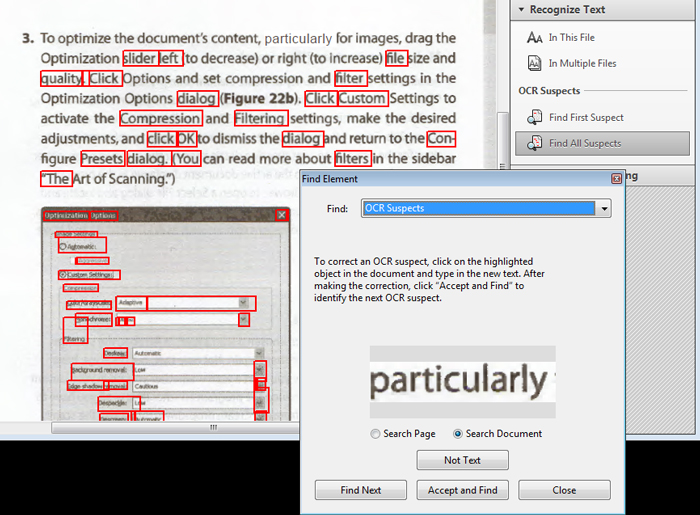
Figure 6: Evaluate suspect text in the page.
Can I change one type of OCR to the other?
ClearScan technology is fundamentally different from Searchable Image technology. If you have a document captured using Searchable Image mode, you can run OCR on it again using ClearScan. In the Recognize Text panel, click In This File. Acrobat X automatically recaptures the content using ClearScan.
If you want to use Searchable Image capture, you need to export your ClearScan document as images, then run OCR using Searchable Image.
What about the last options?
At the bottom of the Scan dialog boxes, you'll find choices for standards compliance and using metadata:
- Select the Make PDF/A Compliant option to make the PDF conform to ISO standards for PDF/A-1b. When selected, only Searchable Image is available in the Recognize Text - Settings dialog box for the PDF Output Style option.
- If you choose Add Metadata, the Document Properties dialog box appears after scanning. In the Document Properties dialog box, you can add metadata, or information about the scanned document, to the PDF file.
Tip: If you are creating multiple files, you can enter common metadata for all the files.
Once you finish choosing scan settings, click Scan to produce the output.
Products covered: |
Acrobat X |
Related topics: |
Scan and Optimize |
Top Searches: |
Create PDF convert scanned documents to PDFs get started with Acrobat DC |
Try Acrobat DC
Get started >
Learn how to
edit PDF.
Ask the Community
Post, discuss and be part of the Acrobat community.
Join now >
11 comments
Comments for this tutorial are now closed.
Lori Kassuba
10, 2014-12-11 11, 2014Hi Wayne Webb,
Here are some suggestions for you to clean up the scans:
http://blogs.adobe.com/acrolaw/2014/01/how-to-erase-and-clean-up-a-scanned-pdf-in-acrobat-xi/
Thanks,
Lori
Wayne Webb
2, 2014-12-11 11, 2014Good Morning, I am a Pub Tech for a company archives old documents. My problem is that when I scan the documents, the pages sometimes have staple marks, paper hole images, kinda off color background. Is there any way to clean up the pages? Thanks Have a Blessed Day,
donna baker
3, 2013-09-25 25, 2013Hi Napoleon -
OCR doesn’t work that way. If you apply one version (such as searchable image), you’ve already used the process. Instead, start with the document using ClearScan OCR, which is far more accurate.
donna.
Napoleon
3, 2013-09-20 20, 2013If I use searchable image and correct de suspects and after save the changes I run the OCR in ClearScan the corrected errors don’t disappear?
donna baker
3, 2013-03-26 26, 2013Hi Tim -
That’s an interesting question, but the answer is no. OCR is an all or nothing process.
donna.
Tim
10, 2013-03-08 08, 2013Help!!! I just want to scan a lot of service invioces( 80K) and then be able to referance them by one number in the upper right hand corner. Can i stop the program from trying to recognize/ search the whole document, by asigning just the upper right field?
donna baker
10, 2012-10-22 22, 2012Hi Gerhard -
No, I don’t think so. Those are default Acrobat messages, and there’s no way to turn them off. (You’re very welcome, from Canada ;)
donna.
Gerhard
8, 2012-10-19 19, 2012Thanks Donna,
Created an action called “scan” and it works. Unfortunately right-click works for me only for the icons Create New Action & Edit Actions L
That’s ok as I can have the Tool panel open.
Is there a way of getting rid of the dialog boxes (“please indicate if this scan is complete or if you need to scan more pages"and “Action complete, saved to”) without clicking OK and Close every time?
Thanks a lot from Sweden
Gerhard
donna baker
4, 2012-10-17 17, 2012Hi Gerhard -
You can do much the same thing, only you’ll have to create an Action. There are several tutorials that describe how to do that. Then right-click your action in the Tools pane and click to add it to the Quick Tools toolbar, and you’re up and running.
donna.
Gerhard Bax
10, 2012-10-17 17, 2012I often scan documents and would like to create a button / quick tool instead of going to create .... PDF from scanner .... autodetect mode. This was easier in previous versions of Acrobat Pro, as I remember. There is (I hope) a simple solution, but was unable to find one :-(
donna baker
2, 2012-06-21 21, 2012Hi Scott -
These issues sound like they’re scanner-based. Make sure your scanner driver and files are up to date. You might want to uninstall and reinstall the scanner, too.
You should check your scanner’s documentation for information about page sizes. If it’s only capable of capturing specific preset sizes, Acrobat won’t be able to provide that functionality.
donna.
Scott
4, 2012-06-15 15, 2012When scanning multiple pages the contrast will fade after the first page and stay that way when using the Black and White document pre-set. I have tried multiple times to correct this in the “Configure pre-set” option, but it will not accept much change. Also the page size will only allow for automatic detection instead of specifying the size. The page size boxes are greyed out.
Comments for this tutorial are now closed.