Looking for more help on How to Edit PDF?
- Consult the How to Edit interactive guide.
- Ask a question in our forum.
- You can leave a comment below for the author of this tutorial.
This tutorial shows you how to work with the Edit PDFs features in Acrobat X. See what the all-new Acrobat DC can do for you.
Download a free trial of the new Acrobat.
By Thom Parker – March 10, 2011


If you use Acrobat for document production or workflow processing, then you probably have to spend a lot of time repetitively clicking on menu items and filling out dialogs. I have worked on processes where at least 10 different operations had to be applied to a PDF -- crop, rotate, add footers and a watermark, place specific annotations, and so on. It used to be that to get Acrobat to efficiently perform these kinds of multiple operations, you had to be a PDF Stud, or hire one. But that's no longer true. With the introduction of Acrobat X, Adobe has made Acrobat more powerful, efficient and much more accessible to ordinary users than ever before. Actions are a big part of how that has come to be.
In Acrobat 5, Adobe introduced Batch Processing. A Batch Sequence was a series of standard operations that could be applied to a single PDF or to an entire folder of PDFs. When the sequence is applied to one or more PDFs, it's called a Batch Process. A great idea, but this feature involved several rather non-intuitive dialogs and has always been a bit clunky and inaccessible to most users, i.e. not for the faint-of-heart.
Acrobat X brings this same idea into the 21st Century, putting it front-and-center on the user interface and simplifying the dialogs, thus making it useful to anyone who can click a mouse.
To put it simply, an Action is a hands-free way to apply multiple operations to one or more PDFs at the same time. The operations that make up an Action are pretty much exactly the same operations available on the Acrobat Tools Palette. Actions are very similar to the concept of macros in other popular software applications.
Actions are available from two locations in Acrobat -- the File menu and the Tools Palette. Both contain an item called the Action Wizard (Figure 1), which displays a sub-menu of options for the Actions tools. Both locations display exactly the same options; they are just different locations for accessing the same thing. The first two items are for managing the Actions, "Create New Action" and "Edit Action." The following items are the names of Actions that have already been created. Acrobat comes with a number of useful Actions already built-in and new ones can be created from scratch, imported, or copied and modified from an existing Action.
Any number of Actions can be created, but only the seven most recently used actions are shown in the list. The other Actions are listed in the sub-menu under the "More Actions" option.
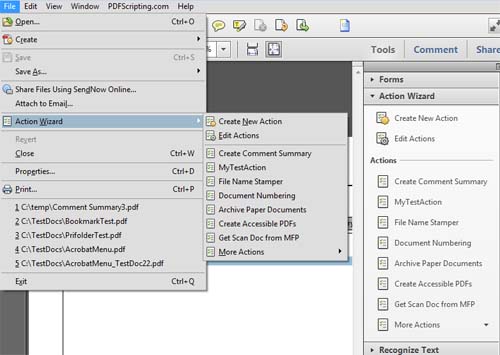
Figure 1 – Getting to the Action menus
To run an Action, just click on the Action's name in either the File Menu or the Tools Palette. The first thing displayed is a dialog for verifying the Action to be run (Figure 2).

Figure 2 – The first dialog displayed when an Action is run
The dialog shows everything about the Action. The best feature of this dialog is that it's optional. Use the checkbox on the bottom left to stop the dialog from popping up every time the Action is run.
Clicking on the next button starts the Action. What happens next depends entirely on how the action is set up. For example, the "Start With" entry on the dialog in Figure 2 shows that this action will operate on the PDF currently open in Acrobat. So when "Next" is pressed, each of the "Steps" listed is applied to the current PDF in the order listed. These steps can have preset values, in which case they are applied silently, or they can be marked as interactive, in which case the step would display an input dialog. As each step is processed, Acrobat displays a progress dialog at the bottom right of the page display area (Figure 3).

Figure 3 – Information on the Action's progress. Clicking on the "X" will quit the Action.
Some steps in an Action require user input to continue. For example, Step 3 for the Action shown in Figure 2 is an "Instruction Step." This step will display a small input dialog on the bottom right side of the page display (Figure 4). At this point, the Action is paused and the working PDF is displayed. The user can then work on the PDF to complete the task outlined in the step. In this case, the instruction is to add bookmarks to the PDF. However, the user can in fact perform any operation on the PDF. The instruction step is just a guide for the process.
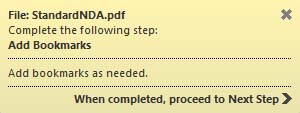
Figure 4 – Instruction step. The Action is paused until the user press "Next Step."
When the task is completed, the user clicks on "Next Step" to continue on to the next step in the Action.
Finally, when all the steps in the Action are complete, Acrobat will perform the "Save To" operation. As shown in Figure 2, the "Save To" for this action is set to "Ask When Action is Started," which displays the file "Save As" dialog. This text is a bit misleading since the user is actually asked at the end of the Action, not when it is started.
The process outlined here shows many of the possible interactions an Action can have. However, there are many more, and exactly what an Action does depends on how it was designed.
Selecting the "Edit Actions" item from the "Actions Wizard" displays the dialog shown in Figure 5.
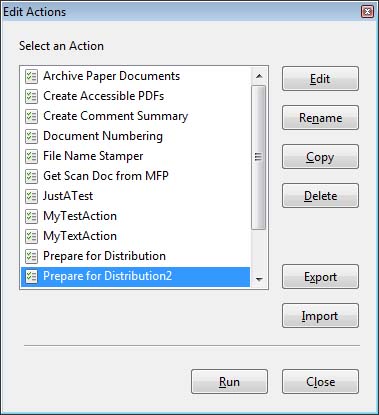
Figure 5 – The Actions list dialog. This is the control panel for manipulating the Actions.
From this dialog, any of the existing Actions can be edited, deleted, copied or exported. The copy option is very important because Acrobat's built-in Actions can't be edited directly. Instead, if a variation of a built-in Action is needed, it has to be copied first, and then the copy can be edited. An Action is edited by clicking on the "Edit" button, which displays the Action Edit dialog. This is the same dialog displayed when the "Create new Action" item is selected from the "Action Wizard" (Figure 6). Of course, when "Create new Action" is selected, the command list on the dialog is empty, as shown in Figure 6.
Figure 6 – The Action-editing dialog. This is where Actions are created and modified.
There are three parts to all Actions. They are labeled "Start with," "Steps" and "Save To." The "Start with" part determines the source of the files the Action will be applied to. This can be a single file, an entire folder of files, or it can be determined by the user when the Action is run. One of the most useful options is "Ask When Action is Started." This option displays a dialog for collecting files from the user. The big advantage to this option is that the file list is ordered, i.e., the Action is applied to each file in the order it appears in the list. Something not immediately obvious is that the input files do not have to be PDF. They can be any file format that can be converted to PDF. Acrobat will do the conversion before the Action is applied.
The last part "Save to," determines how a file is saved after the Action is applied. The options include not saving the file at all, saving back to the original file folder, saving to a target folder, and asking the user what they want to do. The "Don't save" option is used in a couple different situations. First, if the Action operates on a file already open in Acrobat, it may be desirable to allow the user to decide how and when the file will be saved. Another situation is when the Action only collects data on the files and does not make any changes.
The "Steps" are the real heart of the Action. This is an ordered list of commands that will be applied to the file, or set of files, specified in "Start with." The left side of this dialog shows a list of command categories. Notice that the category names are nearly the same as the names of the categories on the Tools Panel, and for the most part the commands that can be added to an Action are the same as the commands that can be run manually from the Tools Panel. There are, however, some differences. Not all tools in Acrobat are suitable for use in an Action, and conversely there are some commands that make sense for an Action that do not make sense as a tool.
To add a command to the "Steps," click on it (Figure 7). As many commands as necessary can be added, and the same command can be added more than once. Each command has a remove button on the far right, and the order can be changed by dragging and dropping individual commands already in the list.
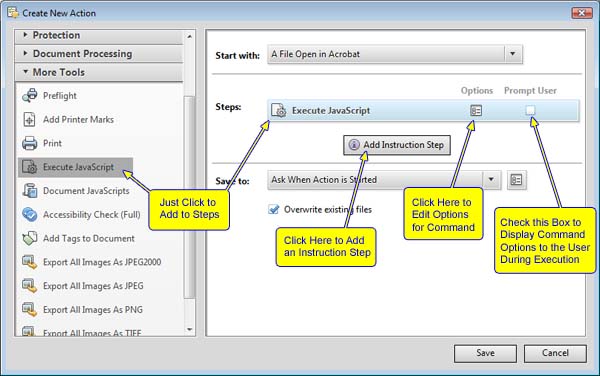
Figure 7 – Commands are added to the Action with a single click.
Many of the operations require some kind of input. For example, the rotate-pages command requires the amount of rotation and the page range where the rotation will be applied. Each command in the "Steps" includes a button for setting these options and a checkbox for prompting the user to enter this input data. If the checkbox is left blank, the command will run silently using the preset input values. But if it is checked, the input dialog will be displayed to the user at the time the Action is run.
Figure 7 shows the options under the "More Tools" category. This is where all the tools are placed that aren't available on the "Tools Panel" and don't fit neatly into the other categories. The one shown in the figure is "Execute JavaScript." This command is particularly useful for advanced Acrobat users. All the other commands are relatively static. Each command does one specific thing in a pre-programmed manner, whereas a script can be written to perform operations that are not on the list, and to apply operations in an intelligent way. For example, a script could use information stored on the document to control the operation, or to decide whether or not the operation is applied at all.
Not only are Actions a powerful productivity tool because they offer a way to group operations, they are also powerful because they can be shared easily with other users. The Actions list dialog (Figure 5) has buttons for both importing and exporting Actions. Sharing is simply a matter of exporting an Action to a ".sequ" file and then e-mailing the file to another user with Acrobat X. To import the Action, all the user has to do is double click on the file icon (Figure 8).

Figure 8
The ".sequ" file extension is exactly the same file extension used for Batch Sequence files in the previous versions of Acrobat. In fact, the file format is also exactly the same. If Acrobat X was installed over a previous version of Acrobat, then the old Batch Sequences will automatically appear in the Actions list. But, if Acrobat X is installed on a new system, then the old Batch Sequences can be imported into Acrobat X as Actions by copying them to the new machine and double clicking on them.
Give Actions a try and see how simple they are to use and how much time they can save you.
Products covered: |
Acrobat X |
Related topics: |
Edit PDFs |
Top Searches: |
Edit PDF files convert PDF to Word convert PDF to Excel convert PDF to PowerPoint Rearrange PDF pages Convert PDF to JPEG |
Try Acrobat DC
Get started >
Learn how to
edit PDF.
Post, discuss and be part of the Acrobat community.
Join now >
12 comments
Comments for this tutorial are now closed.
Thom Parker
7, 2016-01-12 12, 2016Hi Eric, Sorry this took so long to answer. Been out on XMas Break.
I’m sorry to say that the answer to your question is NO. Adobe specifically blocks activating “Actions” from simple automation, so that Acrobat cannot be used as a document processing server.
Eric Whitley
10, 2015-12-15 15, 2015Hi Thom,
Do you know of a way to trigger a custom Action from a Button? I know a button can Run a Javascript but I don’t know the js code to trigger it. The button can also Execute a Menu item, but I don’t know how to add my Action to the menu. Can either of these be done?
Thank you.Hi Thom,
Do you know of a way to trigger a custom Action from a Button? I know a button can Run a Javascript but I don’t know the js code to trigger it. The button can also Execute a Menu item, but I don’t know how to add my Action to the menu. Can either of these be done?
Thank you.
Lori Kassuba
3, 2015-10-30 30, 2015Hi No actions showing,
These screenshots are for version X not XI. You won’t see Actions listed under the File menu for version XI. Have you looked in the right hand pane for the Action Wizard. You can find more detail here:
https://acrobatusers.com/tutorials/how-to-work-with-actions-infographic
Thanks,
Lori
No actions showing
5, 2015-10-22 22, 2015Window 7, Adobe Acrobat XI Pro, None of the Actions show under Action wizard. I can create, Manage or find more on-line, not use any including one I just created. How to I get the actions to display? I also do not have the option to see the Action Wizard in the File menu.
Lori Kassuba
7, 2015-10-21 21, 2015Hi Beatrice,
Can you post your question here and be sure to select the JavaScript category so our experts can help you?
https://answers.acrobatusers.com/AskQuestion.aspx
Thanks,
Lori
Beatrice T. Neris
2, 2015-10-19 19, 2015Is there a way to create a macro to extract certain data fields from a PDF (i.e. invoice) and populate that data into an excel spreadsheet? I have Acrobat XI Pro.
Lori Kassuba
6, 2015-04-29 29, 2015Hi Sumaiya,
This would take a bit of scripting. You would need:
1. A print-only text field
2. A script that will launch before the file is printed and update that field (either by incrementing it or by giving it a random value)
3. A script that sends the same file X times to the printer (you can’t just print X copies, because then the field won’t update)
You might try posting your question here and be sure to select the JavaScript category:
https://answers.acrobatusers.com/AskQuestion.aspx
Thanks,
Lori
Sumaiya
11, 2015-04-28 28, 2015Hello, I need to print 100 copies of a document, each with a different serial number. Right now I’m doing it with a button, pressing it before each print..takes a lot of time..how can I do it through actions? Thanks
Lori Kassuba
9, 2015-03-12 12, 2015Hi Vijay,
You’ll need the Pro. version to import and use Actions.
Thanks,
Lori
Vijay
8, 2015-03-10 10, 2015Hi.
I know you can’t create macros/actions in Adobe Standard, but can you import actions (.sequ-files) and use them in Adobe Standard?
Scott
4, 2015-01-19 19, 2015I recently found a sequ file already written/compiled for exporting a summary of comments <Create Comment Summary.sequ>...I have two questions…
1) Can I modify this sequ file to add additional fields <like “reply” or “status”...?
2) Is there a repository someplace of downloadable sequ fiiles…specifically a spell checker for PDF files…
THANKS!
Scott
Fabian Garcia
7, 2014-08-11 11, 2014Is there a way to automate “bulk adding” comments from one PDF to a folder with multiple PDF’s? Basically add the same comments from one file to many files in an automated way. Thanks
Marty
4, 2014-08-11 11, 2014Hi, I would like to know if adobe forms can generate macros? I have developed a form and would like each response to generate a specific sentence. Eg. If you click on a tick box which says Cat 2, a macro generates a sentence, such as “There is a category 2 cyclone”. I want all of the responses to generate similar sentences in a separate document which can then be e-mailed. Any idea’s? Thank you.
Thom Parker
8, 2014-07-31 31, 2014Pedro - Any kind of complex merging scheme has to be custom scripted. You could use an Action, but it is very difficult to control the order of how large groups of files are processed, so you would need a technique for keeping track of each file as it is loaded by Acrobat. A full answer to this question is outside the scope of this comment.
Pedro Barbosa
4, 2014-07-30 30, 2014I have a folder with files where each ID can be repeated. How can I merge by ID? Example: _1234XY.pdf, _1234XZ.pdf and _4321XY.pdf get to _1234.pdf and _4321.pdf where the first includes the first two pdf’s
Lori Kassuba
6, 2014-05-28 28, 2014Hi G. Perez,
The Standard version of Acrobat does not have the Action feature. You could do this with JavaScript. Here is a discussion on the topic:
http://answers.acrobatusers.com/Print-button-select-page-print-copies-print-javascript-q126346.aspx
Thanks,
Lori
G. Perez
2, 2014-05-28 28, 2014Hello,
i have Acrobat X Standard. Is there a way to create a macro that lets me print out a custom number of copies? Instead of going thru the steps of Print, Number of Copies, Ok, etc I would like to create a macro that prints X number with click of one button
G. Perez
Thom Parker
5, 2014-01-21 21, 2014Why yes, there is. There are a large variety of methods for automatically moving data from a form and into a DB. For example, there are services such as www.formrouter.com that will take care of it all for you. LiveCycle form have the ability to connect through ODBC (on the PC) directly into a DB. And there are many more custom solutions you can create that depend on the type of DB and the platform on which you are operating. In fact, if you do a bit of googling you may find some off the shelf solutions for specific types of DB.
The reason this is neither simple nor easy is that what you are really asking about here is managing a custom data workflow. It’s custom because of the front end, your custom form, which you created for your own purpose, and represents a custom data structure. It is very difficult to build out a generic data workflow that will work from form to DB (end to end) for every type of data structure and usage model (i.e. what’s in between the ends), which is why so much of this is custom. That said, the Adobe form handling service, FormsCentral, goes a long way towards this end.
Aileen
9, 2014-01-16 16, 2014Is there a way to automate exporting data from a form into a spreadsheet instead of clicking on forms, more form options, manage form data, merge data files into spreadsheet, add files and then export?
Lori Kassuba
2, 2014-01-13 13, 2014Hi John,
You can add an Action to the Quick Tools toolbar simply by dragging the Action from the Action Wizard panel to the toolbar “well”. This is area to the right of the gear icon in the toolbar in Acrobat X or XI.
Thanks,
Lori
John
3, 2014-01-08 08, 2014I want to add a specific action to the quick tools toolbar. How?
Lori Kassuba
2, 2013-04-03 03, 2013Hi Steve,
Since you have the Pro. version of Acrobat X, you could do this with an Action on a folder of individual PDFs. All you need to do is create a New Action and include the Insert page command step with your cover page and then Save the files. Here is a tutorial on how to create an Action in case you’re not familiar:
https://acrobatusers.com/tutorials/how-do-i-create-a-new-action
Thanks,
Lori
Steve
9, 2013-04-02 02, 2013Hi,
I am using Adobe X Pro, and would like to find out how, or if there is a way, to make multiple, two-sided pdf files. What I am doing is taking several documents, then adding a cover sheet to each individual document. How we do this now is we make copies of the original documents, place those copies in the raw paper feeder (upside down) then take the cover sheet and run it for however many copies we made of the documents we need. Make sense? Hope someone can help!
Lori Kassuba
2, 2013-03-11 11, 2013Hi Ryan,
Actions are used to automate specific features in Acrobat. They’re not designed to automate filling forms. You’ll need to use JavaScript in your form to do this.
Here is a tutorial to get you started:
https://acrobatusers.com/tutorials/conditional-execution
Thanks,
Lori
Ryan Schnurer
8, 2013-02-27 27, 2013Will this feature enable me to allow user choices? For example, can I write a yes/no question as an instruction step and based on the user’s input perform the next action or skip the next action?
David Beynon
2, 2013-01-21 21, 2013Hi
Could this capabilty be used to automatically repeat display of a pdf document? I am using a PC screen to show some images on automatic scrolling, but want the scrolling to start again once the last page is reached.
David
Hi David,
Actions are not designed to do this but if you have the PDF open in Full Screen mode, you can use the Full Screen preference (under Edit > Preferences > Full Screen) to Loop after last page to do this.
Thanks,
Lori
Thom Parker
10, 2012-09-04 04, 2012You have to be a bit more specific about what you mean by a “digital signature”. There are two kinds. First, there is a digital copy of your hand written signature, called a wet signature, and it is very popular right now. The “Sign Now” service applies wet signatures, but it is easy to do with an “Action”. The first part of the process is to create a wet signature stamp. Then use a script to apply the stamp to the PDF. Another method is to place a button on the PDF at the location you want the signature, and then import an image into the button. Ask on the regular forums for details.
The second type of “Digital Signature” is an encryption method called a digital ID. You apply a digital ID with a signature form field. The details of this are a bit complex. Again, please ask about the details on the regular forums.
rb macario
3, 2012-08-30 30, 2012Hello, i just want to ask on how to automate the putting of digital signature to a digital signature box using Action Wizard.
Comments for this tutorial are now closed.