The response box: Part 2 of 5 on popup windows
Learn how to use the Response Box to collect simple input from the user.
By Thom Parker – September 7, 2006


Scope: All Acrobat versions
Skill Level: Beginner and Intermediate
Prerequisites: Familiarity with the Acrobat JavaScript Console
This series of tips introduces the Acrobat JavaScript Popup Boxes. Acrobat has a variety of these popup boxes, or dialogs, for alerting the user to important information and to collect input from the user. In Part 2 of this series we explore the Response Box, which is used for collecting a simple input from the user. The Alert Box (covered in Part 1) and the Response box are the two most useful and easy to use popup dialogs.
All examples and more are demonstrated in the sample file below.
RespBoxExamples
Download [PDF, 27 KB]
The Response Box (Part 2 of 5)
The Response Box presents the user with a single text input box. Here’s a simple example you can run from the JavaScript Console. The result is shown in Figure 1.
var cRtn = app.response("Enter target email");
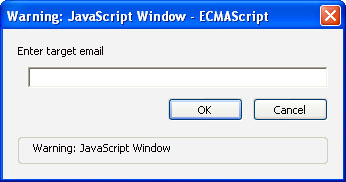
Figure 1 – Basic Response Box
The first argument to app.response() is the text displayed in the body of the Response Box. This is the standard input, but the Response Box can be called with no arguments at all since it always displays a text input box. The text entered in this box will be returned to the cRtn variable if the user presses the OK button to exit the dialog. If they press Cancel , cRtn will be null.
The Response Box shown in Figure 1 was created from code in a document button script. The window has warning messages on both the top and bottom. This is an Acrobat security measure meant to keep the user from being spoofed. That’s spoofed, as in fooling the user into doing something they shouldn’t, not spooked, which they will be when they see the warnings.
These warnings are displayed whenever the code is run from a suspicious context, like a script in a PDF. The only way to get this message to disappear is to run the code from a trusted context. There are two kinds of trusted contexts, privileged contexts and certified documents. Privileged context is a topic we won’t get into here, but basically it’s something that can only be done from Folder or Application Level scripts. Therefore, it is not suitable for generally distributed documents, but does work in a closed workflow (where IT has control over everyone’s system).
Certifying PDFs has a similar restriction. Documents are certified by selecting the File > Save as Certified Document menu item and then following the instructions. The certification process applies a digital signature to the PDF. When Acrobat loads a certified document it looks on the user’s system for the same digital signature used to certify the PDF. If it finds the signature, the document is verified and the warnings on the Response Box and other dialogs disappear. If it doesn’t find the signature, then the document is unverified and Acrobat displays the warning messages. The gist of this is, having the signature means that you trust documents coming from that source, which again means a closed system. A digital signature must be passed out to everyone you will be generating documents for.
The other input arguments to app.response() control how the Response Box looks and acts. Here is the full argument list (Table 1)
app.response(cQuestion,cTitle,cDefault,bPassword,cLabel);
Table 1 – Input Arguments for the app.response() function
| Argument | Description |
| cQuestion | Main Response Box text |
| cTitle | Window Title of Response Box |
| cDefault | Initial value of input text box, also value returned if no changes are made |
| bPassword | Causes text entered into input box to be obscured by asterisks (*) |
| cLabel | Short text string placed in front of input box |
If the cTitle argument is specified, the title text follows the warning text in the window title. The cDefault argument is the initial value of the Response Box. The text is displayed in the input text box and if the user presses the OK button without making any changes, this is the value returned by app.response(). The cLabel argument should be kept as short as possible, one or two words.
Here’s a Response Box that uses all the input arguments. It is part of a larger Folder Level script that adds a digital signature to the current document. Using a script for this task avoids all the standard dialogs, reducing the number of user clicks and keystrokes. The result is shown in Figure 2.
// Code for adding Signature field not shown
// In example document...
var cRtn = app.response ({ cQuestion:"Enter the password for your digital signature", cTitle:"Custom Digital Signature Script", bPassword:true, cDefault: global.cLastPswd, cLabel:"Password"});
if(cRtn && cRtn.length) {
    // Code for signing not shown
    // In exmaple document
} else app.alert("Signing Failed, User canceled operation");
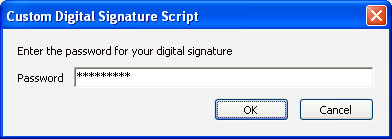
Figure 2 – Response Box using all input arguments
For quickly and easily acquiring a single text input from the user, there is no better solution than the Response Box. This dialog, together with the Alert Box satisfies the majority of cases where a popup dialog is needed i.e., error and warning messages, yes/no questions, and simple text input. However, there are situations and workflows where something more is needed.
The next two tips, Part 3 and Part 4, cover the two kinds of file browser dialogs. These are more than just dialogs, they provide just about the only file system access functionality in Acrobat JavaScript.
Part 5 is an introduction to Custom Dialogs. Acrobat’s custom dialog functionality allows for the creation of complex and dynamic input panels.
Related topics: |
JavaScript |
Top Searches: |
Edit PDF create PDF Action Wizard |
Try Acrobat DC
Get started >
Learn how to
edit PDF.
Ask the Community
Post, discuss and be part of the Acrobat community.
Join now >
0 comments
Comments for this tutorial are now closed.
Comments for this tutorial are now closed.