This tutorial shows you how to work with the features in Acrobat 9. See what the all-new Acrobat DC can do for you.
Download a free trial of the new Acrobat.
Scanning and OCR: Beyond the basics with Acrobat 9
Learn how to use advanced techniques to perform OCR and scan to PDF with Acrobat 9.


Scan to PDF and OCR seem like a straight-forward workflow and certainly can be. On the other hand, there are situations where a scanned document may be visually disappointing, and running the OCR process results in a confused and illegible clump of letters, symbols and strange character strings. In this article, I’ll show you the outcome of some experiments in digital capture and scan to PDF, as well as some scanning and OCR tips and techniques.
Not many people have the time to putter around with scan settings and images. You want the work done now, with perfect results. Fortunately, tinkering is what I do best, and this article takes puttering to a whole new level.
Although you’d normally use the scan optimization settings for generating a PDF file from a scanner, did you know you could use the settings for any image? Or how about a document where you want both perfect text and a perfect image without compromising either? You can do it. Have you ever considered scanning a negative or slide? Read on for some tips for that, too.
Note: For instruction and tips on how to perform a scan and choose filter and compression options, check out my January 2009 article, Troubleshoot Scanning and OCR.
Optimizing an image using scan settings
Whether you’ve got a TIF image you're converting to PDF, or a photo you’re scanning to PDF, you can work with the settings separately from the scan process.
To scan a document into Acrobat in its raw state, choose Create > PDF From Scanner > Custom Scan to open the dialog box. Click Options to open the Optimization Options dialog box, choose Lossless compression, and turn off the filters (Figure 1). Then proceed with your scan.

Figure 1: Deselect the scan correction settings.
Keep in mind that if you’ve got a 2x3-inch original image at 200dpi (like my sample files), you’re not going to have outstanding PDF results. You might want to try to improve the source image in Photoshop using filters such as Unsharp Mask, Despeckle, and so on, as well as correcting features like contrast and levels. Although some of the available optimization settings in Acrobat can perform corrections such as noise removal (Despeckle), the settings aren’t as customizable as those in an image editor like Photoshop.
Using the uncorrected images
The left column in Figure 2 show the before images of a scanned paper document. The scan source was a century-old brochure proving provenance for an antique piece, so it wasn’t in pristine condition. Contrast that with the column at the right, where the uncorrected scan was adjusted and corrected in Photoshop.

Figure 2: The century-old original.
First of all, let’s check out how Acrobat deals with the original images. As you’d expect, the quality of the OCR matches that of the images—it’s not very good! In Figure 3, you’ll see the captured text using the Searchable Image Exact capture settings.

Figure 3: The poor-quality image produces poor-quality capture.
Acrobat interpreted the content on Page 1, but on page 2, only the text above the cabinet image and the label below were captured (Figure 4).
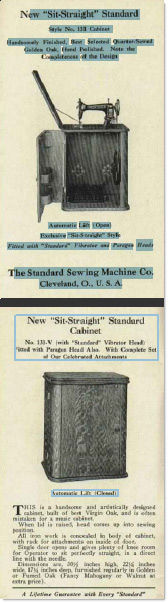
Figure 4: Composite image showing content captured from each page.
Using the Photoshop-corrected images
Now let’s see what happens when I capture the content from the copies of the image corrected in Photoshop (Figure 5). You’ll see most of the text has been captured (aside from the footer). However, the content on the page remains unusable.

Figure 5: Content captured from Photoshop-corrected pages.
Manually correcting the scan
For the final experiment, I’ll make changes to the images manually. Choose Document > Optimize Scanned PDF to open the dialog box. You’ll see the same list of filters as those offered when configuring the original scan (shown in Figure 1). The first step in optimizing involves defining the balance between file size and quality. Since my goal is to capture the maximum amount of detail, the slider is set at High Quality. Then, I chose options from the listed filters one by one, applied the setting and saved the file.

Figure 6: Sequentially apply and evaluate optimization settings.
Tip: Once you’ve applied an optimization setting, you can’t undo it. To preserve the sequence of corrections, save the file between each attempt so you can revert to the previous saved version if necessary.
After I ran the OCR and captured the text, the results were incomplete and the output garbled, as in previous attempts (Figure 7).

Figure 7: Manual optimization yields poor results.
The final solution
So what has my experimentation shown us? First, the best appearance came from working with the correction and adjustment tools in Photoshop. And second, regardless of the file’s manipulation, the Acrobat OCR process can’t capture the content in a meaningful and useful way.
Granted, my experiment was destined to fail, since it’s unlikely the OCR process can capture content from such small, indistinct text. If I needed to save the content to be used for indexing or searching, the solution is to correct the images in Photoshop and save as PDF for the best display of the pages themselves. Then I have choices (and more experimentation) for associating the text with the images.
Insert text into the tags
Open the file in Acrobat and run OCR. Then add tags. Open the Tags panel, and go through the tags typing in the Actual Text (Figure 8). Unfortunately, the results from this experiment were mixed, as sometimes locating a search time actually highlighted the word, while other times the entire tag’s area was highlighted.

Figure 8: Inserting actual text into the tags produces mixed results.
Recreate and insert a text layer
The only way to guarantee that you have the exact content of a document, as well as the best image of your file, is to recreate the content from the pages and insert it as a new layer. There’s no doubt it’s time consuming, but for special material, it’s worth the effort.
To start, rekey the text and save it as a PDF file. I used an InDesign file as the text source, with the page size and text location matching the layout of the document (Figure 9).

Figure 9: Reproduce the text content using the same configuration as the original image.
In Acrobat, open the Layers panel, and click Import as Layer to open the dialog box. Choose these settings:
- Click Browse to open a dialog to select the source file for the new layer.
- Type a name for the layer in the Import Options section of the page.
- Make adjustments to the position of the content if necessary—you can see the overlay in the Preview area (Figure 10).

Figure 10: Adjust the position of the new text layer.
- In the Appearance section, decrease opacity to 0%, and leave the new layer in front of the page.
- Click OK to close the dialog box and add the text layer.
It’s time to test the text. In the Find toolbar, type a word from the page. In the example, “completeness” shows a hit in the proper location on the page (Figure 11).

Figure 11: Adjust the position of the new text layer.
Notice the highlight location shows slightly off the visible characters, as the hidden text layer doesn’t use the same font as the original page.
My final topic for today doesn’t involve the same exhaustive experimentation. Instead, let’s take a look at scanning transparent documents.
Scanning transparencies
A flatbed scanner is designed for reflective source material, that is, a document that bounces light back to the scanner sensors. A basic scanner isn’t designed to scan transmissive objects, or those that allow light to pass through such as negatives or slides.
That doesn’t mean you can successfully scan a transparent source file, but you do have to make some adjustments.
Here are a few tips you can use to to improve the quality of a scanned transparency:
- Use the largest source item available, such as a slide rather than its negative
- Remove slides from their mounts
- Tape the source item to the scanner glass to prevent bends in the film that produce odd color or rainbow effects
- If you can, adjust the White Point and Black Point settings manually rather than letting the scanner use the border on the negative as a default Black Point
- Evaluate and test the Gamma settings for the scan
Tip: A high-end professional drum scanner uses a high-power lens mode to increase the resolution as well as brighter lamps for better scanning. If you want to scan transparent source material such as negatives or slides on a regular basis yourself, look for a slide scanner.
Products covered: |
Acrobat 9 |
Related topics: |
Scan and Optimize |
Top Searches: |
Create PDF convert scanned documents to PDFs get started with Acrobat DC |
Try Acrobat DC
Get started >
Learn how to
edit PDF.
Ask the Community
Post, discuss and be part of the Acrobat community.
Join now >
4 comments
Comments for this tutorial are now closed.
donna baker
5, 2012-09-11 11, 2012Hi Joseph -
Yes, you make a good point. Thanks.
donna.
Joseph Reinckens
6, 2012-09-10 10, 2012Regarding the “invisible text box” method, I found an easy way to find the box on the page. Because it is a comment, the full text WILL display if you List Comments. If you click on the comment in the list, the outline of the box on the page that contains it will be displayed.
donna baker
5, 2012-09-10 10, 2012Hi Joseph -
I suppose your technique would work, but I think it would take a lot more time than simply scanning/capturing a page and then setting a permissions password. It’s an interesting idea. Thanks for sharing!
donna.
Joseph Reinckens
2, 2012-09-09 09, 2012If all you need to do is make the image searchable and not have the text copyable there is a much easier way:
1) Create a text box with the searchable text. Begin the text with a space and a carriage return. In other words, the first line will be blank.
2) Right-click on the box and select Properties.
3) Change the box to no border and no background color. You can also reduce the width of the box.
4) Reduce the HEIGHT of the box. As it reduces, the text will disappear line by line. When the height is less than one line, only the FIRST line will display—which consists of an INVISIBLE space.
5) Move the invisible box near the text you want searchable.
CAUTION: If you have to create a lot of these boxes, DO NOT try to save time by setting default to no border AND no background color. You’ll wind up accidentally creating invisible boxes with no content and will have to randomly hunt through the page to find them.
Although you CAN put the box anywhere on the page, it’s best to put it near the text. If you have to change the text in the future, that will minimize hunting.
Comments for this tutorial are now closed.