This tutorial shows you how to work with the Create PDFs features in Acrobat 9. See what the all-new Acrobat DC can do for you.
Download a free trial of the new Acrobat.
Troubleshooting PDF-creation issues in Word with Acrobat 9
Learn how to use Acrobat 9 to produce predictable output when you convert Word to PDF.
In this tutorial, learn how to use Acrobat 9 to produce predictable output when you convert Word to PDF.
This article describes important issues and includes tricks you can try from that presentation. The list isn’t exhaustive, but may help pinpoint issues you're experiencing with your files.
Microsoft Word serves as the source program for more PDF files than any other software. In general, problems with PDF creation from Word stem from these sources:
- PDFMaker choices
- Bookmarks
- Links and hyperlink settings
- Document structure
PDFMaker issues
Although it seems simple to click the button, the PDFMaker macro is a complex structure, and is interconnected in your system in various ways. In Microsoft Word (Windows), for example, you'll find the Adobe Acrobat menu, configuration settings and toolbar, depending on the version of Word you're using. Whether you're working from Word, generating a file via Distiller or converting a file to PDF from within Acrobat 9, the same set of .joboptions files are used. The .joboptions files contain the conversion details and settings such as fonts, images and so on.
In individual programs, like Word, the PDFMaker uses those same settings files along with offering program-specific choices. Let's look at some of the Word PDFMaker choices that can trip you up on the Settings and Bookmarks tabs. In Word 2007, click Preferences on the Acrobat ribbon; in Word 2003, choose Adobe PDF > Change Conversion Settings to open the Acrobat PDFMaker dialog box.
General Settings
The Settings tab shows by default when you open the dialog box (Figure 1).

Figure 1: Pick general settings first.
The two items checked in the figure can cause PDF-creation issues:
- If you don't have a powerful system, don't select the option to open the PDF file automatically. As your system processes the Word document, it also tries to launch Acrobat 9, which can cause a system slowdown or even freeze. If you want to see the file immediately, open Acrobat 9 before starting the conversion.
- Don't convert the document information. Sometimes the problem lies in the structure of the file itself. Separating the content from the structure may allow for a complete PDF file.
Bookmark logic
Bookmarks are extremely useful navigational tools, but they can be as frustrating as they are useful. First, make sure you've selected the Create Bookmarks check box on the Settings tab of the Acrobat PDFMaker dialog box.
Watch the options you choose on the Bookmarks tab of the PDFMaker dialog box. If you've planned, you know which items on the document you want to use for bookmarks. Often you'll have default Word headings that you can use. You might also have custom styles with assigned heading levels, like the example shown in Figure 2. When a subset of one of the Bookmark options choices is active, you'll see the check box show a green background, rather than a solid check mark.

Figure 2: Select the elements to use for bookmarks.
Click the individual Bookmark boxes in the list to select and deselect elements. After conversion, you'll have a logical and useful list of bookmarks for navigating the document (Figure 3).

Figure 3: A useful set of bookmarks.
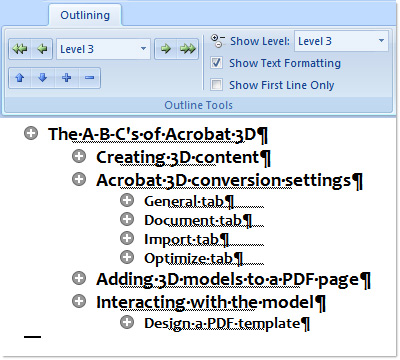
You can simulate the appearance of the Bookmark list using the Outline view in Word. As you see here, showing Level 3 elements in the Outlining ribbon yields the same list of headings as in the finished bookmarking example.

Figure 4: Preview bookmarks in the Outline view.
Linking success
Links and hyperlinks can be difficult to process, whether added to document content or as a table of contents. Here are a couple tips to consider when troubleshooting your document links:
- On the Acrobat PDFMaker Settings tab, select the options to add links and tag the file. Adding links is straightforward; tagging the file adds a structure that makes it simpler for Acrobat to understand and interpret when producing your document.
- On the Bookmarks tab of the PDFMaker, deselect the Convert Word Bookmarks option if selected. Word bookmarks are features in a long document structure, such as indexing, and the Hyperlink field information can interfere with your PDF output.
Build a Table of Contents
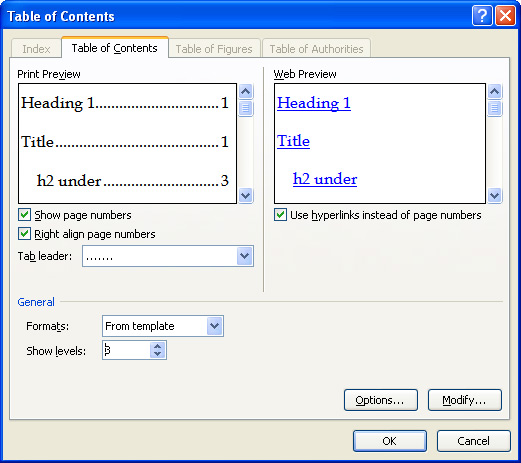
If you've had problems making your hyperlinked table of contents work properly in Acrobat, go back to the source and either replace or check the Table of Contents manually. From the References ribbon, click Table of Contents > Insert Table of Contents to open the dialog box (Figure 5). Make your choices, and be sure the Use Hyperlinks Instead of Page Numbers check box has been selected.

Figure 5: Check the hyperlink settings.
In the resulting Table of Contents, you can see how different the same item is addressed in the field code (Figure 6). The sample at the top simply identifies the page where the corresponding title is located, while the bottom table of contents identifies a page reference.

Figure 6: Use a hyperlink for identifying a location.
Tips for handling the document
Here are a few quick ways to fundamentally change the content of your Word document by manipulating its content or the code associated with it. Repairing the structure of the Word document or overwriting an erroneous file component may be all that's standing in the way of a properly exported PDF file.
- Rename the file: Resaving the file with another name overwrites data stored with interim saves that may be the source of the conversion problem.
- Move the content: Select the entire document -- except for the final ¶ (para tag) -- and paste to a new document. Word stores much of the file's data at the end of the document. Moving all the content to a new file retains your content, but places it within a new file structure.
- Rename your template: Normal.dot template file. Just like renaming a document file, renaming the template can overwrite any structural issues.
Note: In Office 2007, the file is named Normal.dotm if you use the macro-enabled document template format. - Save the file as XML: Saving the Word file as XML restructures the file. Then, resave the XML file as a Word document again. The Export > Resaveprocess reconstitutes the Word document with a new structure.
Some general fixes to try
You've tried all the tricks, and your file still doesn't look as you want. What's next? Well, there are a few general system issues you can check out that don't take much time or require a computer-science degree to accomplish.
Repair your Acrobat installation
Any time your program is misbehaving, consider repairing the installation. It’s quick, and takes care of quirky issues. Choose Help > Repair Acrobat Installation and let your system review and repair any issues in the program installation.
Delete Acrobat temporary files
You may find your program slows down when there are too many .tmp files on your system. You can make the deletions in Windows via the Start > Run dialog box. Rather than using a DOS command using the del acr*.tmp /s script, use your system utilities to clean up temporary files.
Check the log files
The Distiller log files capture problems and store them in a file on your system. Each file that throws an error records the information in the messages.log text file (Figure 7).

Figure 7: An annotated error message example.
Tip: Look for the messages.log file via this path: Documents and Settings / [username] / Application Data / Adobe / Acrobat / Distiller 9.
Identify conflicts on Mac
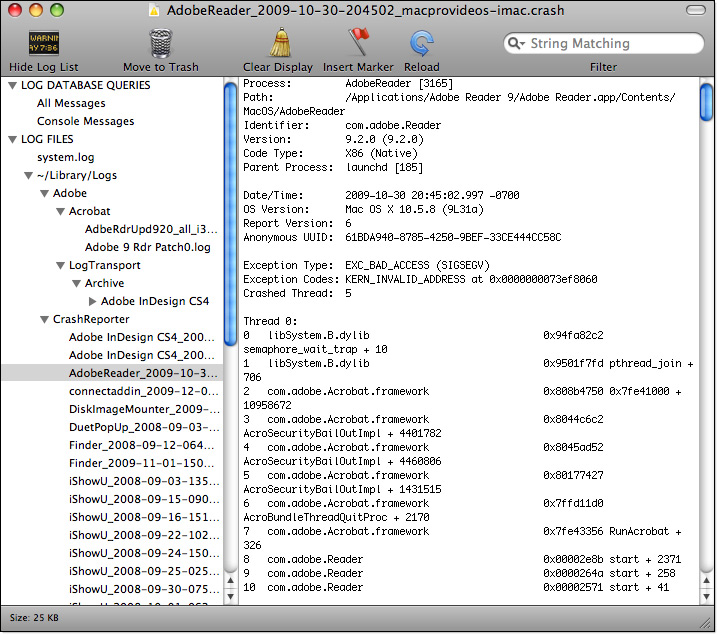
You may be facing an application conflict. On Mac, you can pinpoint issues in the Console utility. Open the Console, and click Show Log List. Scan the list in the left column and click your conversion or file issue. The report, shown in the right column, isn't for the faint of heart, but can help you identify problems (Figure 8).

Figure 8: Track down errors in the Console. - Click for larger image.
Try Acrobat DC
Get started >
Learn how to
edit PDF.
Ask the Community
Post, discuss and be part of the Acrobat community.
Join now >


0 comments
Comments for this tutorial are now closed.
Comments for this tutorial are now closed.