This tutorial shows you how to work with the Combine Files features in Acrobat 9. See what the all-new Acrobat DC can do for you.
Download a free trial of the new Acrobat.
Acrobat 9 in the Office
Learn how to use the customization and multimedia features that appear in PDFMakers, the menu items and toolbars.
Acrobat continues to offer new and interesting ways of incorporating features into PDFMakers, the menu items and toolbars installed into common Office products. Acrobat 9 is certainly no exception, and offers more customizations and multimedia features than ever. Check out what’s new.
If you have both Microsoft Office products and Acrobat (Standard or Professional) installed on the same Windows computer, Acrobat inserts commands on the Adobe PDF menu and the Acrobat PDF toolbar as part of the program’s installation process.
Note: Since many of the PDFMaker features can’t be programmed for use on Mac, the PDFMaker menu and toolbar is included only for Windows products in Acrobat 9. For Mac users, the Adobe PDF Printer is available, as is the built-in Apple Save as PDF feature.
PDFMaker basics
A PDFMaker is a clever bit of programming that allows you to specify conversion settings and other features from within an Office document prior to creating a PDF file. The PDFMaker offers the same conversion settings as those used for generating PDF output from Acrobat Distiller, Adobe PDF Printer, or from within Acrobat itself. Acrobat 9 PDFMaker technology works with Office XP, 2003 and 2007 (Windows).
Tip: If you use Office 2007, you’ll notice a decrease in the time Acrobat takes to process the file and generate your PDF output.
For those new to Acrobat and PDFMaker, here’s a quick rundown of the process and features:
1. Open the source file and prepare it for conversion. For example, you can convert comments from an Excel spreadsheet to display in the resulting PDF file—if you want to view the comments open in Acrobat or Adobe Reader, set their characteristics in Excel first and specify the settings in the Acrobat PDFMaker dialog box.
2. From the program menu, choose Adobe PDF > Change Conversion Settings to open the Acrobat PDFMaker dialog box. Choose settings for the conversion and resulting PDF file (Figure 1). All programs offer general and security settings. Any additional options depend on the program you are working in.
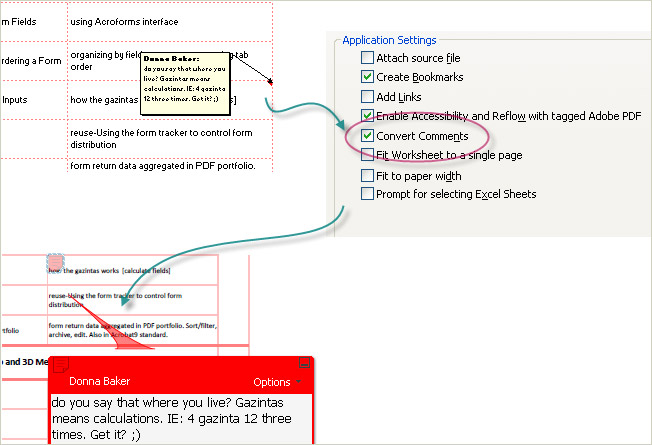
Figure 1: Choose program and PDFMaker settings for desired outcome.
3. From the program menu, choose Adobe PDF > Convert to Adobe PDF to process the file and create the PDF version. If you prefer, click Convert to Adobe PDF from the Acrobat PDF toolbar (Figure 2).

Figure 2: Use toolbar or menu commands for conversion
Note: For in-depth information and instruction on creating PDF files using PDFMaker, choosing settings, and other conversion issues, check out the tutorial, article, and forum sources available at acrobatusers.com.
Roundup of what’s new—and cool
Some of the new PDFMaker features are available throughout the Office suite PDFMaker products, while others are included in only certain products. Here’s a quick roundup of new PDFMaker features.
Specify the content to convert
All Office PDFMakers now offer an option to create a PDF from subsets of the file, as well as the entire document. Say you want feedback from a colleague on a particular image or paragraph in a Word document. Instead of sending the whole file, select the content on the page and then follow these steps:
- Choose Adobe PDF > Convert to Adobe PDF to open the Save PDF File As dialog box.
- Name the file, and click Options to display the dialog box shown in Figure 3. Conversion options include a selection (provided you have preselected content on the page), a page range or the entire document.
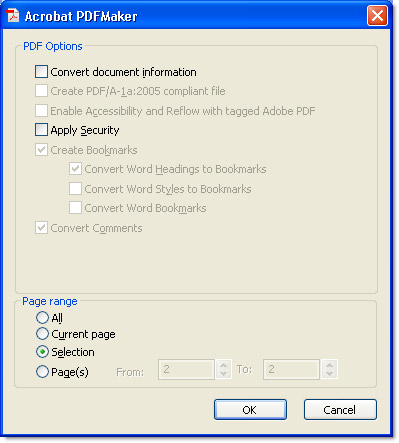
Figure 3: Make conversion selections before saving
- Choose the page features at the bottom of the dialog box. The options available depend on your choice. For example, choosing a Selection disables options like Bookmarks and producing a standards-compliant PDF file.
- Click OK to close the dialog box, then click Save to convert and save the PDF content.
In Excel, the options include a selection, one or more sheets, and the entire workbook (Figure 4). In order to access the options, first choose Adobe PDF > Change Conversion Settings and select the Prompt for selecting Excel Sheets on the Adobe PDFMaker dialog box.
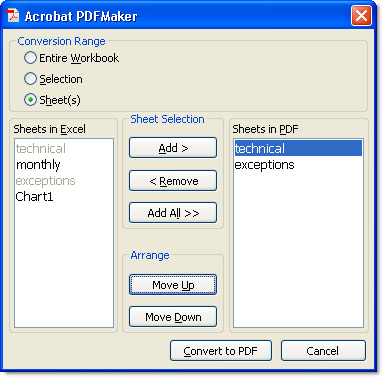
Figure 4: Specify and order content
Caution: PDFMaker can’t create a tagged PDF if there are print areas set in the worksheet.
In PowerPoint, follow the same process as for converting a Word selection, and choose the selected slides, a slide range or the entire presentation.
Add some excitement
Acrobat 9 Professional lets you embed video content in Word or PowerPoint documents, and converts them to FLV (Flash Video) format. Follow these steps:
- In the prepared Word or PowerPoint document, display the page on which you want the movie placed.
- Choose Adobe PDF > Embed Video and Convert to Flash Format, or click the Video to Flash button on the Acrobat PDFMaker toolbar to display the Insert Video dialog box (Figure 5).
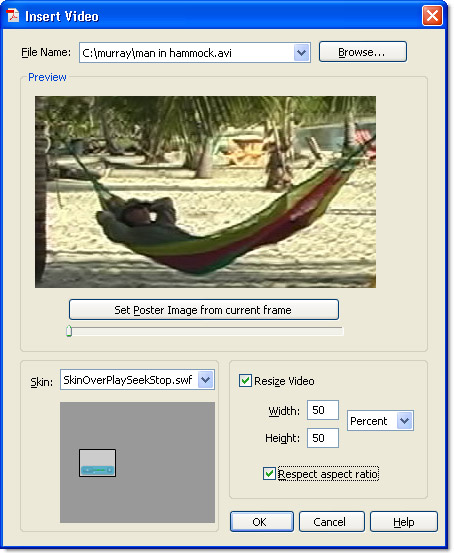
Figure 5: Select features for the embedded video
- Click Browse to locate and select the video for embedding. The file is loaded into the Preview area of the dialog box.
- To specify a poster frame (the still image shown on the page when the movie isn’t playing), drag the slider at the bottom of the preview area. Once you have the desired frame displayed, click Set Poster Image from Current Frame.
- Click the Skin drop-down arrow and choose an option from the list. In Figure 5, the skin displayed in the PDF version of the page will include play, seek and stop functions.
- If desired, to reset the size of the movie click Resize Video to activate the settings. Reset the width and height using either percentage or pixels.
- Click OK to close the dialog box and insert the video object on the page.
- Convert the file to PDF to view the page (Figure 6).

Figure 6: Select features for the embedded video
Download a PDF file containing the movie.
Download PDF file [PDF: 1.32 Mb]NOTE: Acrobat 9 or Reader 9 is required for viewing this file.
The view from all sides
If you work with Acrobat 9 Professional Extended, Acrobat installs 3D ActiveX controls in Word, Excel and PowerPoint that let you insert 3D files into Office documents. To use the feature, choose Adobe PDF > Insert Acrobat 3D Model to open the dialog box. Click Browse for Model to locate a 3D file stored in one of many major CAD formats; click Browse for Script to locate a JavaScript for the model if required.
If you convert your document with the embedded 3D model, the PDFMaker converts the document using your specified settings, and converts the model to 3D PDF (Figure 7).
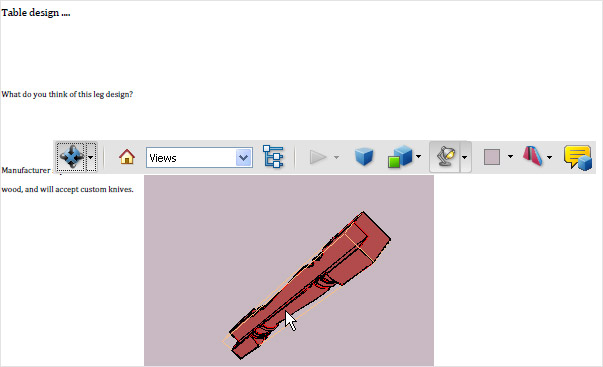
Figure 7: Models embedded in Office files are converted to 3D PDF
PDF from anywhere
In the past, you could create a PDF file from an image or content copied to the system clipboard from your open PDF files. With Acrobat 9 (Windows), you aren’t restricted to using content within Acrobat. Instead, copy any content to the clipboard—from an Illustrator drawing to a Photoshop layer or text from an InDesign layout—and create a new page in Acrobat automatically.
Suppose you are working on a letterhead design in InDesign, and decide to have a colleague check on the layout. Just select the objects on the page and copy them; then in Acrobat, choose Create > PDF from Clipboard to instantly generate a new PDF file (Figure 8).
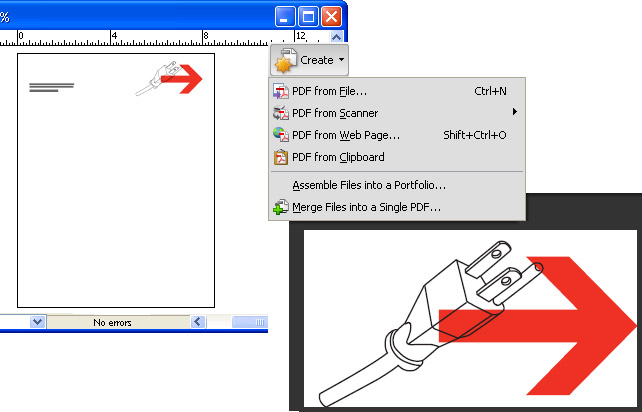
Figure 8: Produce a PDF file from clipboard content
Expand your Outlook
The Outlook PDFMaker offers a number of enhancements as well. One of the biggest is the ability to convert e-mail to PDF in the background so you can keep working. Other improvements include:
- Storing recent e-mail archives for fast retrieval
- Downloading images to include in the PDF files without displaying the images in Outlook
- Converting fields such as To and CC to PDF along with the content
- Generating e-mail addresses from mailto tags
- Using header information as metadata
Pick and choose in Internet Explorer
Acrobat has offered a PDFMaker for Internet Explorer for the last few versions of the software. In Acrobat 9, along with the previous functions that allowed you to convert a web page or portion of a page, preserve links, and so on, you can now select specific areas from a web page to include in a single PDF file.
Here’s an example: I want some input from a colleague on changing logo colors. I open Internet Explorer and the page displaying the images, click Select to activate the selection tool, and click to select the items for conversion on the page. The selections made, I choose an option from the Convert menu to generate the file, and it’s ready to go (Figure 9).
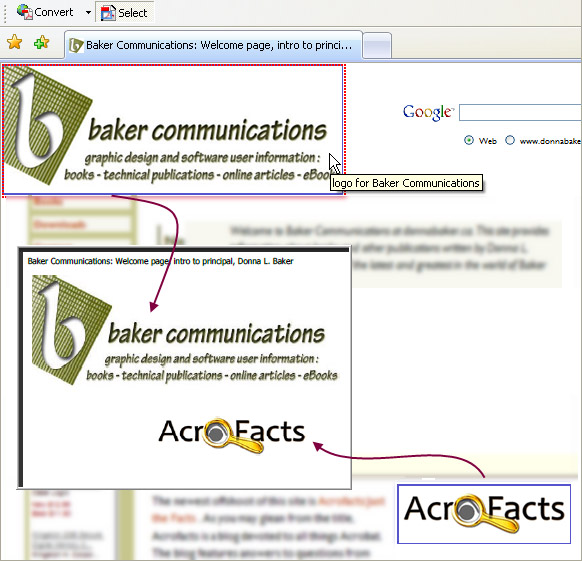
Figure 9: Combine selected content from a web page into a single PDF file.
Products covered: |
Acrobat 9 |
Related topics: |
Combine Files, Review and Comment |
Top Searches: |
Create PDF combine files into one PDF Rearrange PDF pagesStart a PDF review comment on your mobile device |
Try Acrobat DC
Get started >
Learn how to
edit PDF.
Ask the Community
Post, discuss and be part of the Acrobat community.
Join now >


0 comments
Comments for this tutorial are now closed.
Comments for this tutorial are now closed.