


Looking for more help on How to Edit PDF?
- Consult the How to Edit interactive guide.
- Ask a question in our forum.
- You can leave a comment below for the author of this tutorial.
This tutorial shows you how to work with the Edit PDFs features in Acrobat 9. See what the all-new Acrobat DC can do for you.
Download a free trial of the new Acrobat.
It’s Friday afternoon. You’re nearly ready to deliver a customer project. Then you get a call: Can you change the layout on a couple of pages, add some images -- and how about a background? To add to your misery, your graphic designer has left on vacation, and the idea of doing anything in Adobe InDesign sends shivers down your spine. Suddenly, it occurs to you: You can make the changes right in Acrobat 9!
I’m sure this scenario has happened in one form or another to many of us. Perhaps you are familiar with the source program, but don’t have access to the source file. You may have the source file, but have made other changes in the document that you don’t want to lose by revisiting the original file. Whatever the reason, Adobe Acrobat 9 offers plenty of tools and features that allow you to edit and modify your PDF document in short order.

How you approach making changes depends on the tasks you need to do. Like most activities, you can base your approach on different variables. In the sample project, you might like to work through the document using a specific tool (such as making the text changes using the TouchUp Text tool), or panel (such as making changes in the Pages panel). You may prefer to work from page to page instead for a more methodical approach. My personal preference is to start with macro changes, such as deleting or moving pages, working down to precise changes like rearranging words or changing fonts.
Note: I’m using a sample document derived from an InDesign template. The original and finished versions are available for your experimenting pleasure.
Download Original [PDF, 200kb]Download Finished [PDF, 540kb]
The current document layout consists of four pages, although one is destined for deletion (Figure 1). You’ll see callouts indicating the areas where changes are required.
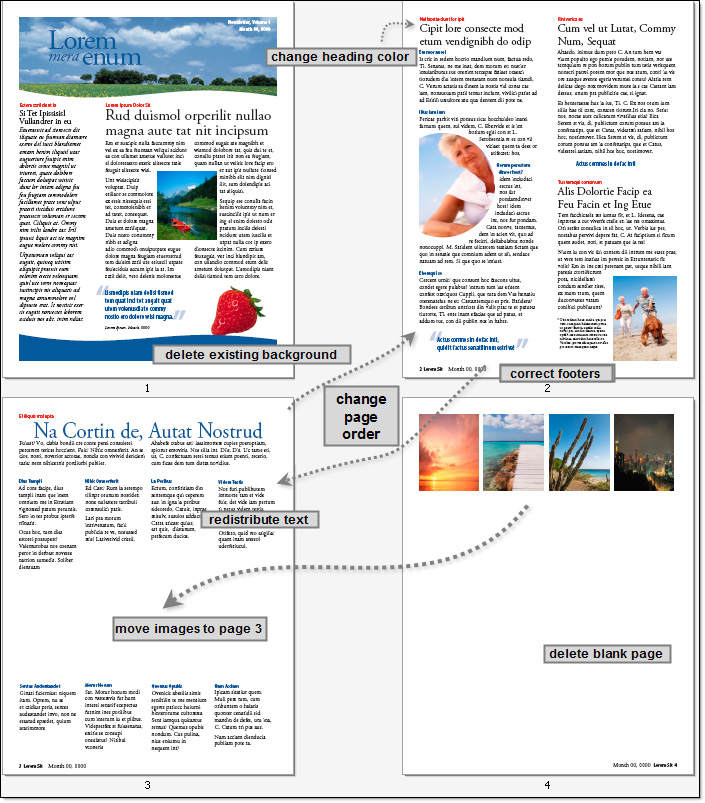
Figure 1: A planned approach saves time and effort.
As you see in Figure 1, there are a number of tasks involved. I’ll run through the process and decisions required to make the changes.
In the project, starting with major edits includes changing page order, moving images and deleting an extra page. Since the swapping and deleting can both take place in the Pages panel, the first thing to do is move the images from page 4 to the current page 3. To do that, click the TouchUp Object tool on the Advanced Editing toolbar, shown at the upper right in Figure 2. Select the images and copy/paste them to the receiving page. I’d do the page layout later.

Figure 2: Use the right tool and view for the job.
I’ve used some timesavers: If you look at Figure 2, notice that the Two-Up Continuous option is active on the Page Display Toolbar. That way, I can view all pages of my document at the same time as I make these larger changes. Also, the four images moved to page 3 show a marquee selection. By choosing all four images, I save several Copy/Paste steps.
Next, I’ll take care of the page issues using the Pages panel (Figure 3). Drag and drop to reorder pages, select a thumbnail and click the Trashcan icon to delete it (after confirmation).

Figure 3: Change the page order and number in the Pages panel.
Notice the oval callout and !! overlaying the page 3 thumbnail in Figure 3. Although I had moved the images from page 4 to page 3, you don’t see them as the thumbnails require redrawing. You’ll see the images move on the document pages, of course. To redraw the thumbnails, save, close and reopen the document.
Next up are the page-level modifications. In the project, I’d like to use the royal blue graphic at the bottom of page 1 as a vertical background for pages 2 and 3. Without the source file, I have Acrobat 9 options to use, including:
Which would you choose? Either works well, but I’m going to make a new PDF file and paste a copy of the graphic to the page for the simple reason that the new PDF document uses a standard page size, also used by my sample project. When I rotate the graphic on the new page, I don’t have to bother with any structural modifications to the page, and I’ll save time placing the background later.
To get the new PDF file for the project file’s background underway, select the graphic on page 1 using the TouchUp Object tool, and copy it. Then, follow these steps to build the new page:
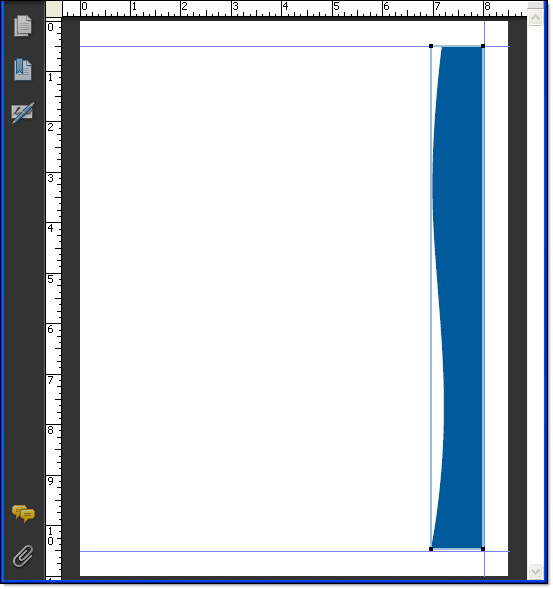
Figure 4: Create a new PDF document for the background.
Tip: You don’t have to worry about maintaining the graphic’s aspect ratio as you resize the object as Acrobat maintains the ratio by default.
With the background ready, it’s time to add it to the project.
Page 1 contains decorative header and footer elements, so it doesn’t need a background. Fortunately, Acrobat 9 allows you to apply backgrounds to select pages rather than the whole document. To configure and apply the graphic background to pages 2 and 3, choose Document > Background > Add/Replace to open the Add Background dialog box (Figure 5).
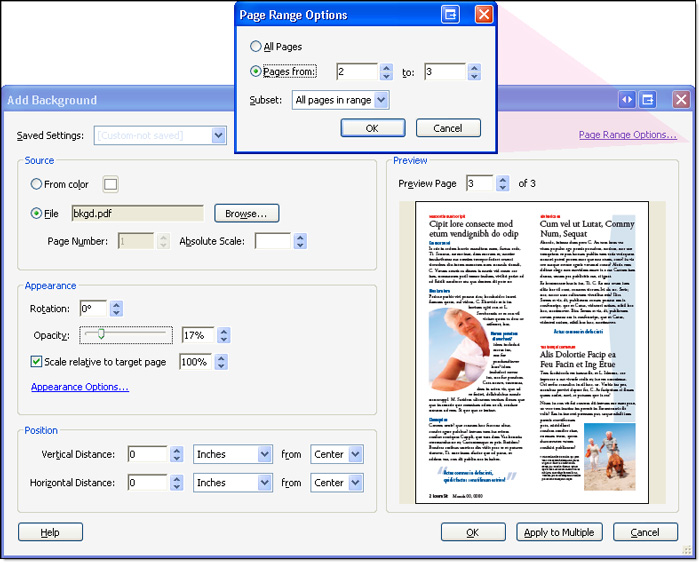
Figure 5: Apply a background object from a pre-configured PDF file.
Click Browse to locate and select the background PDF file. Once it’s added to the dialog box, there’s very little configuration to do, since it was done in the background PDF document itself. The graphic in the project’s background uses a low opacity (17 percent). To assign the pages to receive the background, click Page Range Options to open the dialog box, also shown in Figure 5. Select the pages and click OK to close the dialog box. Finally, click OK to close the Add Backgrounds dialog box (Figure 6).
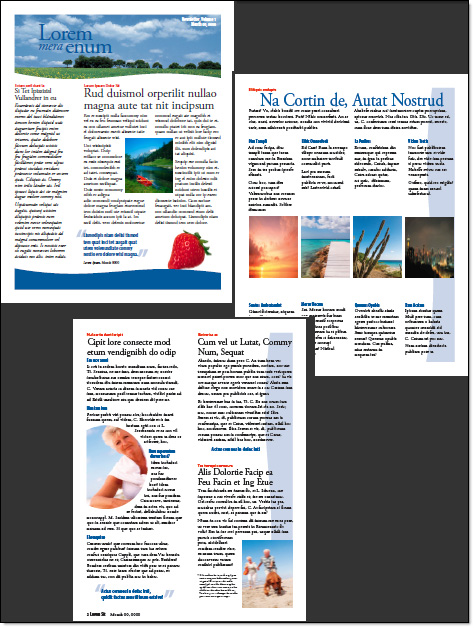
Figure 6: The new background displays on the appropriate pages.
Now for the detail work.
There are still several unfinished items in my project makeover. The layout on page 2 needs to be organized, and the headings’ text color changed. I’ll start with the headings.
I’m going to change the font and color of all the red headings. Unfortunately, there’s no simple way to select more than one block of text at a time, but it’s a quick job. To make the changes, follow these steps:

Figure 7: Change the titles’ appearance.
The footers at the bottom of each page are InDesign footers, and aren’t configurable in Acrobat. To change the page numbers manually, click into the footer object’s text with the TouchUp Text tool, drag to select the number and type a replacement page number. The replacement text automatically uses the font and appearance used by the original text.
The final task involves adjusting the content on page 2. Choose View > Grid to display the grid overlay on the page to help placing objects. Try working with the View > Snap to Grid command toggled on and off.
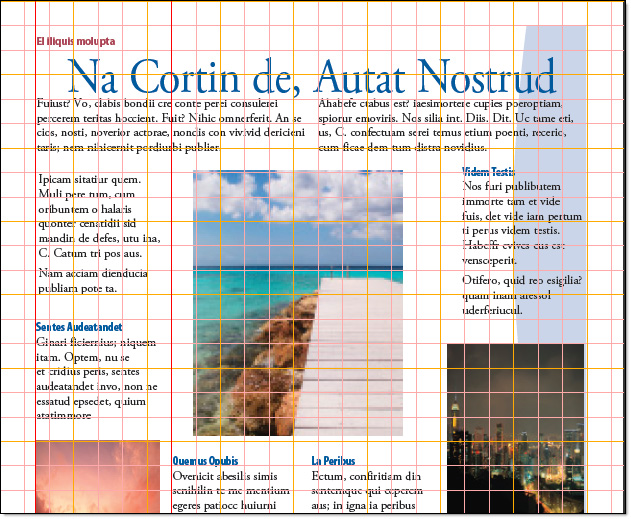
Figure 8: Use the grid for adjusting object layouts.
Here’s one final tip for today: Learn to finesse your object selections on the page. There’s nothing more frustrating than trying to select a certain amount of text, and getting the background and other images along with the selection. Instead, try my method, shown in Figure 9. As you see at the left, click and drag with the TouchUp Object tool in an area that’s free of other items, and only drag to hit the items. When you release the mouse, you’ll have all the objects you want selected, and none of the extra items.

Figure 9: Identify the lines you want to select (left) to include them in the final selection (right).
Products covered: |
Acrobat 9 |
Related topics: |
Edit PDFs |
Top Searches: |
Edit PDF files convert PDF to Word convert PDF to Excel convert PDF to PowerPoint Rearrange PDF pages Convert PDF to JPEG |
Try Acrobat DC
Get started >
Learn how to
edit PDF.
Post, discuss and be part of the Acrobat community.
Join now >
2 comments
Comments for this tutorial are now closed.
donna baker
6, 2013-07-15 15, 2013Hi Jethro -
Unfortunately there isn’t a way to center paragraphs in Acrobat 9. Acrobat XI includes a new text editing mode where you can reset the paragraph justifications.
donna.
Jethro Tull
10, 2013-06-26 26, 2013Neither Acrobat 9, nor this great help tutorial, provide options for changing the attributes of the text in a line or paragraph - such as align left, align center, align right or justify.
HELP please!
Thanks you.
Comments for this tutorial are now closed.