This tutorial shows you how to work with the Accessibility features in Acrobat X. See what the all-new Acrobat DC can do for you.
Download a free trial of the new Acrobat.
Acrobat X accessibility - Beyond the obvious
Take a look at accessibility requirements for common page elements you might not consider.


You know your PDF files need to be accessible to make sure all your readers can view your content and comply with various requirements. But what if you want to make an existing file accessible and don't have the original document?
Acrobat has included accessibility features for many years. In Acrobat X, you can add tags, and review the status of a document using either brief or extensive checking tools. In this article, I'll take you on a tour of some common accessibility features. Then I'll go beyond the basics to look at accessibility requirements for common page elements you might not consider—accessible comments, form fields and more.
Note:
Acrobat X Standard offers a subset of the tools and features required for editing a document for accessibility. To edit tags or reading order, for example, you need to use Acrobat X Pro.
Where to Start
Keep in mind the principle reason for making a file accessible. Imagine how a page would read, and not how it looks. A screen-reader device identifies the content based on the tag structure, and then, its content. For example, the heading at the top of a page may read as “Heading 1,” followed by the text content for that tag.
Simply because you specify tagging a file when you export it from your source program, doesn't mean it's fully accessible. If your document is part of a review, or you add form fields in Acrobat X, there's even more need to check the file before distributing it.
In Figure 1, you can see the dramatic difference between the pre-tagged source file (top) and the version tagged in Acrobat X (bottom). Each version shows a highlighted tag, also identified in the Tags panel.
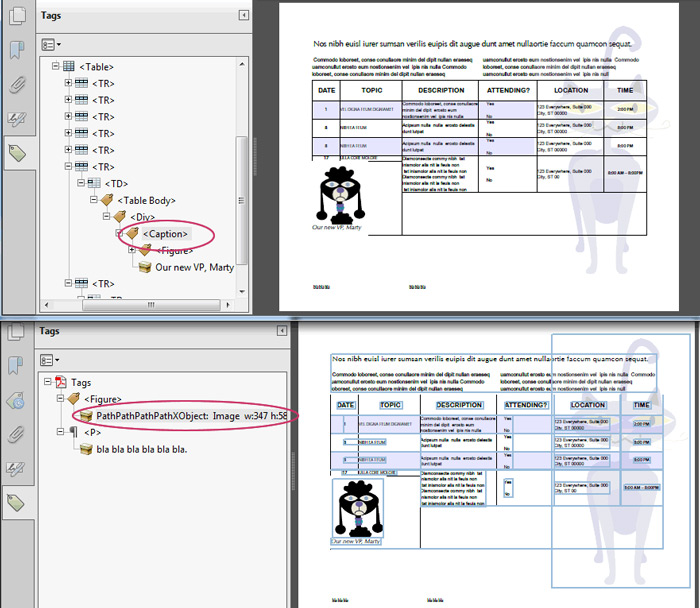
Figure 4: Reading order defined by the default document tagging.
Note:
To tag the document, click Tools to open the panels. Click the Tools drop-down menu and choose Accessibility to open the set of tools. Click Add Tags to Document.
In the document tagged in Acrobat X, a screen reader would read all the content on the page as a single <Figure> tag, since the heading, text in columns and all the content in the table appears within that <Figure> tag. The footer would read as a separate <P> or paragraph tag.
The general rule of thumb is to add tags in the source program. The fault (if you can assign fault in this case) isn't an issue with Acrobat X. Instead, it's based on how the source program structured the page, and how those structures translate as elements Acrobat X can define.
You could attempt to correct the tags, if you have a few hours to spare. Instead, I'm going to use the tagged version, and make some changes. Once opened in Acrobat X, I added comments and a button hyperlink (Figure 2).
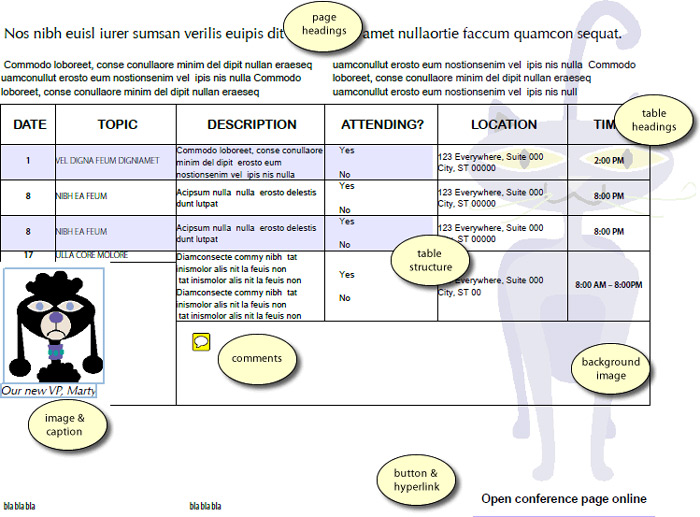
Figure 2: Original tagged file with added content
There are a few “problem” areas that need consideration, shown in Figure 2. These include:
- Evaluating the tag structure
- Ensuring the reading order flows through the content properly
- Defining the background image
- Including the comments as tagged items
- Configuring the image and caption group
Run the Accessibility Check tools
Acrobat X includes tools for evaluating the tags in a document. You can use the Quick Check and the Advanced Check tools, both in the Accessibility tools panel. For my document, running the Quick Check revealed no problems—which is the result I expected. However, running the Advanced Check process using all the checking options tells a different story (Figure 3).
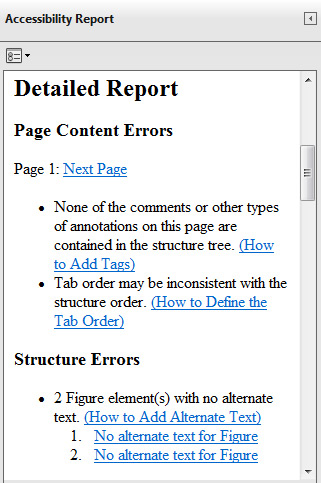
Figure 3: The Advanced Check results
The check didn't find any issues with the table or image / caption structure. However, neither image has alternate text tags, nor are comments included within the page's structure. The report also cautions to check for issues with the tab and structure orders.
At this point, you could make the corrections using the Hints generated as part of the report and save the file. I'll address the issues using a different workflow.
Check the Reading Order
Before I dig into my list of changes, I want to check the current status of other components of the document. As the Advanced Check results indicated, I need to look at the Reading Order. Right-click on the Navigation Pane button area to display the list of options, and click Order to open the panel. Acrobat X draws the reading order items on the document page. Four items exist so far, not including the footer, comments or link button (Figure 4).
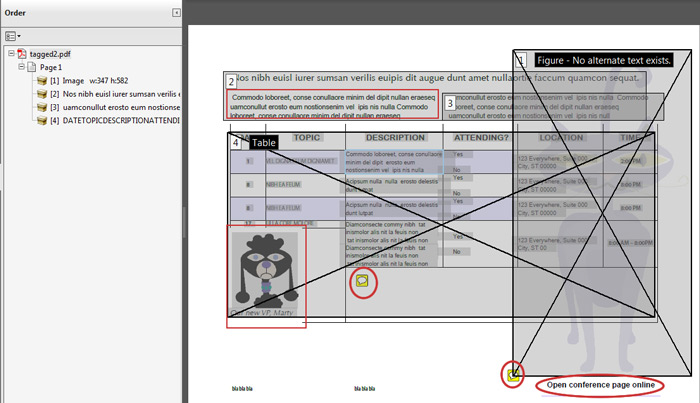
Figure 4: The Reading Order shows four blocks.
Along with the missing items, I want to manage both images and the text at the top differently. Now I've seen the basic reading order, I'm going back to the Tags panel to make some changes.
Find and tag elements
From the Tags panel, click the drop-down menu, and choose Find Element to open the dialog box shown in Figure 5. You can make many types of element changes in the document from this simple dialog box.
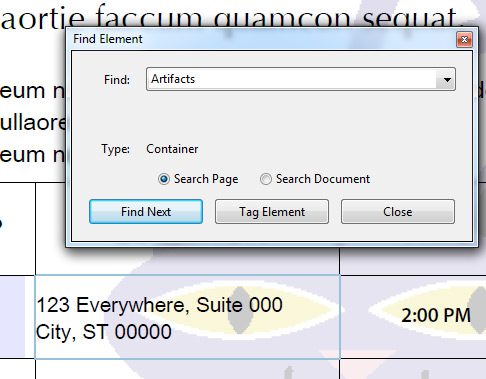
Figure 5: Identify and modify elements
The figure shows a selected artifact identified with a pale-blue highlight. An artifact is a page element that isn't read by a screen reader. In this case, the frame surrounding a cell. Table borders are important visual elements when you're reading a table, but aren't necessary for screen readers to identify orally. Scanning the page shows the table's structure composed of artifacts, which is what I want.
Tip:
Here's another way to look at artifacts. If you select Unmarked Content from the Find drop-down list on the Find Element dialog box, you'll see each cell's borders selected again.
Acrobat X can handle comments automatically, if you specify that option before adding any comments to the file. Click the Tags panel's menu and choose Tag Annotations. From that point, any new comments (or fields) display tags automatically. If not, then you need to tag them manually.
To tag a comment, click the Find drop-down list, choose Unmarked Comments, and click Next. The first comment on the page shows a highlight (Figure 6).
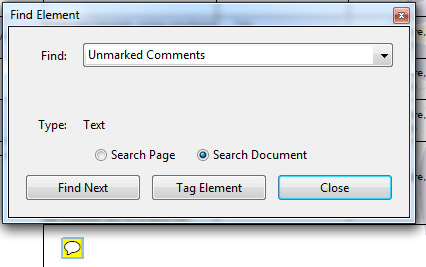
Figure 6: Locate the first comment
Click Tag Element to display the New Tag dialog box. Choose a type from the drop-down list (a comment is a type of annotation). Type a title for the comment and click OK to close the dialog box and return to the Find Element dialog box. Repeat for the second comment (comment02 in the sample document).
In the Tags panel, each comment shows as an object within an Annotation container (Figure 7).
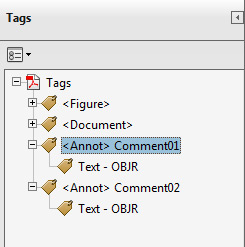
Figure 7: Comments added to the Tags panel
The button at the bottom right needs tagging. Select the object using the Select Object tool ![]() in the Content section of the Tools panel, and click the button object on the page. Choose Add Link from the Tag panel's drop-down menu, and configure the options (Figure 8).
in the Content section of the Tools panel, and click the button object on the page. Choose Add Link from the Tag panel's drop-down menu, and configure the options (Figure 8).

Figure 8: Include the button link in the tagged content
Image tag variations
There are two images on the page, tagged by default. The images use different structures, based on how I defined them in the source file. In Figure 4, notice that the purple cat shows as #1 in the Reading Order, and needs alternate text. I used that image as a watermark, and can do the same in Acrobat X by changing its tag to <artifact>.
Note:
Alternatively, I could add alternate text, and leave it as a proper <image> tag, or select it in the Order panel and define it as background.
Use the Edit Object tool in the Content section of the Tools panel, and click the image on the page to select it. Right-click to open the shortcut menu, and click Create Artifact. In the Create Artifact dialog box, make any changes necessary (I'm leaving the default options) and click OK (Figure 9).

Figure 9: Convert the watermark image to an artifact.
The image of Marty contained within the table uses appropriate tag structures in that the object uses a <Caption> tag containing a <Figure> tag, and the text (Figure 10).
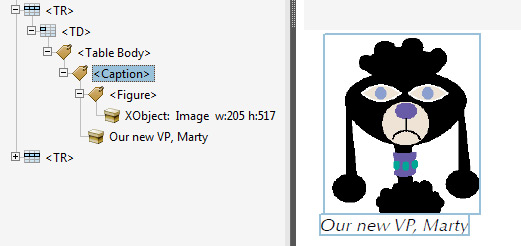
Figure 10: Image of mean Marty and text within a <Caption> tag.
Structurally, there isn't anything wrong with leaving the content as is. However, a screen reader will describe the image before the rest of the table. For clarity, I've moved the caption tag outside the parent <Table> structure in the Tags panel (Figure 11). I've reorganized the tag's location, which has no effect on how the table looks on the page. To comply with accessibility requirements, open the Properties for the image and add alternate text.

Figure 11: The <Caption> tag moved outside the <Table> structure.
Final page order
Now it's back to the Order panel for some last corrections. Figure 12 shows the current status of the Reading Order, and the Order panel. If you contrast this version of the document with that shown in Figure 5, you can track the changes I've made in the document.
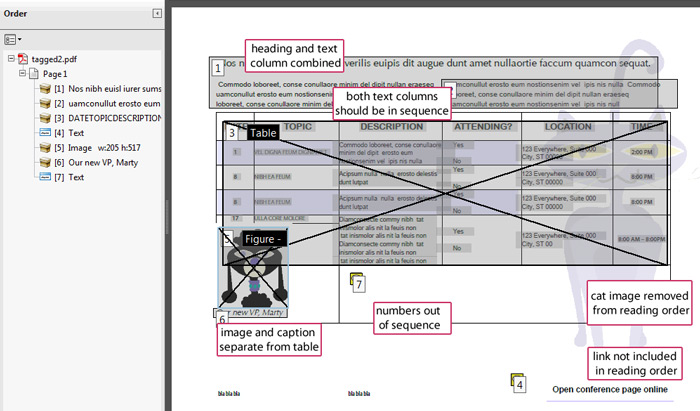
Figure 12: The Reading Order reflects changes made to tags and contents.
To finish the page, click the drop-down menu on the Order panel and click Show Reading Order Panel. Here are some tips for finalizing the reading order (Figure 13):
- Select existing boxes from the list in the Order panel.
- You can work through the panel to draw more boxes on the page.
- Don't be afraid to delete existing boxes and add new ones.
- Define the type of content for new items on the page as you add them.
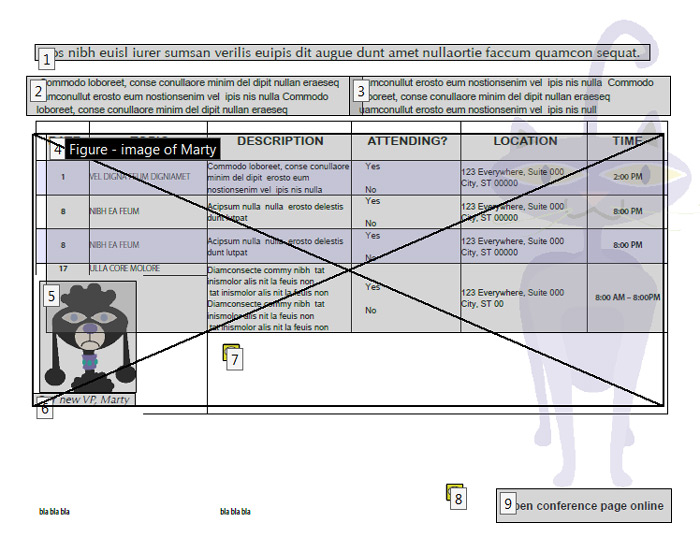
Figure 13: The final document showing proper reading order.
Products covered: |
Acrobat X |
Related topics: |
Accessibility |
Top Searches: |
PDF accessibility convert PDF to Word create PDF |
Try Acrobat DC
Get started >
Learn how to
edit PDF.
Ask the Community
Post, discuss and be part of the Acrobat community.
Join now >
0 comments
Comments for this tutorial are now closed.
Comments for this tutorial are now closed.