Using Bookmarks for Navigating Documents
In my first tutorial, I talked about customizing your Acrobat workspace by adding menu commands. To follow along in our journey through PDF interactivity, let’s leave the UI and look at some tips for easily creating bookmarks to navigate collections of PDF documents.
If you work with large files of several hundred, several thousand or more pages—or many separate PDF documents—that you want to distribute on a CD-ROM, you can easily create navigation links to a collection of files using bookmarks. If set up properly, the end user won’t know the difference between navigating separate documents versus navigating a single document.
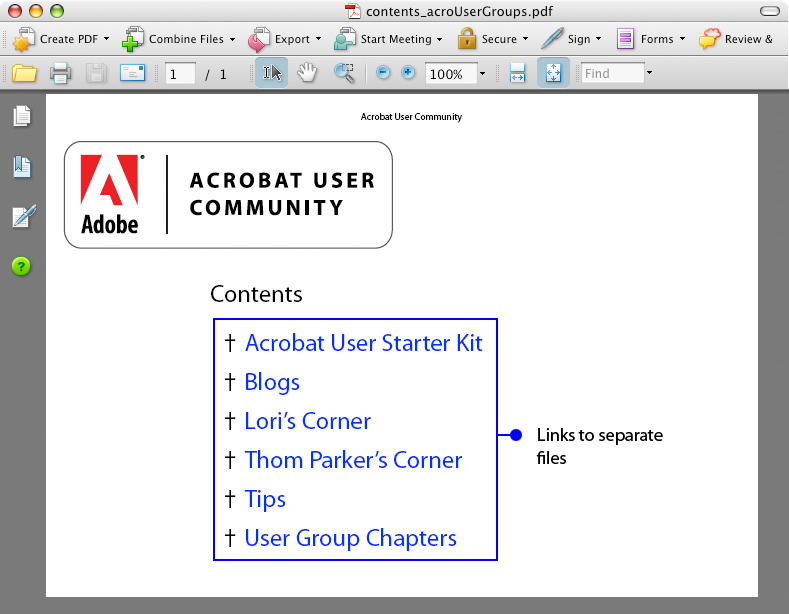
To make this a little clearer, take a look at Figure 1. I start with a single-page PDF file that looks like a table of contents. Each of the items is a link to a separate file.

Figure 1
See larger image
If I click a link from the contents page and view a linked file in Acrobat, I need a way to get back to my contents. Additionally, if I view one linked document, then want to jump to another linked document while bypassing the contents, I need to have interactive links in each of my PDF files.
I could use buttons on each page, but with PDF documents that have many pages, the overhead added with form fields or links would increase the file sizes enormously and slow down the user's page navigation—not to mention all the work required to create buttons/links on every page. A better alternative is to have a set of bookmarks in each PDF file where the bookmark is visible on all pages and linked to all files in your collection.
As you can see in Figure 1, I have a list of six items in my table of contents. Each of the six TOC items is linked to a separate file. For a table of contents having a single page, I don’t need to do anything more than create buttons or links on the page to the six separate files. In other words, no bookmarks are needed in this file.
I’ll create the links by drawing buttons or links around each line of text and use the Open a File action type. After creating links to the other files, I’ll click a link to open a secondary file. I’ll use the Blogs link as an example. When I click the button (or link) for Blogs on the Contents page, the Blogs file opens.
Creating the first bookmark
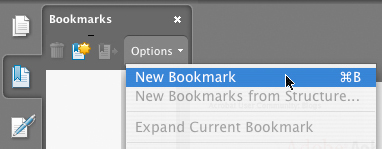
My first step is to create a bookmark that will open one of the documents in my collection. I click the Bookmarks panel icon to open the panel and click Options to open the drop-down menu. From the menu commands, I select New Bookmark as shown in Figure 2. Alternately, you can use Ctrl/Command + B.

Figure 2
The bookmark is created and the Untitled text is highlighted in the Bookmarks panel. Type a name for your bookmark and the new name replaces the highlighted Untitled text. In this example, I type contents. I’ll create this bookmark so the user can easily return to the contents file.
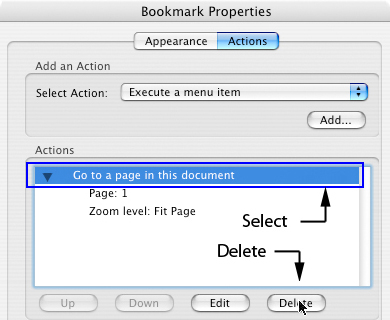
Press Enter /Return after typing a name for the bookmark and right-click (Windows) or Control-click (Macintosh) to open a context menu. From the menu options, select Properties to open the Bookmark Properties dialog box, then click the Actions tab. By default, the bookmark you created captured the page view as the link destination. Click the first line of text in the Actions area and click the Delete button to remove the action (see Figure 3).

Figure 3
Set the action
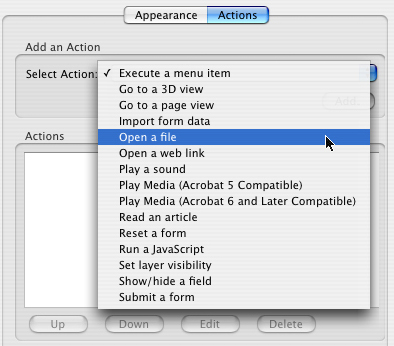
From the Select Action pull-down menu, choose Open a File (Figure 4). Click the Add button in the Actions tab and the Select File to Open dialog box opens. Choose the file you want to open from the bookmark, then click the Select button.

Figure 4
Set window preferences
After clicking the Select button, the Specify Open Preferences dialog box opens. Now you need to make an important decision. If you click New Window, the linked file opens in a new window while your host document (in this case the Blogs PDF) remains open. To simplify the user navigation and keep the user’s screen free of multiple open PDFs, use the Existing Window option (see Figure 5). Choosing this option means that as a user clicks a bookmark, the current file closes as a new file opens, thereby appearing as though the user is working with a single document.

Figure 5
Click OK in the Specify Open Preference dialog box to return to the Actions tab in the Bookmark Properties. Click OK in the Button Properties and your first bookmark is completed.
Repeat all the steps to create additional bookmarks that open other documents. Also, add a bookmark to open the current file you’re working on. In my case, I also create a bookmark to open the Blogs PDF even though that’s the file I have open in the Document pane. After all bookmarks are created with the Open a File actions assigned, my Bookmarks panel appears as shown in Figure 6.

Figure 6
Create a template file
Select File > Save As and save this file with a new name. Name the file template.pdf to avoid confusion with your other files. Delete the bookmark for the current open document. In my example, I delete the Blogs bookmark. Select File > Save As and save the file using the exact same name as the file you opened. In my example, I save it as Blogs.pdf. Close the file after saving and your first file is completed.
Use the File menu and from the recently opened files list and open the template.pdf document. Open the Pages panel and select all page thumbnails but the first page. Open a context menu and select Delete Pages. Alternately, you can select Document > Delete Pages and select the page range from page 2 through the last page in the document.
After deleting all but the first page, save the file again. This file is still titled template.pdf.
Copying bookmarks
There are some Acrobat plug-ins available that permit you to copy/paste bookmarks, combine and split files by bookmarks, and other types of editing available for bookmarks. Unfortunately, Acrobat 8 hasn’t given us much improvement with bookmark management. If you work regularly on files needing the editing described here, you might want to check out some vendors selling third-party plug-ins designed for managing bookmarks.
Assuming you need to perform these steps infrequently, we’ll stick to Acrobat and use a workaround for copying and pasting bookmarks.
With the template file open, select Document > Insert Pages. In the Insert Pages dialog box, select another file in your collection and insert the pages after the first page. Open the Pages panel and delete the first page in the document. Since you’re inserting pages in the template file containing the bookmarks you created, the bookmarks are still present after inserting new pages.
Open the Bookmarks panel and delete the bookmark for the current open file. Select File > Save As and save your file using the same name as used for the file you inserted in the template file.
Close the document, reopen the template file, and perform the same steps on the remaining files.
The most time-consuming part of the steps outlined here is setting up the original bookmarks. After that, following the rest of the steps makes the job a snap.
Read more Acrobat 8 tips from Ted Padova in the "Adobe Acrobat 8 PDF Bible," available from Amazon.
Try Acrobat DC
Get started >
Learn how to
edit PDF.
Ask the Community
Post, discuss and be part of the Acrobat community.
Join now >

0 comments
Comments for this tutorial are now closed.
Comments for this tutorial are now closed.