This tutorial shows you how to work with the PDF Forms features in Acrobat X. See what the all-new Acrobat DC can do for you.
Download a free trial of the new Acrobat.
Checking out your new form in Acrobat X
Learn what form features you should check out after creating a fillable PDF form.


You’ve tested out the automatic PDF form creation tool in Acrobat X. In a blink of an eye, you’ve got the basics for a great form. Then what? Before you e-mail that form, or plan a distribution, there are some features you need to check out.
It’s surprising how well Acrobat X analyzes a document and pulls out form fields. Of course, there are bound to be some issues. Whether it’s form fields that aren’t properly named, an incorrect type of field, or a disjointed tabbing order, you need to take some time to polish the form.
By the way—the example forms I’ve used in this article have undergone rigorous development to make them as unusable as possible. Using a standard form appearance on a fairly simple page layout and background produces far more accurate results.
Checking out the initial form
The accuracy of your initial form layout depends on the quality of the source file. I don’t mean quality in terms of its content or value, but quality in terms of making the content easily understood by the Acrobat X field-recognition process. Here are two versions of a form created in InDesign. Neither of them captures fields flawlessly in Acrobat X (Figure 1).
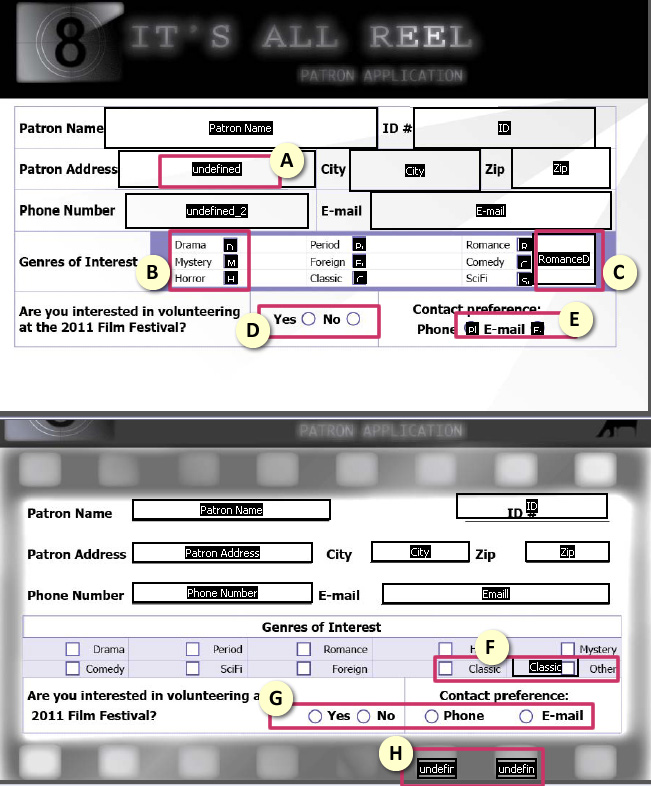
Figure 1: Acrobat X captures some form fields.
To orient you to the examples, Figure 1 shows callouts corresponding to the following descriptions:
- Some fields aren’t named correctly. In the example, the Patron Address field shows a label of undefined.
- All nine check boxes are identified as discrete objects, but could use a common naming structure to keep track.
- An extra text frame shows up, given the name of one of the existing check box fields.
- Some fields are missed, such as these Yes/No radio button fields.
- Captured radio buttons may not be identified as part of a group.
- Acrobat X may identify a field associated with the wrong text.
- Regardless of the page layout, fields may be missed. Although the two versions of the form use different layouts to capture information about volunteering and contact preferences, neither version captures correctly.
- Extra fields may occasionally appear that aren’t intended to be form fields. In the samples, some of the background images have been identified as text fields.
I’ll go through the first form example, and point out some ways to make corrections as I run through my regular workflow.
Text fields and field names
Acrobat X does a good job of naming a field, particularly text fields. It’s important to plan ahead, however, as you may or may not want to use the default field names to store the information.
Naming and placing text fields
To take care of naming issues, be sure to include these steps:
- Delete extra fields
- Check names given to existing fields, and make changes as necessary. In the sample form, fields named Undefined aren’t of much value in understanding collected form data.
- Add new text fields as necessary.
If you’re simply working with the fields’ names, use the Fields panel to save time and mouse clicks (Figure 2). Click the field’s name in the list to activate the text and change it. If you select the field on the Document window, you’ll open the Text Field Properties dialog box.
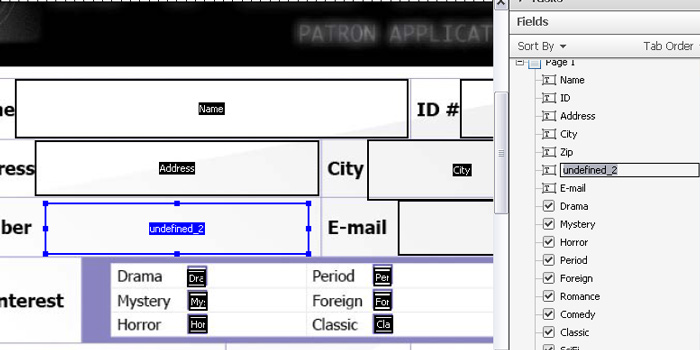
Figure 2: Rename fields in the Fields panel.
Previewing the fields
Time for the first preview: Once the fields are named and added, a preview shows you if you’ve missed any fields, whether the field sizes are appropriate and correctly placed, and so on.
Click Preview on the toolbar to switch the view. As you see in Figure 3, the text fields are correctly positioned, but oversized, and the text entry doesn’t line up with the fields’ names.
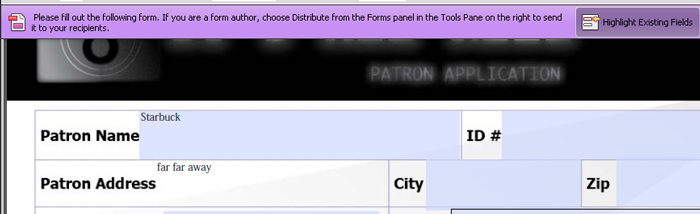
Figure 3: Previewing shows text field issues.
Modifying text fields
Click Edit on the toolbar to return to the editing mode. Here are a few tips to take care of editing the fields:
- Don’t delete any sample text you typed in the Preview. You can see it when you return to Edit mode, and that helps with other changes.
- Shift/Click to select multiple fields in the Fields list in the panel, rather than selecting them on the page to save time.
- Work in batches when you can. For example, I want all fields to be smaller vertically. Rather than changing them individually, change one field to the proper dimensions. Select the other fields to change, then right-click over the modified field to open the shortcut menu. Choose Set Fields to Same Size > Height to resize the fields (Figure 4).
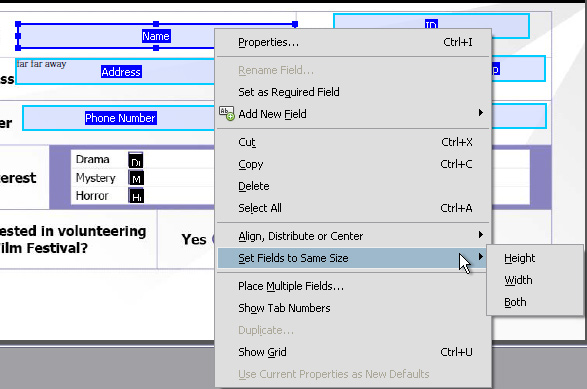
Figure 4: Resize the set of fields.
Tip: Be sure to right-click over the modified field. Acrobat X uses that field as the example for the new dimensions.
Adjust the positions of the fields as necessary. Take advantage of the tools you find on the shortcut menu. For example, click Show Grids to display a grid overlay, handy for moving fields into position. Also, use the Align and Distribute options to space fields on the page.
You don’t have to configure fields individually as there are many appearance and visibility features that can be batched. Follow these steps to get the entire set of fields coordinated:
- In the Fields panel, shift/click to select the fields you want to modify.
- Right-click to open the shortcut menu and click Properties to open the Text Field Properties dialog box.
- Click the Appearance tab to display the settings. Pick options for the text and other features like borders (Figure 5).
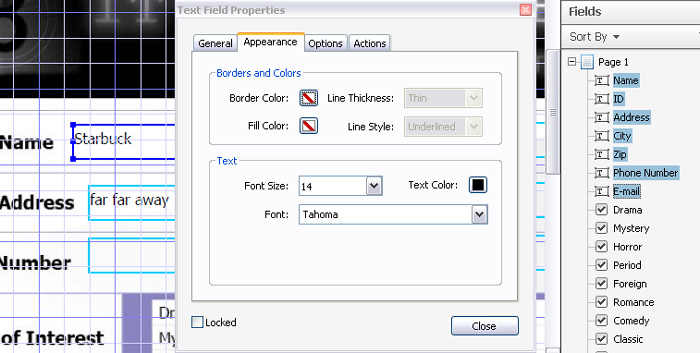
Figure 5: Choose common settings for a number of fields.
- On the General tab, you can select options such as visibility, whether or not a field is read only or required.
- When you’re finished making common choices, click Close.
Radio buttons and check boxes
Although you may think radio buttons and check boxes are the same, and can be configured to look the same, they are fundamentally different. Use radio buttons when you have a single choice to make, and check boxes when the user can pick more than one option.
Fixing radio buttons
In the sample project (as in many Acrobat X forms), although the program often finds the radio buttons themselves, they may not be grouped. Radio buttons are a quick fix, and I usually delete erroneous fields, and reinsert them.
The form tools prompt you as you work (Figure 6). Name the group, and then name each component as you add it.
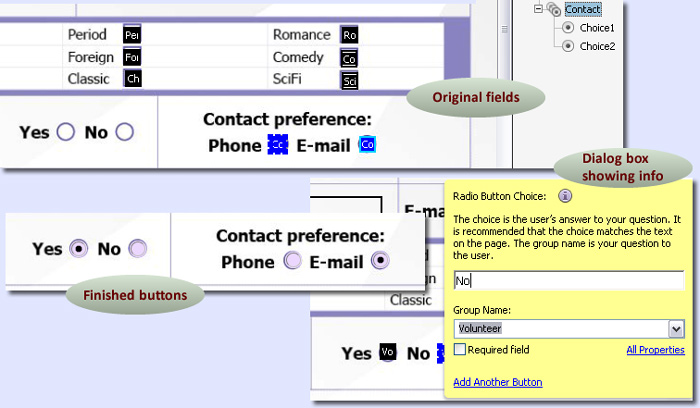
Figure 6: Configure radio button sets.
Tip: If you aren’t sure how to use the field, click the i icon to expand the dialog box to include an explanation, shown in Figure 6.
As with text fields, select multiple radio button sets and configure their appearance in one task. Depending on the structure of your source file, you may want to have the buttons invisible to take advantage of your original design.
Changing the choice names in the Fields panel also changes the choices shown in the Options tab of the Radio Button Properties dialog box (Figure 7).
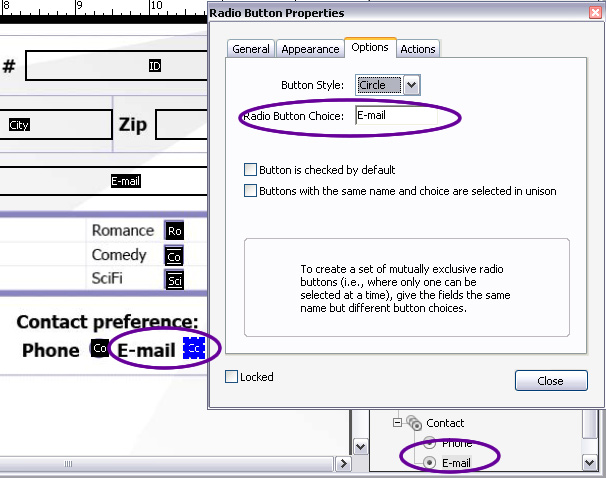
Figure 7: Give the choices useful names.
Check your check marks
Whether or not your check marks are interpreted correctly during the field-recognition process depends on how you’ve designed the form. Most often, as in the sample project, placing a small box following a label generates the fields. Like other fields considered here, select them as a group to make appearance changes as necessary. Be sure to look at the field names as well. In the sample project, one field was named incorrectly (selected in Figure 8).
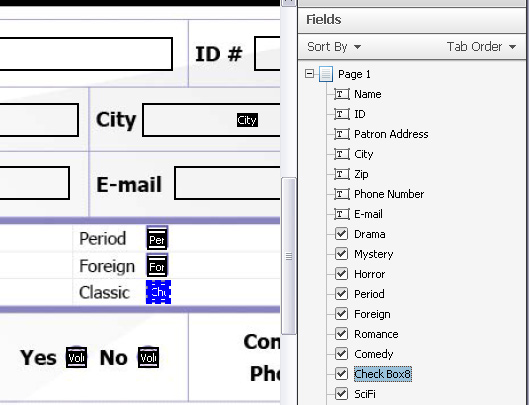
Figure 8: Check the given names.
Whether you choose to leave the default names depends on your overall form design and data requirements. In a simple form like the example, it’s easy to figure out what the items refer to, while in a more complex form, I usually change the names to include a common prefix. For example, I might rename the fields in this form G-drama, G-mystery and so on.
Review the tabbing order
One final task you should always check in a new form is the tabbing order. Many people move through a form using the Tab key, and expect to move left to right, top to bottom in a form. To see the tab order, click the Tab
Order button on the Fields panel to open the menu and then click Show Tab Numbers. You’ll see each field given a number, except for radio buttons where the choices each show the same number.
In the sample project, the tabs aren’t in the correct order (Figure 9). Some of the check marks are out of order, and I’d prefer the tab move left to right through the set of check marks, rather than by column.
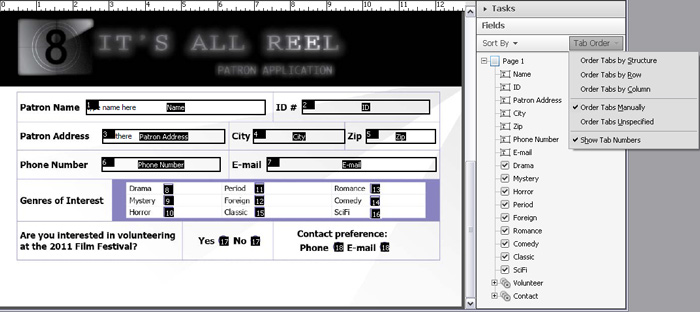
Figure 9: Always check the tab order.
To fix the tab order, choose options from the Tab Order dropdown menu. In the sample project, choosing Order Tabs by Row takes care of the order inconsistencies in one mouse click.
Some tips for working with forms
Here are a few more tips for working with forms:
- Many times you need to adjust the position of labels on your form. If you start from an image, you won’t be able to do that as the entire page is a single object. Instead, start from a source file that contains text and objects, like an InDesign or Word file.
- You can use a casual field-name structure in a simple one-off form. On the other hand, where you’re planning on a series of interrelated forms (such as those managing employee information), you’ll need consistent naming from form to form.
- If you’ve got the fields highlighted in Preview mode, you’ll also see the highlights when you switch back to Edit mode. If you don’t want to retain the background color, click Highlight Existing Fields again before switching back to the Edit view.
- Coordinating the appearance of a form’s fields with the field labels isn’t necessary for collecting the actual data, but it does contribute to a professional-looking form.
- Remember to switch to Preview mode to test the fields periodically.
- You don’t have to configure fields individually as there are many features that can be batched, particularly dealing with the fields’ appearance and visibility.
- Data from radio buttons should be meaningful. That is, you should be able to tell in your collected data what the options refer to.
- Using a common naming prefix for check boxes makes it a lot simpler to configure form functions, search for particular form fields and so on.
Products covered: |
Acrobat X |
Related topics: |
PDF Forms |
Top Searches: |
Convert existing forms to fillable PDFs fill and sign PDF online |
Try Acrobat DC
Get started >
Learn how to
edit PDF.
Ask the Community
Post, discuss and be part of the Acrobat community.
Join now >
3 comments
Comments for this tutorial are now closed.
Lori Kassuba
1, 2014-06-06 06, 2014Hi Jessamy,
If you bring up the JavaScript Console and execute the following code:
console.clear();
for (var i=0; i<this.numFields; i++) {
var f = this.getField(this.getNthFieldName(i));
if (f!=null) console.println(f.name);
}
This will give you a listing of all the text form field names. You can then copy and paste this list into a blank PDF or Word.
Or you could use the code in this tutorial to build a report:
https://acrobatusers.com/tutorials/print/building_reports
Thanks,
Lori
Jessamy
1, 2014-06-04 04, 2014Thanks for the tutorial. The problem I have is to check all text fields individually takes a lot of time. Is there a way to check this quickly? I’m often converting 15 pages forms and it seems to take too much time clicking on every box and button to test field name, yet, if I don’t do that, I’m bound to have text boxes with similar field names = faulty forms.
Cheers
Jess
donna baker
4, 2013-03-26 26, 2013Hi Arny -
Here are a couple of references that will show you how to produce the reusable files you want:
https://acrobatusers.com/tutorials/how-do-i-save-a-form-in-adobe-reader-x
https://acrobatusers.com/tutorials/how-fill-and-save-forms-adobe-reader
donna.
Arny Pickholtz
5, 2013-03-08 08, 2013I have created a form in Acrobat 10 that I want to send out and people can fill in some of the form… save it ... reopen it and save it again.
I can’t seem to do this is Acrobat 10…. I’ve heard that Acrobat Pro will let me do this.
Arny
Comments for this tutorial are now closed.