Choose your Destination
Acrobat 8 Professional includes the Destination feature, used to name a linking or bookmarking location. Destinations take a bit of time to set up, but save time in the long run in certain scenarios, such as the following:
You set up a complex document, linking content from a number of files and locations together. Time passes, and you have to change the contents and pagination of some of your composite files. Alas, your perfectly linked document no longer points to the right locations, and you have to laboriously test and re-link. More time passes, more changes are made, and you are testing and re-linking yet again.
Stop making extra work for yourself—set up destinations in your documents once, and forget about them.
Caution: The Destinations feature is disabled in a file enabled with extended features for use in Adobe Reader. In order to set destinations, save a copy of the file without the extended features.
Today’s destination is …
By definition, a destination is simply a label attached to a specific location and view in a document. You use destinations as the specified locations for links and bookmarks.
Similar to other Acrobat features like metadata or indexes, destinations aren’t necessary all the time. Two situations where you should consider destinations rather than simple links or bookmarks are materials that are regularly updated, such as technical manuals or reference guides, and layered documents that are subject to regular change, such as drawings or schematics.
Note: The document containing the destinations is referred to in this article as the target document; the document containing the links or bookmarks is referred to as the source document.
Design a system
If your usual PDF file structure warrants setting up a destination system, take the time to plan a structure for naming destinations, just as you might for planning nomenclature for items such as field names or keywords/subjects. A logical, understandable destination structure is particularly important when you work in an environment where multiple users work with the same files.
Define a naming structure
Here are some ideas for destination nomenclature:
-
Consider using topic names, or base the destination on the heading names, as is common practice with simple bookmarks.
-
If you have similar headings for different document dates, destination names such as 0701_summary and 0704_summary will help differentiate the material.
-
If you have similar headings within different files, such as descriptions of products or parts, use a combination of names. For example, rotorXJ7-schematic and rotorXJ8-schematic could identify the content in two product files that display the products’ illustrations.
Develop a workflow
There are two ways to approach using destinations. You can either start with your source document that contains the links and bookmarks, adding the destinations individually in the target document and attaching them to the source document. Or, specify destinations in your target files and then create links and bookmarks.
Configure the destinations
Destinations can be used in the same document you intend to use for linking, or in a target document. In a workflow where you use several documents, approach the task by naming destinations in the target files first, and then use the link or bookmark actions in the source document to quickly make the connections.
Specify destination views
Follow these steps to set up one or more destinations in a PDF file:
-
Open the target document (the one you want to link to).
-
Display the page and view for the location you want to define as a destination.
-
Choose View > Navigation Panels > Destinations to open the Destinations panel.
-
Click the New button, or choose New Destination from the Options menu; in the resulting text field, type a name for the destination.
-
Continue displaying page views and assigning destinations as required (Figure 1).

Figure 1: Configure and save named destinations in a target PDF document.
See larger image
- Save the target document.
As necessary, repeat the process with as many documents as you intend to use for the task.
Make the connections
Next, it’s time to make the links or bookmarks. The following steps show how to configure a link using a named destination:
-
In the source document (where you want to create the link), select the text to use for the link.
-
Right-click/Control-click to open the shortcut menu shown in Figure 2 and choose Create Link.
Tip: If you prefer, you can choose Tools > Advanced Editing > Link tool and drag a rectangle to specify a location for the link.

Figure 2: Create a link using the shortcut menu command.
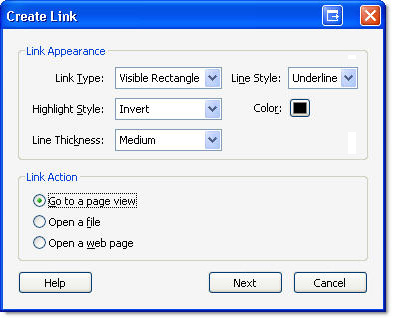
- In the Create Link dialog box, shown in Figure 3, set the link appearance, select Go to a Page View, and then click Next. The Create Go to View dialog box displays over the page.

Figure 3: Define the link characteristics.
-
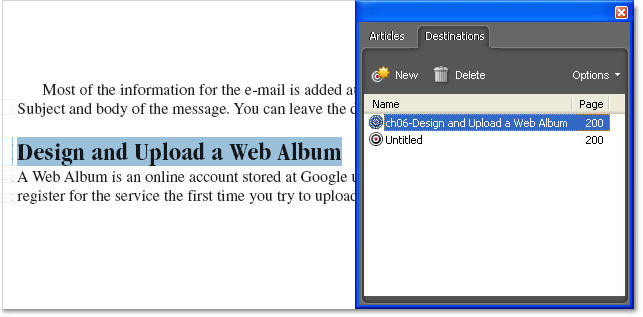
In the target document, double-click the desired destination in the Destinations panel. The Create Go to View and Create Link dialog boxes close automatically.
-
Save the source document.
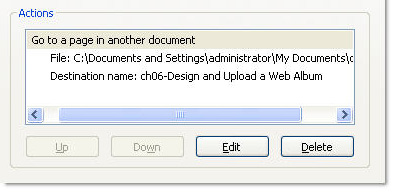
You can check the details of the destination. Double-click the link with the Link tool to open the Link Properties dialog box. On the Actions tab, you’ll see the destination listed in the Actions panel (Figure 4).

Figure 4: The destination is shown in the link actions.
Test the destinations
To test your actions, click the links or bookmarks you’ve attached to destinations.
A word of caution: Be sure to close the target documents in Acrobat before you test your links or bookmarks. Otherwise, the action points to the first page of the target document, rather than to your destination view.
Use destinations to control layer visibility
You can also use destinations to link to layers. Display the content and layers in your target document. Then, open the Destinations panel and create the desired destinations (Figure 5).

Figure 5: Create destinations based on layer visibility.
In your source document, create a link or bookmark and follow the same process as described earlier to attach the destination.
Click the link to display the layered file according to the specified destination’s layer visibility (Figure 6).

Figure 6: The link displays the destination’s established layer visibility.
See larger image
Tip: Destinations set in a layered drawing are useful to create a list of links to show different elements of the drawing instantly. For example, add links to show a building envelope, wiring, plumbing, and so on based on destinations that define groups of visible layers.
Manage destinations
You don’t have to worry about ensuring the list of destinations is current. When you open the Destinations panel, the document is automatically scanned and all named destinations are listed in the panel. Very convenient!
Sort the list
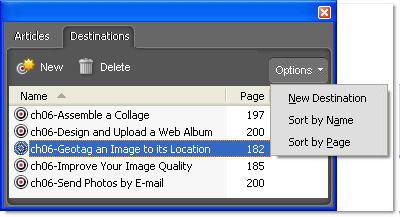
It’s easy to keep track of a few destinations. When the project includes dozens of destinations, Acrobat 8 lets you sort the destinations for ease of access. Click the Options menu on the Destinations panel and click Name to sort the list alphabetically (Figure 7). To view the destinations sequentially in the document, click Page to sort the list on a page-by-page basis.

Figure 7: Sort destinations by page or alphabetically.
Check and change the destinations
A destination can be modified after you have created it. Right-click/Control-click the label in the Destinations panel to display the shortcut menu and choose from these options:
-
Click Go To Destination to view the target location for the destination.
-
Change the location and view of the destination by displaying the content in the document pane as you would like it to appear and then click Set Destination from the shortcut menu.
-
Click Delete to remove an existing destination.
-
Click Rename to activate the destination label and type a new name.
I’d like your feedback:
Have you used named destinations rather than simple links? Did you know they existed? I’d like to hear about your experiences.
E-mail me!
Try Acrobat DC
Get started >
Learn how to
edit PDF.
Ask the Community
Post, discuss and be part of the Acrobat community.
Join now >


1 comment
Comments for this tutorial are now closed.
Lori Kassuba
8, 2015-11-04 04, 2015Hi Courtney,
I would try increasing the font size first, then add the link.
Thanks,
Lori
Courtney
12, 2015-10-30 30, 2015Thanks for the great tutorial! I am trying to find out how to attach a link to text. I highlight my starting text, right ckick, and create a link just fine. Then if I format my starting text, say increase the size from 10pt to 20pt, the link box doesn’t resize with the text. Any thoughts? Thanks!
Comments for this tutorial are now closed.