This tutorial shows you how to work with the Review and Comment features in Acrobat 9. See what the all-new Acrobat DC can do for you.
Download a free trial of the new Acrobat.
Comparing content in Acrobat 9: You *can* compare apples and oranges
Learn how to use the tools in Acrobat 9 to compare content between documents.


How often do you need to make changes to a document — and then hunt through several iterations to make more changes, or determine when specific modifications were made? As in earlier versions, Acrobat 9 offers tools for comparing content between documents. You'll enjoy the improvements and additional functions.
The Acrobat 9 Pro comparison feature has come a long way from its beginnings. Now you can specify the type of documents you want to compare, how you want the comparison to proceed and how you want to see the results. To keep track of your activities, manage the settings and results in the Compare navigation pane.
I'll show you the basic process, and then dig into some specifics you can utilize to make the results more meaningful for your needs.
Set up the comparison
The basic workflow for comparing documents is similar to earlier versions in that you select two documents to compare. Keep these selection caveats in mind:
If you're using documents enclosed in a PDF package, first select the package, then the component from the Package Item list.
- You can't use a PDF Portfolio file generated in Acrobat 9 as one of the items for the Document Compare process.
- To set up a Compare process, follow these steps:
- Choose Document > Compare Documents to open the Compare Documents dialog box.
- For both the Compare (older document) and To (newer document) fields, click Choose to locate and select the files you want to use. Alternatively, you can choose open files from the Document drop-down menus.
- For comparisons of document segments, specify the page numbers in the First page and Last page fields (Figure 1). Acrobat compares all pages by default.

Figure 1: Specify file names and page ranges for comparison.
- Select a Document Description option, or leave the default choice.
- Click OK to close the dialog and compare the files.
Note: Read about making specific choices depending on your desired outcomes in the later section, "Tailor the Compare Tool to Your Needs."
The results are in
Acrobat processes the files and generates the changes. The contents are displayed in the Compare navigation pane, new in Acrobat 9. Each result has a corresponding comment, as in the past.
A Summary page, added prior to the existing document pages, lists the file names, differences, and shows a key to the report's symbols (Figure 2). Click links on the Summary page to view the document in the document pane, and show the first reported change.
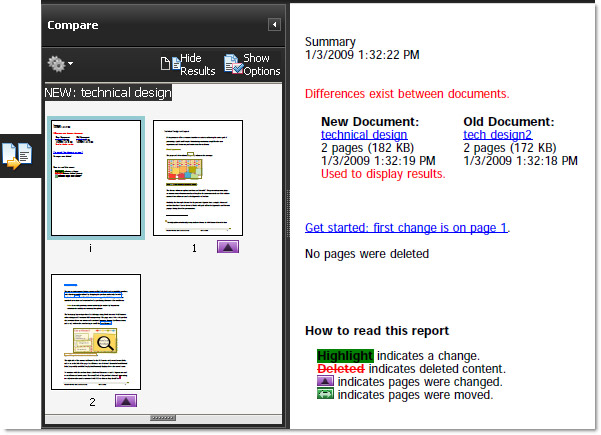
Figure 2: Manage the views and results in the Compare pane.
Other ways to view content include:
Click a page's thumbnail to display it in the Document panel (Figure 3)
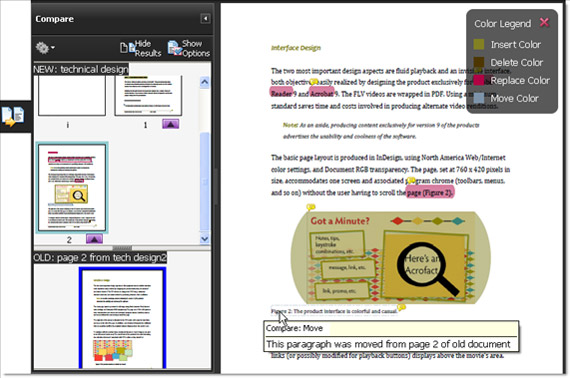
Figure 3: Display the selected page.
Drag the splitter bar at the bottom of the Compare pane upward to show thumbnails of the old document's pages (also shown in Figure 3)
Choose Synchronize Pages from the Options menu to show the same page from each document in separate windows (Figure 4)
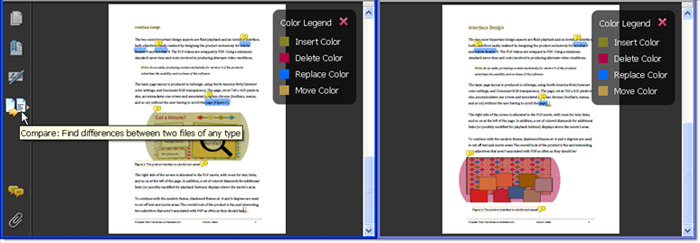
Figure 4: Show the same page from each document side by side.
Change the page-thumbnail sizes
If you like, you can save the Summary file for future reference.
Modify what you see
The Compare navigation pane offers a number of customizations. Click Show Options and toggle the choices from the menu, depending on your needs. Define what changes to show, including text, images, formatting and backgrounds. Look for customizations, such as color scheme and opacity slider for the overlays (Figure 5).
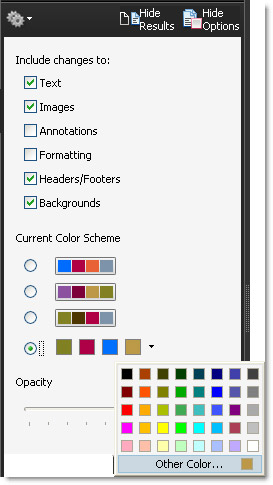
Figure 5: Adjust the evaluation options in the panel.
View, select or adjust your choices in the Compare pane's Options menu. Toggle the Hide Options/Show Options button on the Compare pane to show the results or settings, respectively.
Tailor the compare tool to your needs
You can use the same two documents and end up with different results, depending on the order in which the files are compared and the structure you define for the comparison.
What are you comparing?
The order in which you choose the documents defines how Acrobat specifies the results. Here's an example: File01 contains an image, figure reference and a caption; File02 shows the same page without the image, figure reference or caption.
When the Compare dialog box lists File01 (containing the image) as the new file, and File02 (sans image info) as the older document, the resulting Compare results reflect the reference order. That is, does the new file contain content inserted or deleted from the old file? The answer, of course, depends on which file you define as "new" and which one you define as "old."
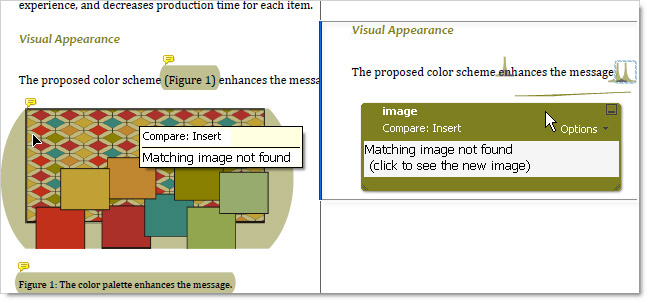
Figure 6: Results reflect the relationship between the old and new documents.
Tip: You'll also notice differences in whether Compare defines a change as Insert/Delete based on the color legends.
Select a structure
Part of the setup process includes identifying the type of pages you're working with. You can specify descriptions of differences in evaluated page content, such as text and images, based on a chosen document structure options.
In the lower part of the Compare Documents dialog box, choose one of three settings that most closely describes your document (Figure 7). Compare tailors the report according to the chosen option.
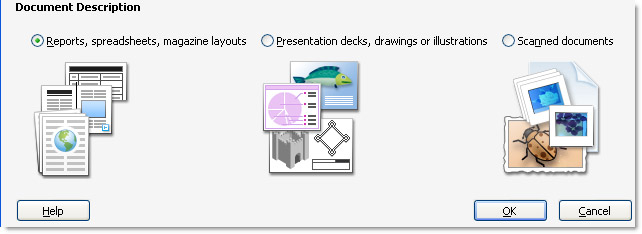
Figure 7: Identify the basic structure of your documents.
Acrobat offers three distinct choices, including:
- Reports, spreadsheets, magazine layouts. Choose the default option when the text in your documents flows from one page to another. Compare looks for moves between pages and content on respective pages.
- Presentation decks, drawings or illustrations. Choose this option when your documents for comparison are individual units. Compare looks for changes in order, like swapping pages in a set of slides.
- Scanned documents. Acrobat creates temporary images from each document that are then compared as images.
In the pages shown in Figure 8, you clearly see differences between the two versions, such as different images, image locations, heading sizes and so on.
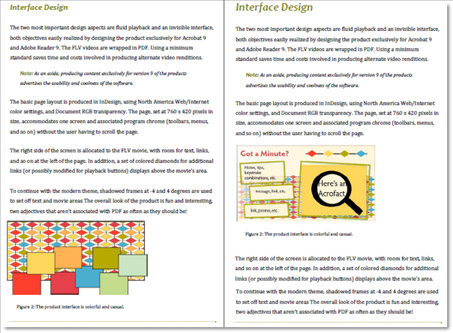
Figure 8: File01 (left) clearly shows differences from File02 (right).
Using different comparison criteria shows different results, as you see in Figure 9. In the left example, the two sample files identify each item of change for both the default comparison of reports, spreadsheets, and magazines, as well as presentation decks, and so on. The results at the right, on the other hand, simply identify areas of the page that are different when using the Scanned documents option.
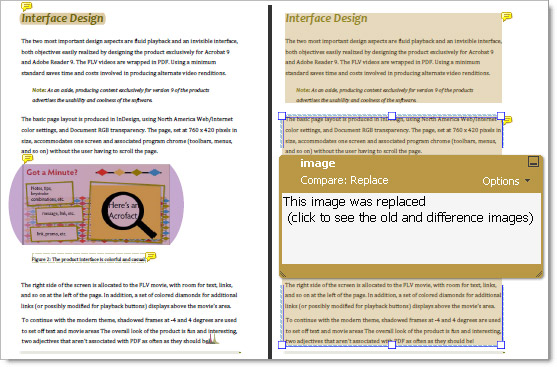
Figure 9: Results may specifically define changes in images, formatting, and so on (left) or more broadly on a page image basis (right).
Integrate compare into a review process
Here's one final way to customize the Compare results: You don't insert comments or markups manually when you run the Compare command, but that doesn't mean you can't use them as part of your other review tasks. Copy and paste the applicable comments from the compared document to your review document to streamline your workflow (Figure 10).
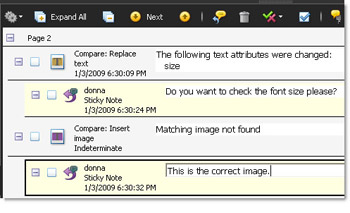
Figure 10: Integrate the results from a Compare process as part of your overall document review.
Take it one step further—if you use custom colors for different reviewers, choose a custom color scheme in the Compare panel's menu before running the command.
Products covered: |
Acrobat 9 |
Related topics: |
Review and Comment |
Top Searches: |
Start a PDF review comment on your mobile device |
Try Acrobat DC
Get started >
Learn how to
edit PDF.
Ask the Community
Post, discuss and be part of the Acrobat community.
Join now >
0 comments
Comments for this tutorial are now closed.
Comments for this tutorial are now closed.