This tutorial shows you how to work with the Combine Files features in Acrobat X. See what the all-new Acrobat DC can do for you.
Download a free trial of the new Acrobat.
Creating Captivating content with Acrobat X Suite


The Acrobat X Suite consists of several products. You're no doubt familiar with Acrobat X (and Adobe LiveCycle Designer), and probably use Adobe Photoshop, too. The third “big” program in the suite is Captivate 5, a rapid eLearning tool. If you've tried out the simulations and demonstrations from the Acrobat X Grand Tour, you've seen Captivate content in action.
How to get started
You don't need an advanced degree in online education to use Captivate effectively. You don't need to be a Flash programmer, a graphic designer or a computer whiz. What you do need is a purpose for the eLearning to help you decide how and what to build in Captivate:
- Demonstration: Suppose you want to produce a demo for customers to show them how to register on your site. For this example, you don't need any feedback or testing, you simply want a visual explanation.
- Training simulation: On the other hand, if you want to educate customers on how to use a software process, you might want to offer them an opportunity to perform the steps involved in a simulation before going live with the product.
- Assessment simulation: You may have a new in-house process that all employees must learn. In this example, you'd want to orient them to the process, give them an opportunity to try it out, and then test their understanding and new-found skill. For management reasons, you'd probably want to record their progress, too.
Consider the simple mouse click
In early Captivate days (and prior to that when the program was RoboHelp), producing output took far more effort and programming capabilities than you need for Captivate 5.
Consider the simple mouse click:
- In a demonstration, you show the mouse moving on the screen, show it clicking an object and then show what happens next. Text captions explain the process and effects of your mouse click.
- In a training simulation, you define a target object on the screen as an active click box (hotspot). When the user clicks the hotspot, the simulation responds by showing the mouse click, and its outcome. Text captions guide the user. If the user clicks the wrong object, a feedback caption opens, explains the error, and optionally adds a prompt or the opportunity to try again.
- In an assessment simulation, you define the target objects with hotspots again. The user's action triggers the simulation to run the response, displays a caption in response to the action (such as Try Again!), and tracks and scores the action.
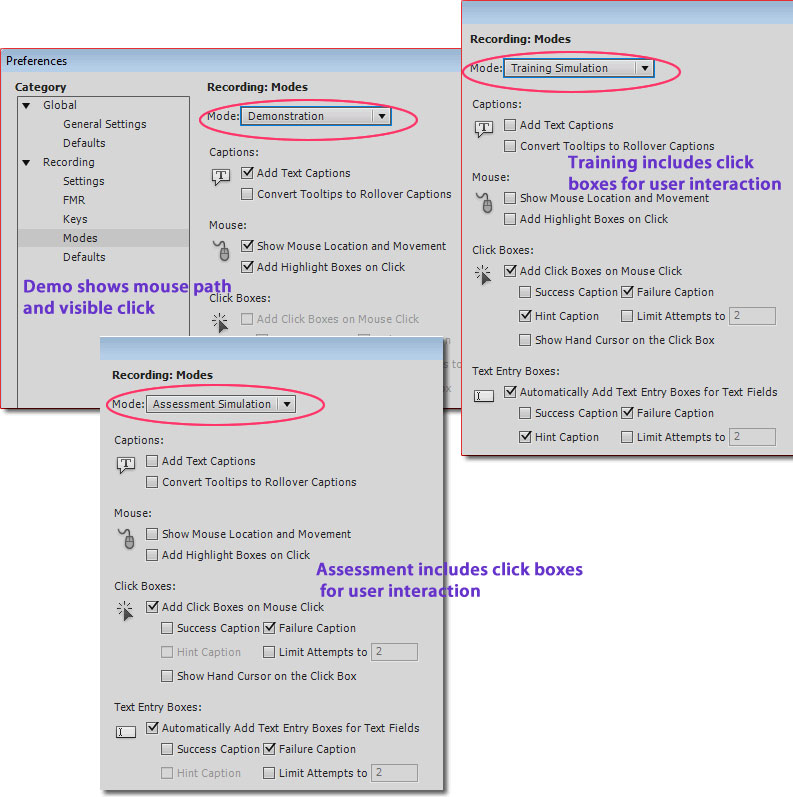
Program actions in response to a mouse click vary by mode.
Capturing multiple simulations
To give you a sense of how Captivate works, I'll walk you through the processes involved in creating both a demo and simulation using the program defaults. It's not as daunting as you might think! One of its best features is the ability to autorecord, or capture the screen once, and reuse it for any or all types of output.
Note: Read about using assessment simulations in the sidebar, “Tracking and Scoring.”
My examples show you how to add a checkbox to a form in Acrobat X. To get started, configure the program as you'd like it to appear at the start of the simulation. Size the program window according to your desired caption size.
In order to capture multiple formats, start from the Welcome screen. Click Software Simulation. The Captivate interface disappears, and you'll see the capture area shown on the screen as a red frame (Figure 1).

Figure 1: Configure the program window and pick capture settings.
In the Capture dialog box that overlays the capture area, pick your recording options:
- Choose either a screen area or an application. I'm using the Acrobat Pro window, which snaps the capture area to the program window's dimensions. If you choose the Screen Area option, specify a size numerically or by resizing the capture frame.
- Choose how you want to capture the screen. The default Automatic option captures still images or full motion (such as you'd see scrolling a program window).
- Choose the type of recording you want to capture. I've selected Demo, Assessment and Training.
- Specify whether to include panning and zooming (moving the screen to correspond with the mouse position), and whether or not to capture audio.
Tip: Once you start working in Captivate, you'll find it's far simpler to record audio separately from the video.
- Click Settings to open panels for configuring the appearance of the features, such as the color of captions. You'll see examples of the settings in the sidebar, Consider the simple mouse click.
- Click Record to hide the dialog box and start the capture. Each time Captivate captures a screen, you'll hear an audible camera sound.
- When you're finished, press END on the keyboard. The Captivate program window reopens.
You'll see three versions of the captured content tabbed in the document window (Figure 2). Now that's convenient!
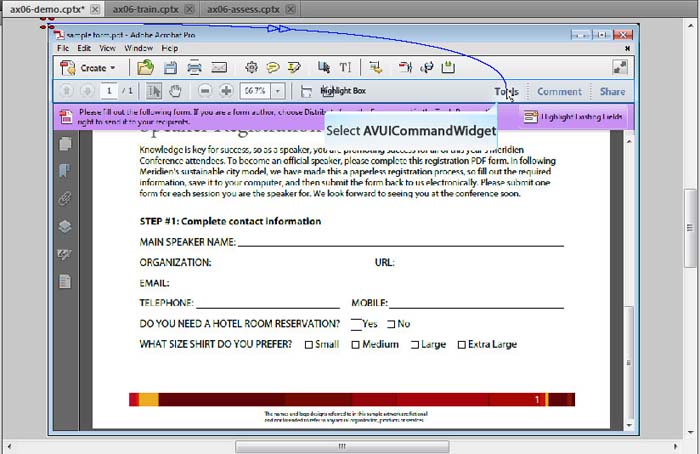
Figure 2: The captured simulations open in separate tabs.
Adjusting results
It's unlikely that your newly-captured content is ready for distribution immediately. You'll find some text captions don't show what you actually want the user to click; highlight boxes may need adjustments, too (Figure 3).

Figure 3: Review the automatic captions and highlight boxes.
The slides themselves, and objects like mouse pointers and captions, display according to default settings. As you see in the Timeline, the slide shows for a default time of three seconds, as do the mouse, caption and highlight objects (Figure 4). To adjust the timing for an object, drag one end of its frame in the Timeline.

Figure 4: View and adjust objects in the Timeline.
At any time, you can preview the project and test your actions. Click the Preview button on the Main Options toolbar to open a list and pick the slides to view (Figure 5).
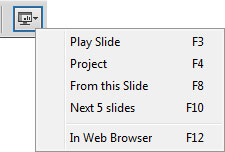
Figure 5: Preview and test the slides.
Producing the finished product
Once you've finished editing your content, it's time to publish the project. Select the file for export from the tabs. Choose File > Publish to open the panel. First, we'll look at the SWF output options (Figure 6).

Figure 6: Configure SWF settings for export.
Features listed correspond to letters in Figure 6:
- The Project Title uses the name assigned to the captured content, and a default storage location. Click Browse to locate and select another folder. Don't try to save the file on a networked drive.
- Choose output options based on how you intend to distribute the project. You can choose two or more options as you see here. Exporting to HTML produces an HTML page and appropriate
- Choose a Flash Player version from the drop-down list. Captivate 5 uses Flash 10 by default.
- Produce a copy of the project suitable for converting to an iPhone app automatically. If you've made a lot of changes to the project, it's a good idea to re-publish all slides before conversion. Captivate renders quickly, so don't be afraid to use the option.
- Settings for the project display in the Project Information area. Click an active setting to open that panel in the Preferences dialog box, or click Preferences to display the full panel.
You don't have to export the project as a SWF. Click Media on the Publish panel to open alternative settings (Figure 7).
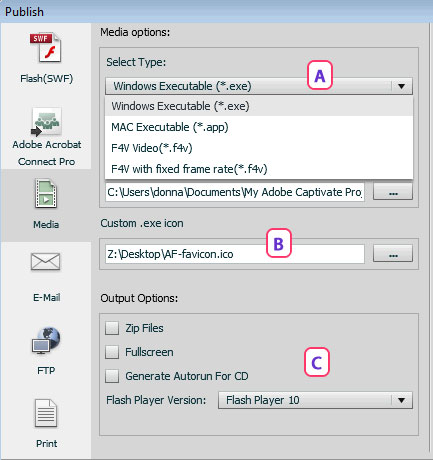
Figure 7: Select settings for executable (.exe) or F4V output.
Again, the lettered list corresponds to the letters in Figure 7:
- Click the Select Type drop-down arrow and pick an executable file format, or a F4V (Flash for Video) option.
- You can even pick a custom icon to use for the executable file.
- Choose other output settings, and customize the project preferences as with the Flash output (not shown in the image).
When you're finished choosing settings, click Publish to export the finished product.
Other features to explore
Of course, there are dozens of customizations you can make to the simulations. You can change the appearance of the callouts, either by revising the program preferences or by creating and attaching a project template that includes default appearances for items like captions, buttons, highlights, and so on (The Acrobat X Grand Tour uses a project template).
Choose from a range of active and dynamic content, such as rollovers, zoom areas and animations (You can see some of these features in the Acrobat X Grand Tour segments).
Captivate 5 introduced Master slides, a default layout containing font styles, background elements and color schemes (also used in the Acrobat X Grand Tour). Master slides in Captivate work in the same way as Master slides in PowerPoint.
Captivate and PowerPoint go hand-in-hand
Speaking of PowerPoint—at the start of this article I asked if you had PowerPoint presentations sitting around that should turn into something more dynamic. In this last section, I'll show you some of the ways you can integrate PowerPoint into a Captivate presentation.
Using my example of adding a check box to an Acrobat form, suppose I had a PowerPoint presentation on working with Form tools used for staff training. To build an interactive Captivate project, I can intersperse PowerPoint slides with Captivate slides, following these steps:
- Right-click any slide in the Filmstrip where you want to insert the slides to open the shortcut menu. Then click Insert > PowerPoint Slide. In the resulting dialog box, select a slide to indicate the location for the imported PowerPoint slides and click OK.
Tip: You can't insert PowerPoint slides before Slide 1 of the Captivate slides.
- In the resulting Open dialog box, locate and select the PowerPoint project you want to import. Click Open to close the dialog box and process the slides. The Convert PowerPoint Presentations dialog box opens (Figure 8).
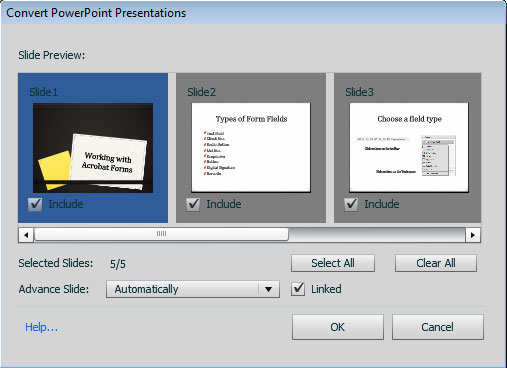
Figure 8: Choose import settings for the slides.
- Select/deselect the Include check boxes to choose the slides for importing. Click the Advance Slide drop-down list and choose either Automatically or On mouse click. Notice the Linked check box selected by default. Click OK to close the dialog box and complete the import.
- Drag the thumbnails in the Filmstrip panel to reorder the presentation.
- Continue with other editing as required, then publish the file.
Tracking and Scoring
You may need training that includes tracking and scoring. You can generate SCORM-compliant training modules, and track them with a Learning Management System (LMS).
Whether you're looking for general completion of modules, or click-by-click assessments (such as you'd find with electronic-record processes), check out the Advanced Interaction features.

Specify varying levels of tracking and scoring.
Choose assessment options in the Properties panel. In the figure, the settings show for Click_Box_3, as selected on the slide. Choose settings for each interaction (or click the arrow at the upper right of any section of the Properties panel to apply to all items, or all items of one type). Choose Project > Advanced Interaction to open a panel showing the overall settings. Notice the project file includes a Quiz number, with each interaction given a unique identifier.
Slides linked to the source PowerPoint presentation let you round-trip edit content directly from Captivate. Right-click a slide, and choose Edit with Microsoft PowerPoint. From the submenu, choose an option to edit the active slide or the entire presentation.
Linked files update when you make changes externally, too. In Figure 9, you'll see the Library listing for the project. Notice the red Status button, indicating the presentation has changed. Click the button to update the project, which then shows a green Status button. (In the example, I deleted a slide from the presentation.)
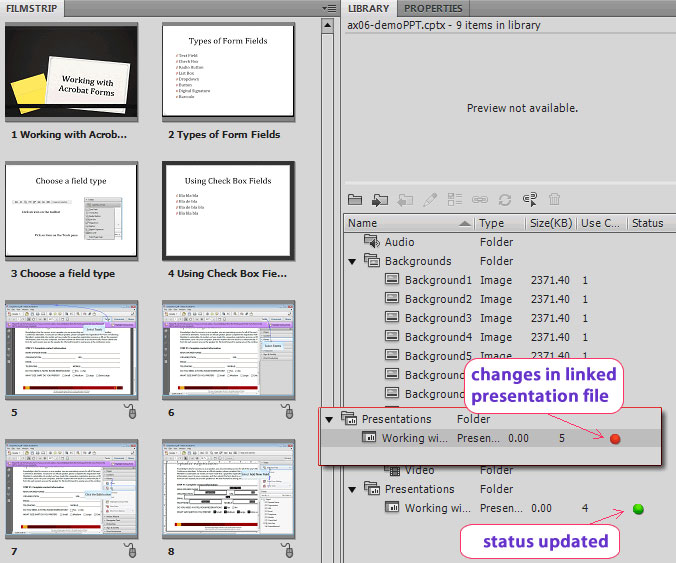
Figure 9: Linked PowerPoint presentation files showing status changes.
You can view the output from the four example projects in this PDF Portfolio.
Download [PDF, 3.9MB]
Products covered: |
Acrobat X |
Try Acrobat DC
Get started >
Learn how to
edit PDF.
Ask the Community
Post, discuss and be part of the Acrobat community.
Join now >
0 comments
Comments for this tutorial are now closed.
Comments for this tutorial are now closed.