Dance with the devil and the TouchUp Text tool
by Carl Young
I’m not a big fan of the Touchup Text tool, even though in this article I am going to explain how to use it to modify text.
I dislike the tool so much I always tell students in my Acrobat classes that using the Text Touchup tool is the devil’s work. Why am I so hard on a feature of Acrobat that so many people like?
Consider these points:
-
Once you have modified the text of a PDF with the Text Touchup Tool, you have broken the connection between the PDF and source file it was created from. Breaking this link eliminates one of PDF’s big benefits--the file fidelity between the source document and the PDF.
-
Once you damage the link between the source and the PDF, you have to decide which one is the official version of the document. Is it the modified PDF? The source file? And if you want both for archiving purposes, you have to remember to go back to the source document and duplicate the change you made in the PDF. Or you can give into temptation and skip fixing the source document and archive both the modified PDF and the original source document and hope no one notices the two are different.
-
I’m basically a lazy guy, so I don’t like having to do things twice. In my opinion, if you need to make a change it is much better to go back to the source document, make the change and then generate a new PDF that reflects the changes. Then you only have to make the change once, and the source document and the PDF are in sync. You don’t have to edit the PDF and worry about making the same change later in the source document. Avoiding the TouchUp Text Tool in this case is a virtue.
-
Most people are disappointed with the results of the TouchUp Text tool. You can’t reflow text in a PDF (except temporarily through the View > Reflow command, and when converting for display on handheld devices), so any changes you make with the tool are limited to a few characters and words. It’s like a pact with the devil. You may get the changes you want, but you may get more than you bargained for and end up disappointed in the overall result.
-
The TouchUp Text tool can be a temptation to be dishonest. Unlike the smudgy look whiteout applied to paper creates, under the right circumstances you can change a PDF in a way that is not apparent to the reader. In fact, that is usually what you want, although for legitimate purposes, I am sure.
Now that I’ve delivered my little sermon, let’s tiptoe around Hades and see how you can modify the on-screen text in a PDF with the potentially dangerous TouchUp Text tool.
When to use the TouchUp Text tool
In my opinion, you should use the TouchUp Text tool only in these limited circumstances:
- You need to fix a typo on deadline, and don’t have time, or access to the source file to fix the problem there and to generate a new PDF.
- You want to quickly embed a font.
- You want to quickly type on the screen and want more choices than are available from the Typewriter tool.
Fixing typos
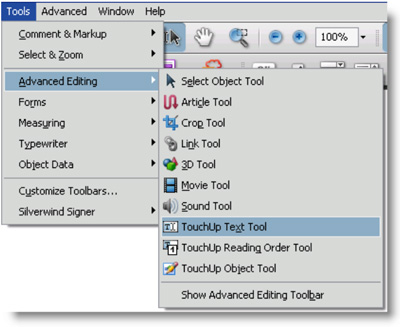
In Acrobat 8, the TouchUp Text tool can be accessed by choosing Tools > Advanced Editing > TouchUp Text Tool.

Figure 1: Where to find the TouchUp Text tool
When you choose the TouchUp Text tool, your cursor changes to an I-beam ![]() just like when you are using the Text Select tool. Unlike the Text Select tool, the TouchUp Text tool gives you the capability to actually change text as if you were in a word- processing application. You can right-click, choose Properties and change the font. Be warned, however, that you must have the font you are editing on your machine.
just like when you are using the Text Select tool. Unlike the Text Select tool, the TouchUp Text tool gives you the capability to actually change text as if you were in a word- processing application. You can right-click, choose Properties and change the font. Be warned, however, that you must have the font you are editing on your machine.
You can delete text, change letters and formatting and add text if the font is embedded, but the text will not wrap and reflow as it would in a word processor.
To make matters worse, if the font is subsetted then you only can add characters that are in the subset or in your fonts folder. For example, you want to change a dollar sign ($) to Euros (€) in a price sheet that uses the font BigImportantCompanyCourier. The font is subset, the Euro sign is not in the subset and you don’t have BigImportantCompanyCourier in your list of fonts.
What do you do? You have to buy and install BigImportantCompanyCourier. Or you cheat and embed some similar font that you do have and pray no one notices the difference. (See the following section on how to embed a font.)
Changing basic font formatting, like bold and italic, is problematic, too. As you can see in the screenshot below, you can’t change a font from bold to italic from the TouchUp Properties window.

Figure 2: Formatting options are limited in the TouchUp Properties window.
Also, the lack of word and line wrap means that if you keep typing beyond the right margin, your letters will run off into software purgatory.

Figure 3: This row of question marks extends off the page.
In addition, striking the Enter or Return key doesn’t mean that the line will go directly below the text as you would expect. See the following for an example of the unpredictable nature of striking the Enter or Return key when the Text TouchUp tool is active in a line.

Figure 4a: Original document.

Figure 4b: Modified document showing there is no text reflow between paragraphs.
In addition to pseudo-word processing, you can insert some special characters, such as an em dash, by right-clicking (Ctrl-click MacOS) and choosing insert. In my experience, the Line Break command never works as I expect.

Figure 5: Insert menu options.
Embedding fonts
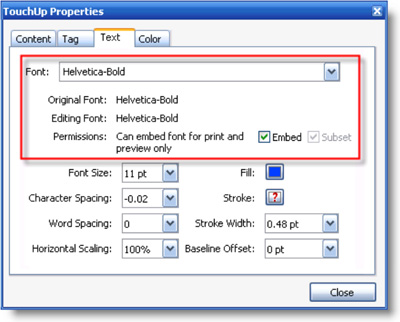
You can embed fonts in a document by using the TouchUp Text tool. Select the text with the font you want to embed, right-click and choose Properties. Again, you must have the font on your machine to embed it, and the font on your machine and the font referenced in the PDF have to be identical. In other words, the match must be Helvetica-Bold and Helvetica-Bold, not Helvetica-Bold and HelveticaBold (no hyphen).

Figure 6: TouchUp Text Properties window.
The examples below show how a document looks before the font was embedded, and afterward.

Figure 7a: An unembedded font displaying incorrectly.

Figure 7b: After embedding with the TouchUp Text tool, the font displays properly.
Typing on the screen
The Typewriter tool is great for filling in forms if you like the font Courier. Courier is the only font choice for the Typewriter tool, although you can vary the point size. Let’s say you want to be a bit more daring, and use something like Arial or TimesNewRoman instead of Courier.
Enter the TouchUp Text tool. Even though its name implies there must be something to touch up before it can be used, you can easily use the TouchUp Text tool to write on screen.
Simply select the TouchUp Text tool, hold down the Ctrl key and click where you want to type.

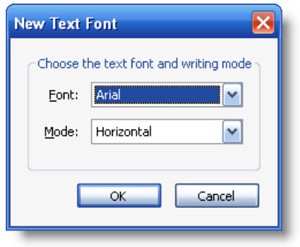
Figure 8: TouchUp Text font choice.
Acrobat presents you with a window that lets you choose any font available on your system. Once you click OK, you enter “Text font and writing mode” and can type away. In this case, pressing the Return key generates line spacing as you would expect.

Figure 9: Writing on screen with TouchUp Text tool and the Typewriter tool.
Conclusion
Acrobat isn’t a word-processing or editing application. It’s a little unrealistic to think you can take something intended as a finished document, edit it extensively and be happy with the results. If you try, you probably will become frustrated very quickly and say a few unholy words.
But if you accept the limits of the tool and don’t try to make radical changes, the TouchUp Text tool might be right for you.
Try Acrobat DC
Get started >
Learn how to
edit PDF.
Ask the Community
Post, discuss and be part of the Acrobat community.
Join now >

0 comments
Comments for this tutorial are now closed.
Comments for this tutorial are now closed.