This tutorial shows you how to work with the Create PDFs features in Acrobat 9. See what the all-new Acrobat DC can do for you.
Download a free trial of the new Acrobat.
Faster, quicker, better PDF tables with Acrobat 9


In this tutorial, let's take that step back and check out some interesting and useful Acrobat 9 features you can apply to tables.
Table text
How could we ever live without tables? When it comes to a PDF table, there are different ways to handle the content, depending on what you plan to do with the data. Figure 1 shows a section of a cabinet manufacturer’s product table that I’d like to reuse in another project.
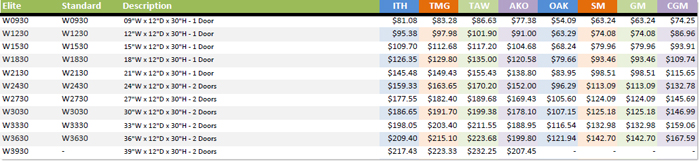
Figure 1: Decide how you need to use the table content.
Reusing the text in Word
Right-click/Control-click the selected cells on the page and choose an option to Copy or Copy with Formatting. When the content is pasted into a new Word document, you’ll see the text placed according to your selection.
In Figure 2, notice the overlay showing the content pasted into Word for Mac as unformatted text; the underlying image shows the same content pasted into Word for Windows, with the popup dialog listing several pasting options. In the Mac version, you’d have to redefine the table structure, while the Windows table is fully formatted (based on the selection) and ready to use.

Figure 2: Pick a copy option to preserve the layout or appearance if necessary.
Copy with Formatting gives you the table structure, content, as well as font information and cell colors in either Mac or Windows.
Moving content into a new file
What if you want to use the extracted content in a new PDF file? You won’t have the same options to maintain the formatting that you do in content pasted into a Word document (Figure 3).

Figure 3: The content pastes as text or in unformatted rows.
That doesn’t mean there aren’t ways to reuse the table. If you want to reuse a segment of the table and don’t need editable text, use the Snapshot tool:
- Set the magnification of the page to 100% for the clearest capture.
- Choose Tools > Customize Tools to open the More Tools dialog box. Scroll to the Select & Zoom list close to the bottom of the dialog box and click the Snapshot Tool check box. Click OK to close the dialog box and add the tool to the toolbar.
- Select the tool and draw a marquee around the area you want to copy (Figure 4). Release the mouse to copy the content to the clipboard.

Figure 4: Select the content using the Snapshot tool. - Choose Create > PDF From Clipboard to convert the clipboard data into a new PDF file.
Note: The new document contains only an image PDF without editable text.
Mac users have another option, one I often use instead of the Snapshot tool. Use Grab to capture the segment of the screen you want to use for the new file. Then choose File > Create PDF and choose one of the Grab options from the submenu (Figure 5).
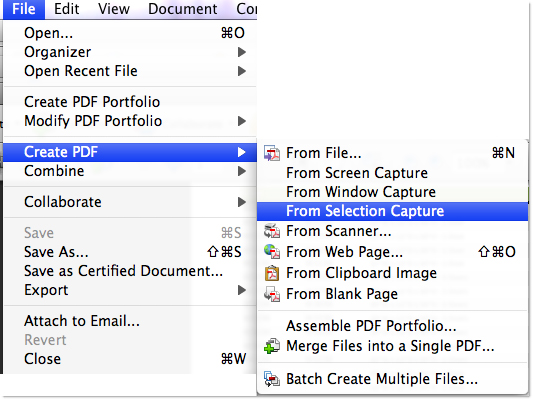
Figure 5: Mac users can opt for the Grab options instead.
Note: If you want editable text, and need to do some work on the table’s contents, see the sidebar, “For maximum accuracy”.
Editing a table in Acrobat
How you choose to edit a table in Acrobat depends on a couple of factors. First, it has to be convenient. It’s easy to strip out a row or two, or change the background for a heading. It’s not so easy, however, to change whether or not the cells are bordered. The Excel worksheet table shown in Figure 6 is a good example.

Figure 6: Table converted from Excel worksheet.
As you see in the figure, there are a few things I’d like to do to the table. It’s quick enough to do in Acrobat Pro. When you’re deciding on your workflow, take into consideration how adept you are at using the TouchUp Tools in Acrobat, whether you’re using the table again in Excel and the contents of the table. For example, I’ve used the TouchUp tools extensively, so don’t have a problem tweaking the layout. If I needed to use the table again in Excel, it’s probably simplest to return to the program, make the changes there and then regenerate the PDF file. I’m working under the assumption that I don’t need to use the table further, and can make the changes in Acrobat.
The content of the table can be an issue. As you see in Figure 7, each colored cell fill, as well as each stroke, is defined as a separate path in the Content panel. Trying to make sense of what you see and what you want to manipulate can be frustrating. However, since I’m going to use a Comment tool and then flatten the page, it’s not a big deal.
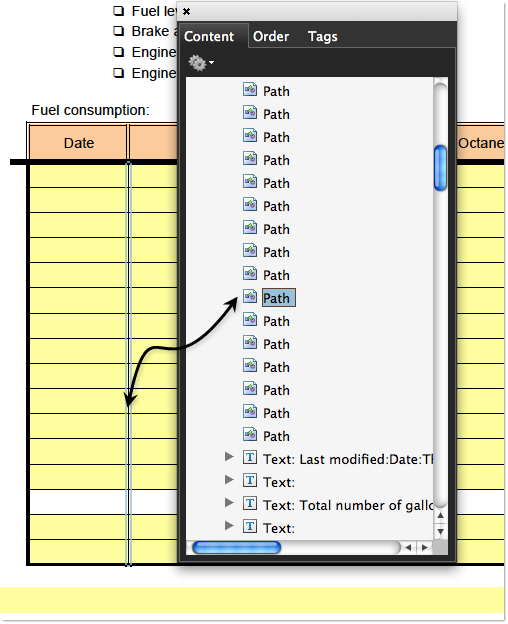
Figure 7: Each stroke and fill is a separate object.
Changing the row background color
My first task is to change the background color for the heading row from dark red. To make that change, follow these steps:
- Right-click the row with the TouchUp Object tool to open the shortcut menu and choose Edit Object. The program selected in the TouchUp Preferences opens, in my case I’m using Illustrator.
- Change the fill color as desired. In my example, I’ve changed to a dark blue (Figure 8).
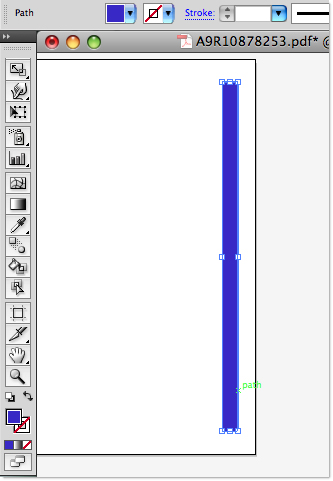
Figure 8: Change the appearance in the specified editing program. - Close the file, and click Save when prompted to save the changes in the temporary file and ultimately change the object’s color on the PDF page.
Note: Notice the rectangle displays vertically in the figure. That’s because the spreadsheet uses Landscape orientation, while Illustrator shows the page in default Portrait orientation.
Modify text color
Changing text color is a simple Acrobat-based fix. Using the TouchUp Text tool (circled in Figure 9), click and drag to select the text on the page. Right-click and choose Properties to open the dialog box. Here you can adjust the text display, such as changing font, size, color and so on. Once the dialog box closes, the changes are made automatically.

Figure 9: Select and change the text color on the page.
Adjust the stroke length
You can make changes to items like strokes on the table, but I advise moderation. It’s time-consuming to make changes for an entire table when you could so easily reformat the original spreadsheet and recreate the PDF file. On the other hand, since my sample project needs only one segment adjusted, it’s easy to select the path using the TouchUp Object tool, then drag to shorten the line (Figure 10). Be sure to zoom into the page to clearly see what you’re doing.

Figure 10: Make simple object adjustments on the page.
Use some digital white out
My final task is to delete three rows from the page. I could spend time selecting and deleting objects one by one. But I have a much better solution, using a Text Box comment.
From the Comment & Markup toolbar, click the Text Box tool and draw a marquee over the table, covering the rows to hide. In Figure 11, I’ve shown the comment frame with a red stroke. Right-click the comment to open the shortcut menu and choose Properties. In the Properties dialog box, set the fill and stroke to White and click OK. The ‘digital white out’ is applied.
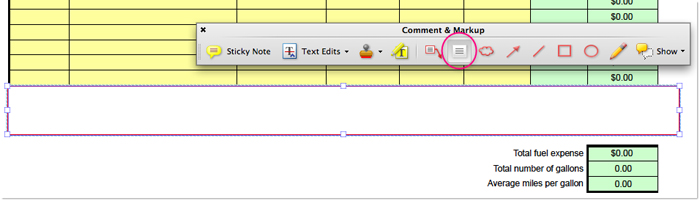
Figure 11: Cover up the extra rows with a comment.
To finish up, I’ll flatten the comment using Preflight. Here’s how:
- Choose Advanced > Preflight to open the dialog box.
- Click the Select Single Fixups button.
- Type flatten in the Search field.
- Click Fix. In the resulting dialog box, name and save the file. Acrobat applies the profile and the extra fields are removed.

Figure 12: Use Preflight to flatten the comment on the page.
Try Acrobat DC
Get started >
Learn how to
edit PDF.
Ask the Community
Post, discuss and be part of the Acrobat community.
Join now >
0 comments
Comments for this tutorial are now closed.
Comments for this tutorial are now closed.