This tutorial shows you how to work with the Print Production features in Acrobat 9. See what the all-new Acrobat DC can do for you.
Download a free trial of the new Acrobat.
Fine-tuning PDF for print output using Acrobat 9
Learn how to view and output content from Adobe Acrobat 9 using some of the new features in CS 5.


There are numerous ways to view and output content from Adobe Acrobat 9. With the release of the Creative Suite 5 suites, new features in Adobe InDesign impact how and where you produce those PDF files.
I can’t imagine using InDesign without using Acrobat. Each Creative Suite release offers new ways to work with content intended for PDF output. In CS5, there are more ways than ever to create content. You'll have to consider how and where you produce a PDF as part of your workflow.
Document-installed fonts
Using document-installed fonts is one of the hot new features in InDesign CS5. Rather than relying on your operating system’s fonts, InDesign temporarily installs fonts to use for a specific document. Be aware though—there are some limitations to the feature.
In the past, you could embed fonts in an InDesign document, and send the font files for any fonts not likely present on the recipient’s computer (assuming the fonts’ licensing permits). The recipient would then install the font on their computer and carry on. In CS5, as long as you package the fonts when distributing the content InDesign temporarily mounts the font for use in the particular document—usually.
Testing the process
Here’s an example showing the different criteria and restrictions involved:
- I started out with an InDesign CS5 document created on Mac OS. There are several fonts in the document, including those in the pages’ text and captions attached to the images (Figure 1).
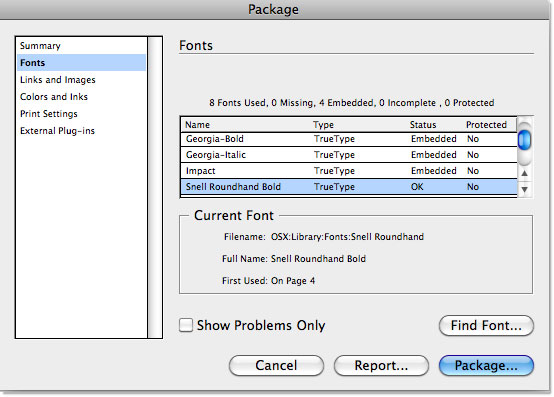
Figure 1: Font information displayed in the Package dialog box. - The document and its assets need to be packaged before sharing. The package includes several folders, one containing the images and graphics, and another containing the fonts (Figure 2).
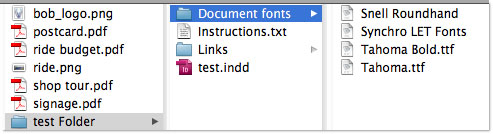
Figure 2: Packaging stores a copy of the fonts for sharing. - Opening the document in InDesign CS5 (Windows) displays the usual Missing Font dialog box (Figure 3).

Figure 3: The dialog box lists missing fonts. - In InDesign CS5 (Windows), only those fonts that can be used in Windows are actually installed. Document-specific fonts are listed at the top of the Font menu (Figure 4). Two of the fonts used in the sample project are Mac-specific, and not usable on Windows.

Figure 4: Not all missing fonts are available.
Final comparisons
To take the process to its conclusion, I exported PDF/X-4-compliant PDF files from InDesign on both Mac and Windows.
Both versions are standards-compliant, even though the pages look different.
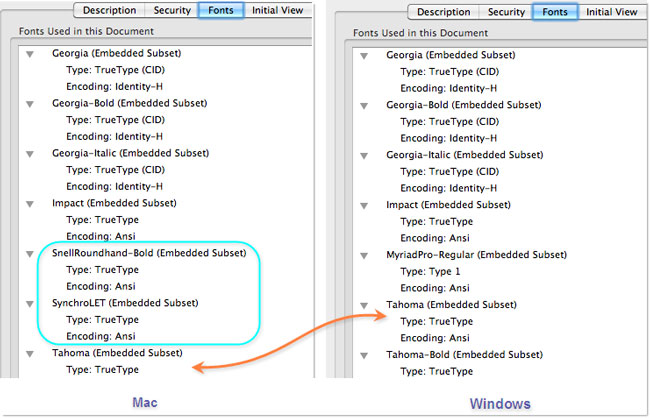
Figure 5: Fonts vary between versions.
Print-production workflows
There are interesting decisions to make when considering your print workflows. Sometimes it’s more practical to work in your source program, while other times you can achieve the same outcomes in either InDesign or Acrobat 9, or work exclusively in Acrobat 9.
Logically, you want to have the source file as complete as possible before generating the PDF file.
Note: Whether or not you have access to the source file, your deadline, and the extent of work required all influence your decision.
Deciding where to work
Not many of us work with color separation or press workflows on a regular basis. These workflows vary according to where the separations are produced. Separations can be created using the output device’s RIP (raster-image processor), or on the host computer using InDesign. You can opt for a PDF workflow in many cases.
I usually base my workflow on these general guidelines:
- What’s the quickest? If I need any significant text changes, I always return to the source program to make changes. Text changes may be content or stylistic in nature.
- What’s the most efficient? Making color changes throughout a document can be done in either InDesign or Acrobat. If I had a callout box that appeared on a number of pages in different sizes using a color tint and decided the tint should be changed, it’s probably more efficient to work in InDesign. All I’d have to do is modify the object style used for the callout to have the change applied. I could achieve the same results in Acrobat, but I’d have to work through the Preflight fixes, and create a new fix to identify and swap out the color tint.
- What requires the most hands-on work? One of the default Preflight settings in InDesign looks for overset text (text that extends beyond the boundaries of the text frame and consequently hidden). Using the InDesign Preflight process alerts me to any instance of overset text as the project develops, and saves proofreading and editing time later (Figure 6). The example at the left of the figure shows the text frame at a sufficient size on the InDesign page. If there’s overset text, the PDF output looks like the example at the right.
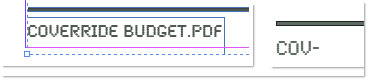
Figure 6: Overset text hidden in PDF file.
Preflight choices
The processes called Preflight in InDesign CS5 and Acrobat 9 vary considerably. The Preflight panel in InDesign evaluates your document based on specified parameters on a continuous basis, while Acrobat 9 preflight offers dozens of checks and fixes. There are numerous print production tools in Acrobat you can work with in addition to preflighting the file.
Let’s check out an example of evaluating and preparing a document using both InDesign and Acrobat:
In InDesign CS5, I’ve created a custom profile containing a variety of items that I want monitored in the file (Figure 7). The Preflight report lists the issues that need repairing to comply with my profile. The profile tracks InDesign-specific items, such as overset text, style discrepancies and so on. Although it’s possible to make changes like modifying text in Acrobat, it’s far simpler to make the changes prior to producing the PDF file.
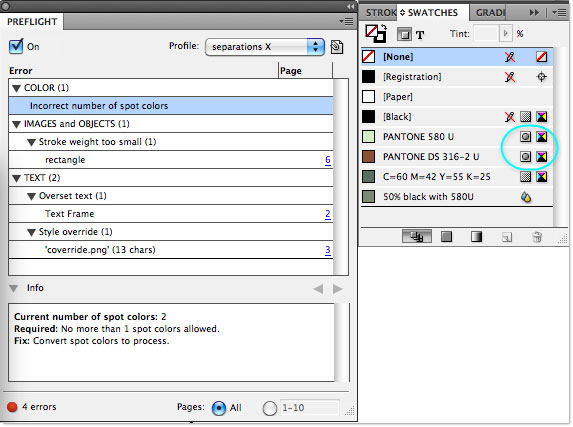
Figure 7: Monitor the document during production.
Note: The profile specifies using only one spot color, while the document contains two spot colors, as indicated in Figure 6. I’ll make the change in Acrobat.
Using print tools in Acrobat
After converting the file to PDF using the Press PDF preset, it’s time to do some checks and testing in Acrobat. You don’t need to be a print professional to take advantage of the Print Production tools. Many offer you previews and help you set up your document for the best (and most economical) results.
There are literally thousands of details you could check in a document, but only a few you should check on a regular basis to help you achieve predictable print output. Let’s check out the document using some of the print tools.
Tip: When working in the print production dialog box, you can use the navigation tools in Acrobat to zoom in or out of pages, or scroll through the pages.
Previewing your output
Click the Output Preview button on the toolbar to open the dialog box (Figure 8). There are several ways to evaluate your document brought together in a single dialog box.
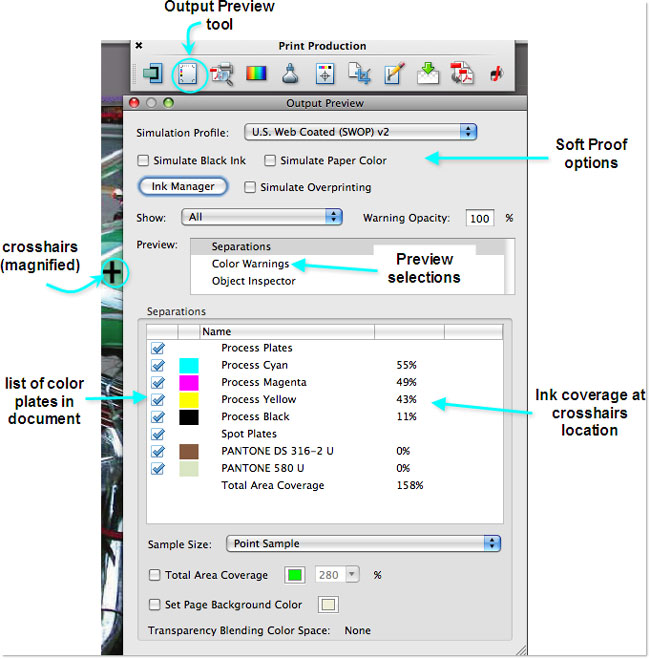
Figure 8: Start with the Output Preview tools.
Figure 8 identifies different ways you can check your file. The most commonly used include:
- Soft Proofing. Your printed output will never look as vibrant as the images you see on screen. You can preview the printed version of a page using a combination of the effect of printing with black ink and/or how the ink looks on paper (Figure 9).

Figure 9: Simulate the appearance of your printed page. - Preview separations. Printing color separations isn’t like printing on your home computer. One plate is made for each color, and the colors are added as the paper runs through the press multiple times. You can toggle the various color plates off and on to see how the page looks (Figure 10).
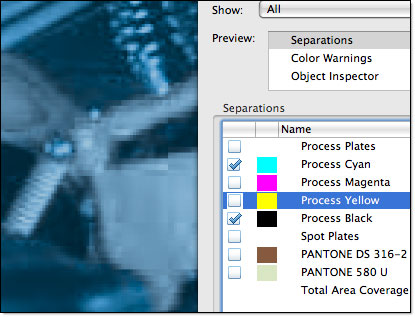
Figure 10: Show different color ink plates.
Note: Spot colors are often required when you need to match a color precisely, such as the red in the Adobe logo. Otherwise, it’s usually safe to make color modifications.
Changing color plates
A regular CMYK document uses four color plates. As you see in Figure 8, there are six color plates, as I’ve included two spot colors along with the CMYK colors. That means each page of the document has to pass through the press two more times to accommodate the extra color.
In the sample, there’s no need to use spot colors, and they can easily be changed in the Ink Manager. Click the button on the Output Preview dialog box (or click the icon on the Print Production toolbar) to open the dialog box.
The dialog box lists the six color plates. Select the Convert all spots to process checkbox to convert the spot colors to their CMYK equivalents. As you see in the Ink Manager, and back in the Output Preview, there are only four plates remaining (Figure 11).
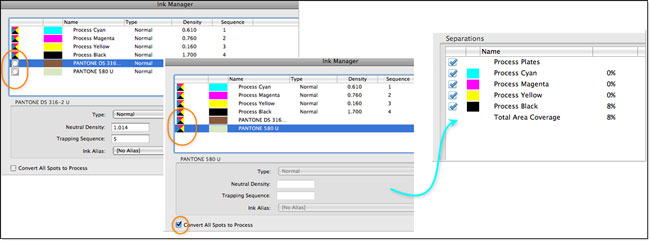
Figure 11: Change ink settings in the Ink Manager.
Note: InDesign and Acrobat share the same Ink Manager technology. InDesign offers the Use Standard Lab Values For Spots option along with the settings shown here.
Inspecting objects on the page
On the Output Preview dialog box, click the Object Inspector label in the Preview list. As you move your cursor over different objects on the page, you’ll see information in the dialog box. For example, in Figure 12, clicking the logo image on the page shows details such as the resolution, color space and colors in the object.
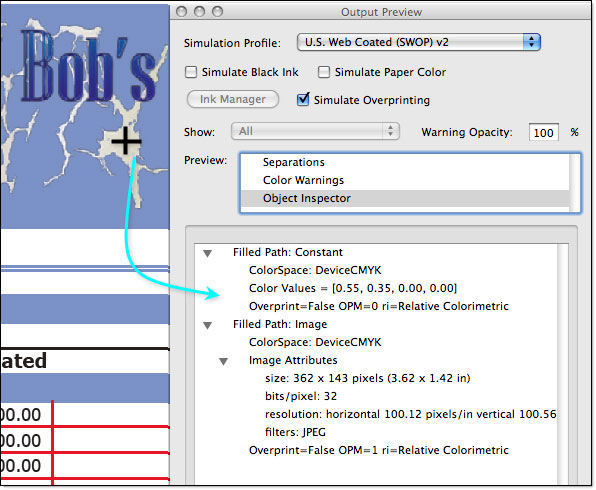
Figure 12: Review object details.
Looking at transparent objects
The final item to check out is the Transparency Flattener. Many images use a certain level of transparency, as do effects like drop shadows or gradients. A printer flattens the transparency. To prevent surprises, you can check out how the page will look flattened, and even flatten the content yourself.
Note: Your print provider usually specifies whether or not to flatten transparency before submitting your PDF file.
Click the Transparency Flattener icon on the Print Production toolbar to open the dialog box. You’ll see the current page in the document shown in the Preview area. To view another page, change it in the document, and then click Refresh on the dialog box to redraw the preview. The preview shows full pages only.
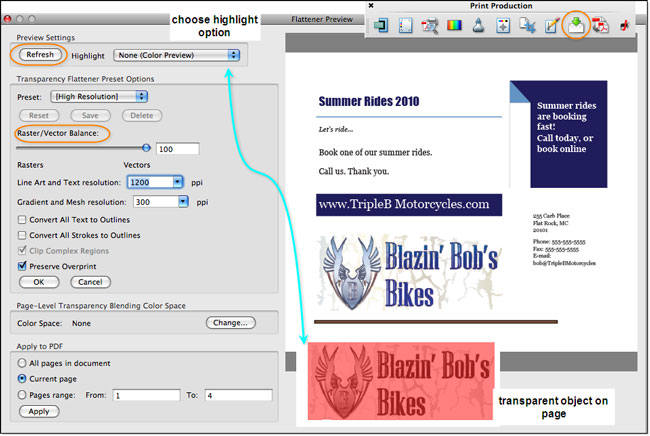
Figure 13: Preview the pages after flattening transparent objects.
You can view the page in color, or pick a highlight, like the callout at the bottom of the figure, showing the transparent area of the page.
Change the settings for the transparency by choosing a preset from the dropdown list, dragging the slider to adjust the balance manually, or typing values in the appropriate fields.
Products covered: |
Acrobat 9 |
Related topics: |
Print Production |
Top Searches: |
Create PDF print production tools overview |
Try Acrobat DC
Get started >
Learn how to
edit PDF.
Ask the Community
Post, discuss and be part of the Acrobat community.
Join now >
0 comments
Comments for this tutorial are now closed.
Comments for this tutorial are now closed.