Getting started with Acrobat 7 forms
Learn how to create a checklist for deployment of PDF forms using Acrobat 7.
Adobe has made form creation very easy with Acrobat. The speed with which you can create a very powerful form tempts many beginning users to overlook some fundamental issues. My phone rings at least once a week with a call from someone who got excited about Acrobat's form tools, developed a form, distributed it and then began fielding calls from unhappy users.
Before you reach for the mouse and start creating form fields, at a minimum use the following checklist to plan your form deployment. You will save yourself a lot of heartburn if you do.
-
Which viewer will your end user have? Do you have any control over whether they are using Reader, Adobe Acrobat and the version of each?
-
Do the users expect to be able to save the data, or is a printout OK? Can they complete the form in one session, or will it take multiple sessions?
-
What happens after the user completes the form? Do they print and mail it? E-mail it? Submit the data to a database?
-
Will the form perform calculations?
-
Will the form be printed and signed with an ink pen, or digitally signed?
There can be much, much more to a form deployment, but you should at least know the answers to those questions before you proceed.
Now that you know what to ask, let's look at why the answers to these five questions matter.
End-user software and 'Local Save'
Reader is free, but someone has to pay for Acrobat, either Standard or Professional. As you could logically expect, software someone buys can do more than software that is free.
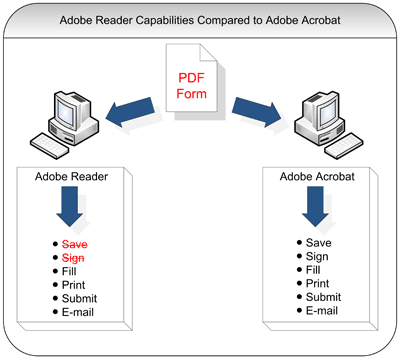
Whether your end user has Acrobat or Reader is critical because Reader has limited capability to work with form data. For example, Reader cannot save form data locally, nor can users digitally sign forms, unless you buy another product from Adobe or subscribe to a service.
If users can complete the form in one sitting, they don't need to save the data locally. If users need more than one session and need to save the data locally, they will either need Acrobat Standard, Professional or 3D. Reader users can have the same functionality only if the form has been processed by Reader Extensions Server.
Adobe is continuously upgrading its software, so newer versions can do everything that the old versions could plus more. (For details, see the Reader 7 User Guide; if your end users use a version other than 7, see that version's Help.)

Which version of Reader or Acrobat is important, too. Beginning with Acrobat 7 Professional, Adobe is including in the Windows version of Professional and 3D a dedicated form-design tool called Adobe LiveCycle Designer. Forms created with Designer 7 require Reader/Acrobat 6.02 or higher. Forms created from within Acrobat can be opened with older versions of Reader/Acrobat.
After completion
Now that the user has completed the form, what do they do? Print? E-mail? Submit to a Web server? Connect to a database?
A fill-and-print form, like most at the Internal Revenue Service (IRS) website, is the easiest. The user fills out the form and then prints it, either by using a button you add to the form or by using the Print icon in either Acrobat or Reader.
Next easiest is submitting form data via e-mail, which works in either Reader or Acrobat. Remember that your end users will have to hit the "Send" button on their e-mail tool after Reader/Acrobat passes the form data along.
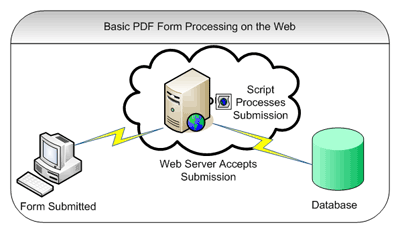
Submitting to a Web server will require help from your IT department. As the form designer, you can create a submit button, but your IT department will need to develop a script that accepts the data from your form and then processes it. For example, your IT department could use Microsoft ASP, Macromedia ColdFusion or Adobe LiveCycle Forms to process your form data.

If you would like your data to end up in a database, you can use Web technologies, such as ColdFusion. If your users have Acrobat, are on your network and your IT department can give them an Open Database Connectivity (ODBC) connection, LiveCycle Designer can produce a form linked to a database. Creating ODBC-connected forms is within the capability of most form developers and is explained in Designer Help. Designer-created forms also can use Web Services Description Language (WSDL) to send and receive data from databases.
Acrobat can use Acrobat Database Connectivity (ADBC) to communicate with databases using ODBC, but be forewarned that ADBC requires the extensive use of JavaScript. There are a variety of third-party tools available as well.
Calculations
Math mistakes are one of the biggest sources of user errors in forms. If you don't eliminate these mistakes by including calculations in your form, you are missing most of the technology's potential.
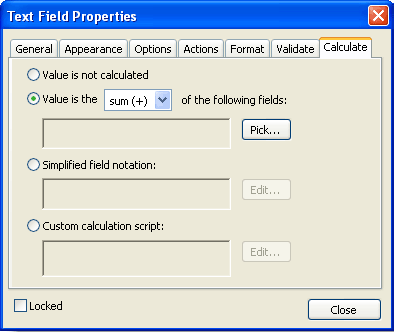
One of the great things about Acrobat is the capability to easily perform basic calculations. In the Calculate tab in Text Field Properties, you can click fields you would like to sum in the Value is the Sum of... area, use spreadsheet-like formulas in the Simplified Field Notation area or use a JavaScript in the Custom Calculation Script box. See Acrobat Help for details on using each of these.

Designer lacks Acrobat's point-and-click method of performing calculations. However, it has something equivalent to Simplified Field Notation called FormCalc. Of course, you can use JavaScript for calculations, too. See Designer Help for more information on using FormCalc and JavaScript.
Signing forms
As a forms author, you can add digital signature fields with either Acrobat or LiveCycle Designer. Your end users can then either sign the form once or multiple times as part of a workflow. Adding the fields is the easy part. Now let's talk about the user experience.
Before deploying your form, be aware of the new security features in Acrobat/Reader that urge the form author to certify the document. Uncertified forms will present your users with a potentially off-putting security warning as soon as they click in a digital signature field.

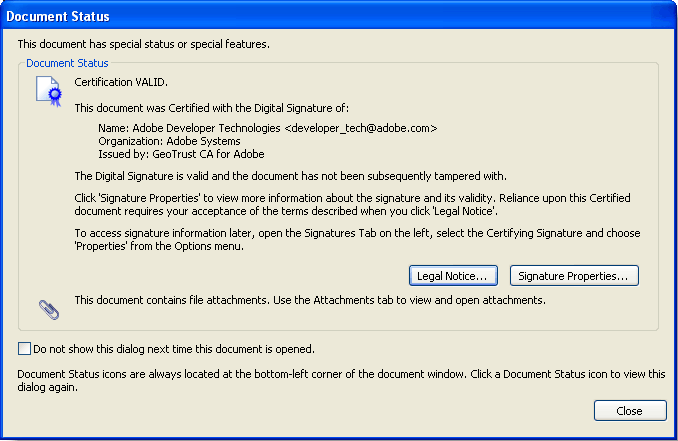
Certified documents will display a blue ribbon in the lower-left corner of the screen and present a more comforting Certification VALID dialog to end-users.

Signature terminology can be a bit complex. As you can see in the Document is Not Certified dialog box and in the Acrobat 7.0.5 Security User Guide, the form author's signature can be called a Certifying Signature, but it is most often referred to as an Authoring Signature. End-user signatures are called Ordinary Signatures or Recipient Signatures.
In Acrobat 7, there are two paths for certifying a form. Which path you take depends on whether the form was created in Acrobat or Designer.
Choose File > Save as Certified Document in Acrobat for forms created in Acrobat. This certification creates an invisible signature.
If the form is created in LiveCycle Designer, the best practice is to have at least two signature fields on the form-one you as the form author will sign (perhaps on behalf of your organization) before the form is deployed, and the rest for end-users. All of these signatures will be visible. You cannot use the File > Save as Certified Document feature of Acrobat 7 on Designer-created forms.
End users can sign the forms with Acrobat Professional or Standard. Adobe Reader users also can sign forms if the forms have been processed by Reader Extensions Server.
Conclusion
Acrobat and Designer are great tools for creating electronic forms, but you can easily go off track if you overlook some basic aspects of your business workflow, such as which PDF-viewing software your end user has. You can have a successful form deployment if you take a few moments to look at the whole form workflow before you start adding fields to a form.
Try Acrobat DC
Get started >
Learn how to
edit PDF.
Ask the Community
Post, discuss and be part of the Acrobat community.
Join now >

0 comments
Comments for this tutorial are now closed.
Smithe228
10, 2014-04-14 14, 2014I am truly thankful to the holder of this website who has shared this fantastic article at here.
Comments for this tutorial are now closed.