Looking for more help on How to Edit PDF?
- Consult the How to Edit interactive guide.
- Ask a question in our forum.
- You can leave a comment below for the author of this tutorial.
This tutorial shows you how to work with the Edit PDFs features in Acrobat 9. See what the all-new Acrobat DC can do for you.
Download a free trial of the new Acrobat.
By Anne-Marie Concepcion – September 21, 2009

In this tutorial, learn how to use Acrobat 9 to add text to a PDF file and style the text and the box the text is in. A bonus tip explains how to ensure that the added text always prints.
Let's say you're in Acrobat and you need to add text to a PDF, maybe in the margin or under an image or to fill out a static form field, and you want that text to appear in printouts, just like the rest of the text. The original file that was exported to PDF isn't available; all you have is the PDF itself. Which tool do you turn to?
Many people would say the Typewriter tool, and that's a good answer. You can access it in Acrobat 7-9 by opening the Typewriter tool bar (View > Toolbars > Typewriter) or from the Tools menu. Click on the Typewriter icon in the toolbar and you can click anywhere on a PDF page and start typing.
The problem is that the Typewriter tool is clunky. The text you type won't automatically wrap to the next line, for example -- you have to hit the Return/Enter key to stop your text from continuing out past the page edge.
Also, you're limited to your system's default font. You can change the text's size, line spacing, and style with the Properties toolbar (Command/Ctrl-E), but there's no way to change the typeface itself.
The next time you need to add text to a PDF in Acrobat Pro, try the Text Box tool. It's part of the Comment group, so go to View > Toolbars > Comments & Markup to access it. Unlike most of the other comment tools, text you enter in a Text Box remains visible all the time; it doesn't close up to an icon like a pop-up note. (Like all comments, though, you can choose to Hide it, which might come in handy.)
Select the Text Box icon in the Comments & Markup toolbar and use it to drag out a box (a text frame) on the page, just as you would in a page-layout program. Release the mouse button and the text insertion cursor is blinking inside it, ready for you to start typing. The text wraps as soon as the cursor hits the edge of the frame.
The initial look of the text and the box itself is probably not what you want, but I'll tell you how they're easily changed, and how to set your own default appearance for it.
To adjust the box's position, click on it with the Text Box or Hand tool. The frame itself highlights, meaning you can drag the frame around on the page or drag one of its handles to resize it.
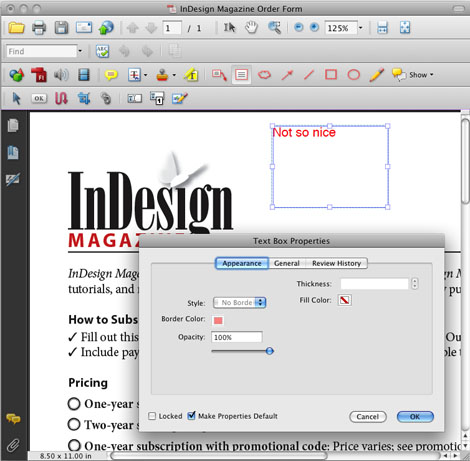
The default style for the Text Box frame is a one-point red stroke, which would make sense if this were an actual comment we wanted a reviewer to notice. For our purposes we don't want any border surrounding the text box.
To change it, right-click on the box's edge (highlighting the box first if necessary) and choose Properties from the context menu. In the dialog box, change the line Style to "No Border" so the red line disappears. Note you can choose a fill color for the box (White is the default) -- I usually change this to No Color so my boxes don't accidentally mask out existing text -- and even an Opacity. I'd leave it at 100% opacity, though, since the setting affects the text as well as the fill.
To make these settings the default look for all the text boxes you'll add to the document, turn on the checkbox next to Make Properties Default at the bottom of the dialog box.
The text you enter inside a text box is easily modified, but you have to select it first. If you've moved out of text editing mode, just double-click on the text with the Text Box tool to jump back in.
Drag over the text to select it and open the Properties toolbar (from the View > Toolbars menu, or press Command/Ctrl-E). Now you can change the selected text's color, horizontal alignment, typeface, and style (bold, italic, underlines, etc.). You can mix formatting in the same text box and changes will be applied just to the characters you select.
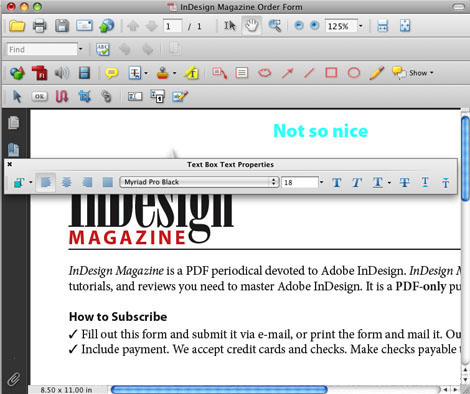
These fonts get embedded in the PDF, by the way, so go ahead and add some text in Bickham Script if you want! Even users with Adobe Reader will see the text just as you entered it.
To make your modified text formatting the default for all future Text Boxes in this PDF, you need to select the box with the Text Box tool (so the frame highlights), right-click on it, and choose Make Current Properties Default from the context menu.
Here's one last neat trick: If you select some of a PDF's text with the regular Select Text tool (to the left of the Hand tool), copy it (Edit > Copy), and paste it in, it automatically comes in as an editable Text Box. You can even copy/paste from one PDF to another, a neat way to grab some content from one PDF and add it to another.
Recently, I was adding some language to a contract a vendor had sent me as a PDF. The Text Box tool worked wonderfully to add exactly what I wanted to include, in the right place and in the right font. I saved my changes, but before I closed the file and e-mailed the revised contract back to them, I printed out a copy for my records.
I grabbed the pages from the laser printer and took a look. Ack! Where did my edits go? The printout didn't include them. It was the original contract they had sent me.
I checked my settings in Acrobat's Print dialog box and found the problem. I had set it to print "Document Only" from the dropdown menu. Acrobat didn't print the additional text I entered with the Text Box tool because it considered those to be comments. To get the printout I wanted, I needed to choose "Document and Markup" from the menu instead. I did so, and when I made a new printout, my Text Box additions were there.
Okay, so now I knew how to make sure my new contract language appeared in the printout, but how could I make sure the vendor I was sending the file to knew? It's not something you can set and save in Acrobat, like you can with a PDF's initial view scale.
I was planning on returning it to them as a PDF attachment. (Yes, I could always put my good printout in an envelope and mail it to them, but -- puh-leeze!) When my vendor's admin opened the attachment in Reader or Acrobat to print it, would they remember my accompanying instructions to specify Document and Markup in Acrobat's or Reader's Print dialog box?
I think not. And this was a contract ... it was vital that my edits always appear.
Here's what I discovered. To convert Text Box comments into actual type embedded in the PDF, you must print the PDF from within Acrobat to the virtual Adobe PDF printer. (This is also known as "refrying" a PDF). The virtual printer is installed automatically when you install any recent version of Adobe Acrobat.
It's easy to do. Open the File > Print dialog box and choose Adobe PDF 8.0 (or whatever version you have installed) from the Printer dropdown list. When you click OK, you'll get an Open/Save dialog box where you can name the PDF and choose where to save it. It should open automatically in Acrobat when it's done.
To test that your Text Box text has been "burned into" the new PDF, press Command-Shift-8 (Ctrl-Shift-8 on Windows), the shortcut for Hide Comments. Your text should remain visible, nothing should change. To show comments again, press Command/Ctrl-8.
Nothing else I tried worked, by the way -- OS X's Save as PDF, PDF Optimizer, exporting to PDF/X-1a, and so on. Either they couldn't generate a PDF at all, or the comments remained as comments. It's likely that exporting to PostScript and then distilling would work (I think), but once I found that printing to PDF did the trick, I was happy.
Note: I don't recommend refrying press-ready PDFs you're going to send to a commercial printer. It's fine for other PDFs, though, that you're using as final documents.
Reprinted with permission by Anne-Marie "HerGeekness" Concepcion, author of the video tutorial Acrobat 9 Professional Tips and Tricks.
Products covered: |
Acrobat 9 |
Related topics: |
Edit PDFs |
Top Searches: |
Edit PDF files convert PDF to Word convert PDF to Excel convert PDF to PowerPoint Rearrange PDF pages Convert PDF to JPEG |
Try Acrobat DC
Get started >
Learn how to
edit PDF.
Post, discuss and be part of the Acrobat community.
Join now >
1 comment
Comments for this tutorial are now closed.
Lori Kassuba
5, 2016-01-07 07, 2016Hi Nilesh tanwar,
I would suggest using a custom stamp to do this. Stamps act just like text box comments and you can see them in the Comments List.
Thanks,
Lori
Nilesh tanwar
9, 2016-01-01 01, 2016i have some query, i want to write some text in text box by default.
when i will click on text box tool than it should show me box with some text written in box. if it is possible than please answer it. thank you
Comments for this tutorial are now closed.