


You know those forms you worked so long and hard to perfect? Wouldn’t it be nice to wave a magic wand and have them suddenly become interactive fields on PDF forms? Say "Abracadabra!"
One of the most intriguing tools in Acrobat 8 Professional is the Artificial Intelligence (AI) feature that helps you create fields on a document where there are no form fields. Using a set of rules, the program attempts to determine what elements on a page are form fields, as well as the types of field, and their names and placement.
You can use any sort of file that you can convert to PDF, whether text and graphics, an image or a scanned file. If you are using an image, before the page can be evaluated for form-field placement, you must capture the text using OCR.
Note: Read how to scan and capture text in a document in my previous article for AcrobatUsers.com.
Simplifying the form appearance
The design adage “less is more” applies to form creation. Acrobat uses a set of rules to synthesize the placement and types of form fields on a document, but it isn’t infallible. The less contrived the document’s appearance, the easier it is for the program to decipher the contents.
Look at the example in Figure 1. I’ve selected part of the table area using the TouchUp Object tool. While the example is extreme, you can see how many objects make up one row of the table.
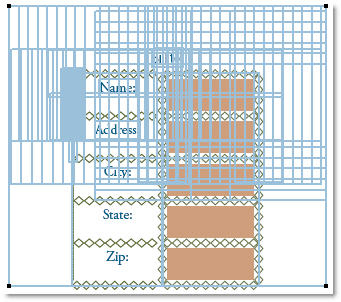
Figure 1 Complex decoration of form fields may be interesting, but complicate the field-recognition process.
Check your document for these elements, and remove or modify them if possible:
- Remove heavy borders around fields
- Delete shaded boxes used to identify boxes and fields
- Remove extra borders on the layout, leaving captions and user-response areas only
- Move captions to the left of user-response areas
Recognizing and naming fields automatically
When the document opens in Acrobat 8 Professional, choose Forms > Run Form Field Recognition to start the synthesis process. Acrobat scans the file, searches for what looks like form fields and draws them on the document (Figure 2).
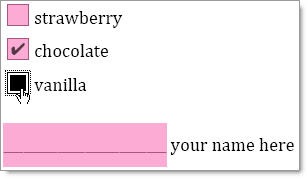
Figure 2 Acrobat interprets the page and inserts form fields where they might belong.
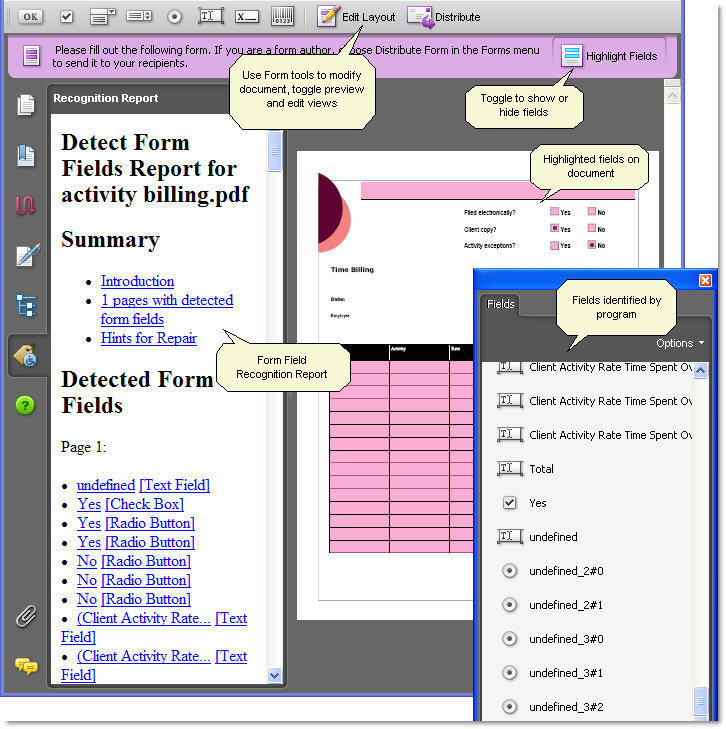
As shown in Figure 3, other program elements are used in the form-field-design process, including:
- The Document Message Bar, which displays the standard form message; click Highlight Fields on the bar to color the fields on the form.
- The Recognition Report, displayed in the Navigation panels area
- A list of the fields on the Fields Navigation panel (opened manually)
- The Forms toolbar, which lets you toggle between a preview of the form and an editing view where the fields are activated (opened manually)

[[Insert fig0307_03.jpg]]
Figure 3 The program window displays a number of form-manipulation features.
See larger image
Tip: To save time, open and dock the Forms toolbar and the Fields navigation panel, shown in Figure 3.
Evaluating recognition results
In addition to drawing the fields on the document page, Acrobat 8 Professional displays a Recognition Report. The report, named Detect Form Fields Report for [filename], contains several sections that are linked together in the report’s Navigation panel, shown at the left of Figure 3.
The sections of the report include:
- The Summary section, which lists the fields identified, as well as suggestions for modifying contents. Click a link in the Summary section to jump to different sections of the report.
- The Introduction explains how the report works, what it shows and how it is used. The Introduction also describes the temporary nature of the report in detail.
- The Detected Form Fields section of the Recognition Report lists the fields by name and by type of field.
- The Hints section of the report includes tips for repairing the form fields. To review the hints, click the [Field type] listing following the name of a form field (Figure 4). The report then displays the “How to Fix [type] Field Form Fields” section of the Recognition Report.

Figure 4 Field names link to information on how to manipulate the form-field type.
Caution: Be sure to use the report once generated. The Detect Form Fields Report and the Recognition Report panel are temporary. If the file is saved with a different name, the report is discarded. The report isn’t reusable, and can’t be saved. You can’t open the Recognition Report panel.
Completing the form
The form usually needs modifications to the automated field synthesis results such as renaming fields, adding additional fields, configuring field parameters and so on. You can refer to a number of articles, tutorials and tips on AcrobatUsers.com for further information.
Be sure to check out this tutorial by Lori DeFurio:
- Creating basic fillable forms
April 2007
Preparing the form
Use the Forms tools in Acrobat 8 Professional or move the form into LiveCycle Designer to complete the form’s content. Before distributing the form, take care of some final structural features in Acrobat 8 Professional.
Setting tab order
Tab order refers to the sequence in which the program moves focus from field to field in response to pressing the Tab key.
Note: Tab order isn’t required for form use, but is a courtesy to users. A consistent tab order is useful for those working with forms frequently, and is required for those using screen readers or other assistive devices.
Check the tab order by selecting the first field on the form, and then pressing the Tab key repeatedly. In many cases, the tab order needs adjusting.
Follow these steps to change the tab order:
1. Select the Pages icon in the Navigation panels’ area to display the Pages panel. Select the page thumbnail.
2. Select Options > Page Properties to open the Page Properties dialog box and click Tab Order (Figure 5).
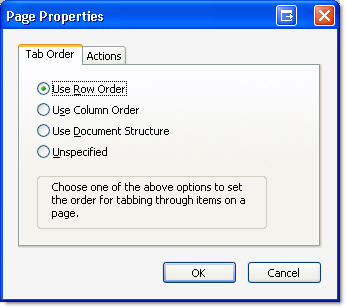
Figure 5 Specify how users tab through the form using Tab Order.
3. Choose an option from the list. The most common method is Use Row Order, as most forms are structured in rows.
4. Click OK to close the dialog box.
5. Test the form: Press the Tab key to shift focus to the next field in top to bottom, left to right order.
Usage rights in detail
Check out More Enabling Features for Adobe Reader by Lori DeFurio. The AcrobatUsers.com article offers in-depth coverage of user rights.
Enabling files for use in Adobe Reader
In the past, users working with Adobe Reader could fill out a form and print the form, but they couldn’t save the form data. Acrobat 7 allowed for documents to be commented on in Adobe Reader; Acrobat 8 takes enabling features much further.
Follow these steps to enable the form for recipients using Adobe Reader 7 or 8:
1. Choose Advanced > Enable Usage Rights in Adobe Reader.
2. The Enable Usage Rights in Adobe Reader dialog box opens, outlining the effects of enabling usage rights, including rights to:
- Allow the saving of form data
- Allow the use of commenting and drawing markup tools
- Sign existing signature fields
- Digitally sign anywhere on the page if used in Adobe Reader 8
- Restrict some editing features
3. Click Save Now. Name the file in the Save As dialog box, and click Save.
Distributing the form
Before a form can be distributed and tracked, it must have a Submit action button or script attached to the file, as shown in Figure 6.

Figure 6 Insert a button using a Submit form action.
Follow these steps to distribute your form:
1. Click Distribute on the Forms toolbar to display the Form Distribution Options dialog box. Choose to either send an e-mail with the form attached, or save the file for later distribution. Click OK to close the dialog box.
2. If you choose to send the form, the Distribute Form wizard opens, shown in Figure 7.
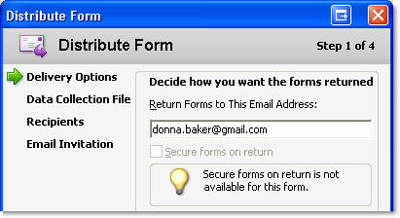
Figure 7 Distribute a form using the Distribute Form wizard.
3. Step through the panes of the wizard, defining these elements:
- Specify a return e-mail address; the default is to use the address specified in the Submit button
- Name a the data-collection file; Acrobat creates a file by default using the file’s name, with “dataset” and a four-digit number suffix
- Specify the recipients for the form by typing e-mail addresses or selecting addresses from your system’s Address Book
- Read and modify the boilerplate text used for the e-mail invitation message; select and load an alternate text file if desired.
4. Click Done. Follow the prompts to send the e-mail invitations.
Tip: You can add forms you work with to a storage library; on the final Distribute Form information dialog box, click Add to my form library.
Tracking a form
The challenge of working with multiple items like forms is how to manage them and remember where you are in your workflow. Fortunately, you can turn to the Forms Tracker in Acrobat 8 and Adobe Reader 8 to manage form distribution and collection.
Follow these steps to initiate a workflow in the Forms Tracker:
1. Choose Forms > Track Forms from the menu or click the Forms Task button and select Track Forms to open the Forms Tracker dialog box (Figure 8). The Tracker dialog box contains separate panels for the Review Tracker, Forms Tracker, and RSS Feeds.
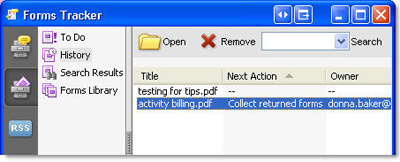
Figure 8 Use the Forms Tracker to manage form workflows.
2. Choose an option from the menu in the left pane of the dialog:
- Click To Do to display forms that are active. A form that has been created, but not sent, for example, is included on the To Do list.
- View the History listing to see forms in progress, dates for actions, such as sending or receiving, and outstanding actions, shown in Figure 8.
- For managing large numbers of forms, type a term in the Search field at the top of the dialog box and click Search. Select a form from results returned in the Search Results view.
- Read the list of forms in the library that include the forms’ titles and dates.
3. Select the form you want to use in the list at the right side of the dialog box and then click Open to view the file in Acrobat 8 Professional.
4. Close the dialog box.
Tip: When you have finished working with a form, click Remove to delete the form from the Form Tracker. It’s easier to track your workflows if only active forms are listed.
Collating and viewing returned data
Your form’s e-mail recipients open the form in either Acrobat or Adobe Reader. Information on completing the form is shown in the Document Message Bar (Figure 9). When completed, respondents can either click the Submit button added to the form, or the Submit Form button on the Document Message Bar to automatically return the form.
![]()
Figure 9 The Document Message Bar explains how to work with the form.
Aggregating and viewing the data
Completed forms are returned to the e-mail address specified in the Distribute Forms wizard. Your workflow determines how and when you assemble returned files. You may add files daily, or at the end of a form’s return period.
Follow these steps to add the form data to a dataset file:
1. Double-click a returned form to open it in Acrobat 8 Professional. The Add Completed Form to Data Set dialog box opens.
2. The “Add to an Existing Data Set” option is selected by default, and the dataset file associated with the form is shown in the field.
3. Click OK to close the dialog box. The dataset file, created as part of the Distribute Form wizard’s function, opens in Acrobat; the original datasheet file is used as the PDF package’s cover sheet (Figure 10).
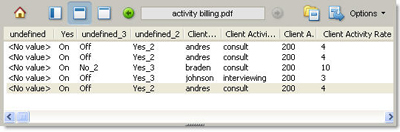
Figure 10 The dataset file is a PDF Package with commands for adding form data.
4. Click Import Data to locate and select additional data files to include in the dataset.
Exporting the data
Acrobat lets you amalgamate the returned data into a CSV (comma-separated value) file for use in a spreadsheet or database table.
Follow these steps to view form results in an Excel spreadsheet:
1. On the Document Message Bar of the PDF, click Export Data to open the Select Folder to Save File dialog box. The file is named according to the PDF Package and saved in CSV format by default.
2. Specify the storage location and file name, and click Save to save the file.
3. Open your spreadsheet or database program.
4. Choose File > Open and locate the CSV file. Click Open to load the file into the spreadsheet.
Each row on the spreadsheet represents one returned form. The columns on the spreadsheet are named using the form’s field names (Figure 11).

Figure 11 The fields are shown as column heads and each form returned is a separate row on the spreadsheet.
I’d like your feedback:
Are you actively working with forms? Have you tried the Form Field Recognition process? How was your experience? Do you use the Form Tracker? Any tips?
E-mail me
4 comments
Comments for this tutorial are now closed.
Lori Kassuba
2, 2014-10-17 17, 2014Hi Sam,
Yes, you can do this using just the free Reader with the IRS forms.
Thanks,
Lori
Sam
12, 2014-10-16 16, 2014I want to access an IRS form online, fill in the applicable fields, print the completed form and if possible, email it to another person.
Is this possible?
donna baker
4, 2012-08-15 15, 2012Hi Diana -
Thanks for writing - and by all means, get your classes finished!
Short answer to your question is that you can’t. There’s no simple way to include attachments to a form document.
donna.
Diana Hansen
8, 2012-08-13 13, 2012Donna,
I’ve been a little busy but one day, I will finish the class that I took from you.
I’ve been stumped looking for an answer to a forms question. I’ve created the form by converting a word document into Acrobat and also I put it into InDesign. (Just to see the difference) This is a form that is on a website and we used the distribute function. The members can input information and the form is sent via email to the enduser. I need to have the users attach receipts to the form before it is submit via email to the enduser. I can’t find how to do this. Can you assist me.
Thanks
Diana
Comments for this tutorial are now closed.