Nuts and bolts of PDF forms
Learn how to create fillable PDF forms with the Text Field tool in Acrobat 7.
By Carl Young – September 7, 2006

Once you have planned your PDF form deployment, you are ready to start building your form. I'll start with a good process for using Acrobat to create a fillable form.
Creating forms with Acrobat
As noted earlier, creating forms with Acrobat is a two-step process. First, a shell or template of some kind is generated from another application, such as Adobe InDesign. Next, form fields are added with Acrobat.
For example, you can use the Expense Report InDesign template that comes with Adobe Bridge CS2 to create a fancy expense report. Export the file as a PDF.
Why didn't we go to the Forms task button and choose Create New Form? Because that would create a new form in Adobe LiveCycle Designer, which is a subject for another article.
Once you have opened the shell in Acrobat, you are ready to go to work. First, open and then dock the Forms Toolbar. Choose Tools > Advanced Editing > Show Forms Toolbar. Then dock the Forms Toolbar by dragging it onto the Acrobat toolbar area, or by pressing Ctrl+8.
Like many forms, the expense report is essentially a grid. You will primarily use the Text Field tool to create the form.
![]()
Text Field Tool
Let's start with the Contact Information: section, which is an address block. Select the Text Field tool and click and drag to add a field to the top line of the address block. Enter the following values:
In the General Tab, name the field Name and add a Tooltip of Enter Your Name.

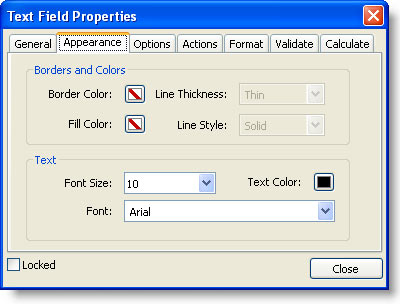
In the Appearance tab, set Border and Caption to none (diver down symbol). Make the default font Arial and set the size to 10.
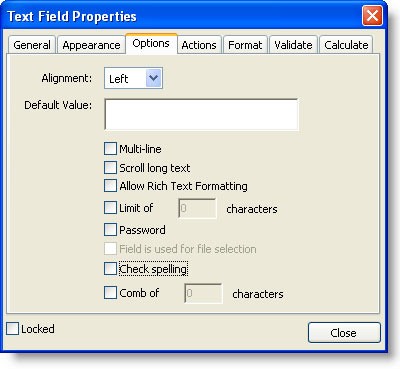
In the Options tab, clear all the presets. Scroll Long Text will let the form user enter more text than can be shown, which is problematic if you think someone will print the form. You can deselect Check Spelling if you don't want to spell check names and street addresses.
Creating multiple fields
Next, move the Text Field Properties dialog box to the right so you can see the entire address block. Right-click (Option-click on Mac OS X) on the field you just created and choose Use Current Properties as New Defaults. Now all your fields will have a uniform look.
Important: To create additional fields, do not close the Text Field Properties dialog box. You can add new fields and still keep this dialog box open. This simple step will greatly speed your form creation.
You can use two techniques to complete this section.
The first is Click-Ctrl-Drag (Click-Command-Drag on Mac OS X). Click on your source field (the one called Name), hold down the Ctrl key (Command on MacOS) and then drag down. Your mouse pointer will turn into a black arrowhead with a trailing plus sign.
![]()
Drag the ghosted field down into the space for the second field.
You can continue adding fields this way, or use the Create Duplicate Fields command.
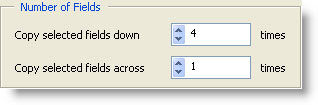
To create multiple copies at once, Right-click (Option-click Mac OS X) and choose Create Duplicate Fields. For the address block, you would want 4 down and 1 across.
Notice that Acrobat automatically appended a numeric series to the names of the fields. You can keep these, or change the field names in the General Tab. Remember, you don't have to click Close every time you rename a field.
Note: If you plan on exporting data from your form into a database, check with your database administrator and match your form field names with the names of the database fields.
To finish the form, you just have to add more fields with the Text Field Tool. Start a grid by drawing one field, and then use Create Duplicate Fields to fill out the rest.
Suggestions for creating fillable forms
Here are some other useful working procedures that you can use on almost any form:
1. Instead of changing fields one at a time, you can change the properties of multiple fields at once by selecting a group. Select more than one field at a time with Ctrl-click (Command-click Mac OS X).
For example, select the fields you add to the main area of the form and then Right-click (Command-click Mac OS X) and choose Size> Height to make the fields uniformly tall. You also have alignment, centering and distribution options.
Once you have selected a group, you can use Create Duplicate Fields copy rows of fields. In the main section of the sample form, you could draw and format fields for the first row. Then make 15 copies with Create Duplicate Fields. (Use the Up/Down buttons until the fields fit into the gridlines.)
2. Dozens or hundreds of fields on a page can be confusing to work with. Use View > Navigation Tabs > Fields to display a window that shows all the fields in alphabetical order. Click on the field you are looking for in the Field Navigation tab and the field is highlighted in red.

If you have enough screen real estate, you can use the Field Properties dialog box and Field Navigation tab in combination. You can keep each in floating windows, or dock the Field Navigation tab.
3. Use the Multi-line and Rich Text Formatting options for explanatory fields such as the Note field. Multi-line gives end users the capability to enter multiple lines of text, and Rich Text Formatting options lets them format the text.
4. To select all fields, use the Select Object Tool, which is not on the Form Toolbar. You can find the Select Object Tool by choosing Tools > Advanced Editing > Select Object Tool.
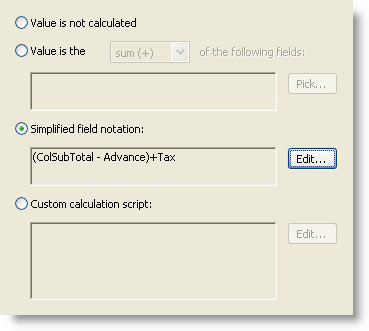
5. Assist your users by making fields calculate. You can use Field Properties > Calculate > Value is the... for simple math. Don't forget about Simplified Field Notation, which was introduced in Acrobat 6 (and not compatible with earlier versions), which often is easier to use for calculations than JavaScript. While you could write a JavaScript to find the result for the main Total field, it's easier to use Simplified Field Notation.
For example, let's say you named the Subtotal field ColSubTotal, the Advance field Advance, the Tax field Tax and the Total field Total.
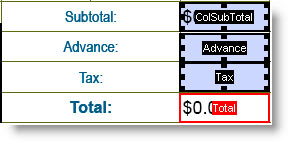
To arrive at the correct value for Total, you would subtract Advance from ColSubTotal and then add in the Tax. Your calculation formula for the Total field would be (ColSubTotal - Advance) + Tax.
Conclusion
The Forms toolbar in Acrobat provides the capability to create effective forms quickly. This article explained general working procedures for creating fillable forms with the Text Field tool, but does not explain every tool and option.
With a little practice, you can start creating business-ready forms in just a few hours.
Related topics: |
PDF Forms |
Top Searches: |
Convert existing forms to fillable PDFs fill and sign PDF online |
Try Acrobat DC
Get started >
Learn how to
edit PDF.
Ask the Community
Post, discuss and be part of the Acrobat community.
Join now >
1 comment
Comments for this tutorial are now closed.
Lori Kassuba
5, 2014-01-21 21, 2014Hi Marie,
Can you please post your question here so we can help you interactively:
http://answers.acrobatusers.com/AskQuestion.aspx
Please be sure to select the Create and analyze forms category.
Thanks,
Lori
Marie
7, 2014-01-17 17, 2014I need help, I am trying to create an order form for scanning slides. My form has 3 options Line 1: 1-499 the price is .49 x the cost for 1 DVD, Line 2 500-1500 = 2 DVDs etc. Each line has a subtotal and then the total. Example: qty x unit price = subtotal x DVD = total. If line 1 doesn’t have a subtotal, what is the code that I need to enter to make the total = zero?
Comments for this tutorial are now closed.