This tutorial shows you how to work with the Combine Files features in Acrobat X. See what the all-new Acrobat DC can do for you.
Download a free trial of the new Acrobat.
Put it in a PDF Portfolio with Acrobat X
Learn the differences between an Acrobat 9 PDF Portfolio and one created in Acrobat X Pro or Suite.
What’s the biggest difference between an Acrobat 9 PDF Portfolio and one created in Acrobat X? In a word—sophistication. Improvements in the product make the appearance, customization and content more sophisticated than what you’ve experienced in Acrobat 9.
I liked PDF Packages in Acrobat 8, and I liked PDF Portfolios in Acrobat 9. It shouldn’t come as a surprise that I like them even more in Acrobat X. With more ways to present, view and customize your projects, I’m sure you will, too.
The basic concept of a PDF Portfolio is the same. You still assemble files and folders, add an interactive interface and customize the display. Of course, since you’re creating a PDF Portfolio in the new Acrobat X interface, the process is different. I’ve built dozens of PDF Portfolios in both versions of Acrobat Pro, on both Mac and Windows, and I find it an easier overall process in Acrobat X.
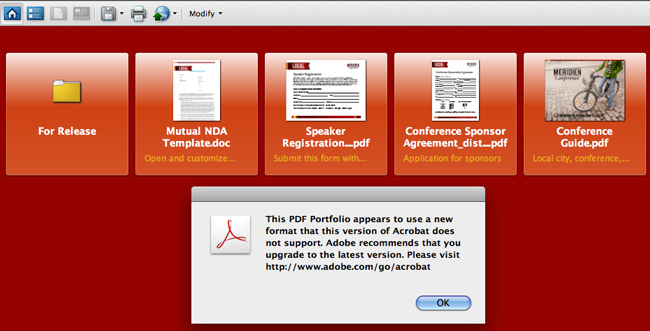
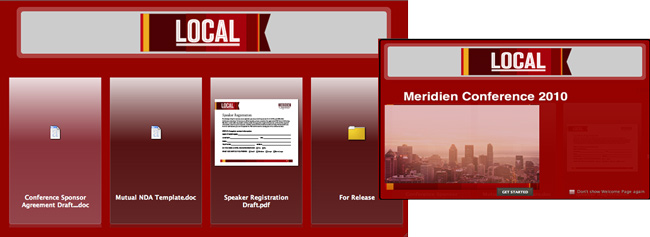
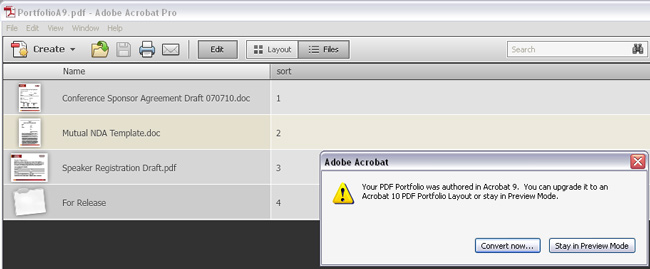
I’ll go through the process of building an Acrobat X PDF Portfolio, and show you some of the differences from the previous version. Be sure to check out the sidebar to learn how Acrobat X deals with a PDF Portfolio created in Acrobat 9 Pro, and vice versa.
Constructing a PDF Portfolio in Acrobat X
To get started, click Create PDF Portfolio on the Welcome window, or pick the command from the File menu. The Create PDF Portfolio dialog box opens, and lets you pick a layout, as well as add files directly (Figure 1).
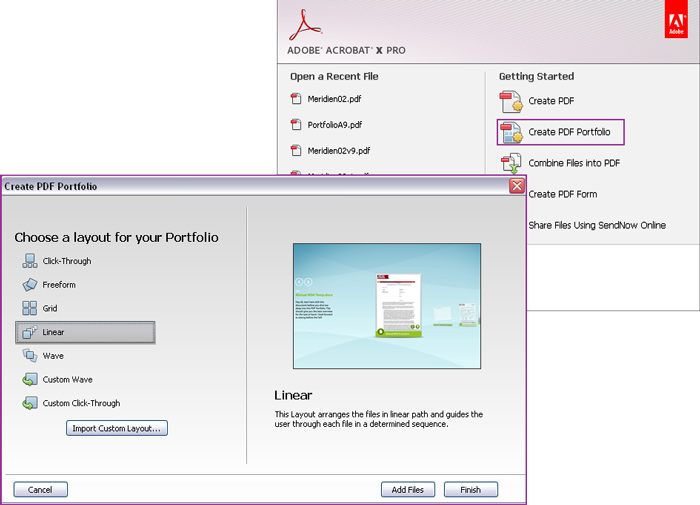
Figure 1: Make initial choices in the dialog box.
Note: In Acrobat 9, the interface was called the Navigator; in Acrobat X, it’s been renamed the layout.
Click through the preconfigured layout choices on the dialog box. You’ll see a thumbnail and description for each option. You can also choose a custom layout, and/or add files. All choices you make on the dialog box can be changed once you’re in the PDF Portfolio. Click Finish to close the dialog box and open the PDF Portfolio in the program window.
Unlike Acrobat 9, where the PDF Portfolio features opened in a separate program interface, Acrobat X uses the same window for the PDF Portfolio. You’ll see the toolbars disappear from the top of the window, and the right-panel labels change to Layout, Details, and Share. The Layout panel displays by default (Figure 2).
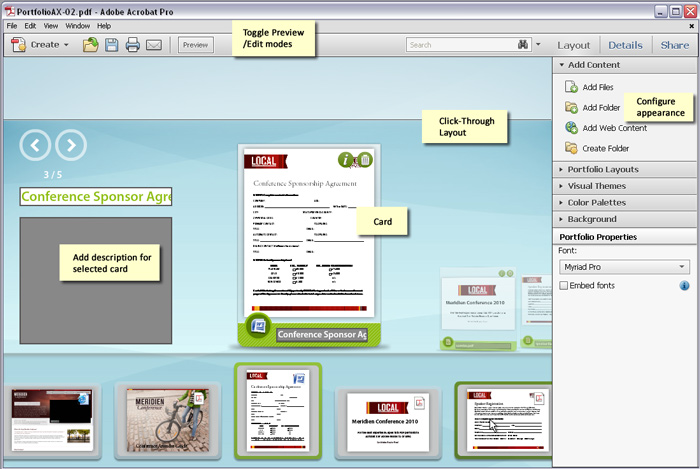
Figure 2: Start from the Layout panel.
Some of the layouts in Acrobat X are similar to those in Acrobat 9 Pro. For example, you’ll find a grid layout, and the Acrobat 9 Revolve layout is similar to the Acrobat X Linear layout.
Adding content
As in Acrobat 9 Pro, you can click the different bars in the panel to open groups of commands. Choose options from the Add Content commands to import files or folders, add a blank folder, or add web content (new in Acrobat X).
You can either add a web link to download a page from a specific URL, or add an embed tag to link to online content, such as video. To add web content to your PDF Portfolio, follow these steps:
- On the Layout panel, choose Add Content > Add Web Content to open the dialog box (Figure 3).
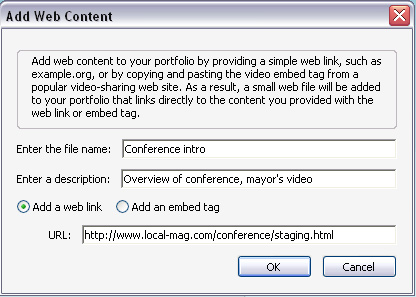
Figure 3: Add web content directly to a PDF Portfolio.
- Type a name for the file, used to display on the card.
- Type or copy/paste the URL for the page you want to insert.
- Click OK. The dialog box closes, and Acrobat X downloads and adds the page to the PDF Portfolio (Figure 4).
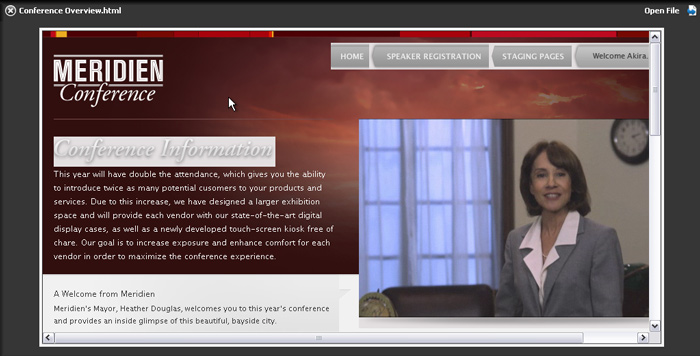
Figure 4: Add web content directly to a PDF Portfolio.
Configuring the appearance
Acrobat X offers many more ways to customize the appearance of your PDF Portfolio than Acrobat 9. Where you could pick a layout in Acrobat 9, and then customize the color and header, Acrobat X lets you go significantly further. Here are some of the highlights:
Choose one of the five default Portfolio Layouts, or import a custom layout (Figure 5). The layouts include a display method and navigation options.
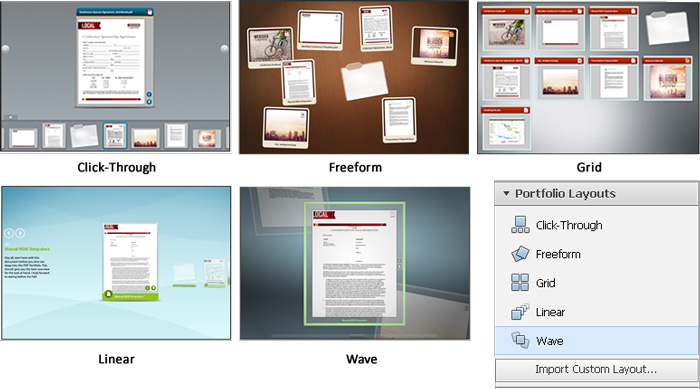
Figure 5: Choose a layout.
- Click the Visual Themes bar to open the list, and pick one of five default skins, or themes, used for the various elements of the layout. You can also create and import a custom theme (Figure 6).
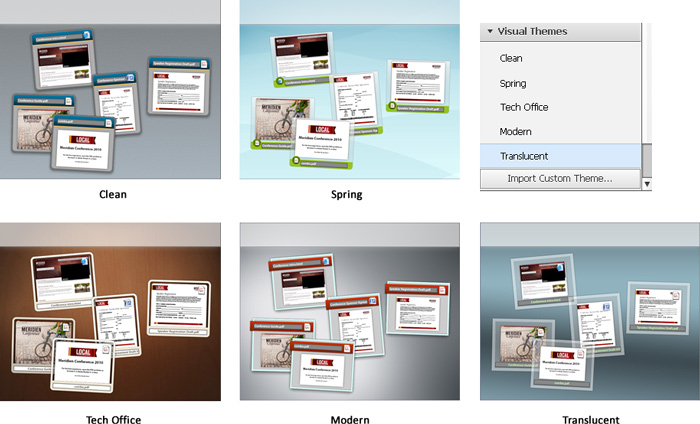
Figure 6: Specify the appearance of elements on the PDF Portfolio.
- Click the Color Palettes bar to open the set of preconfigured palettes. You can pick one of the options, or select one and click Create from Existing to open a color picker. Choose the element you want to change and pick the new color. To delete a custom palette, mouse over the palette to reveal the X and click it (Figure 7).
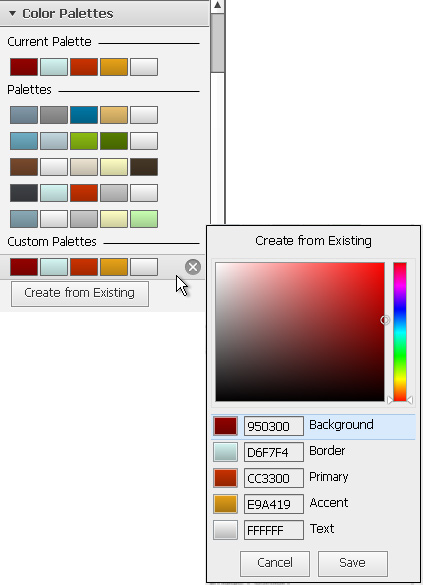
Figure 7: Choose or customize a color palette.
- There are many ways to configure the PDF Portfolio’s background. Click Background to open the settings. Pick a color, and specify a solid or gradient, as well as the intensity of the gradient. Each visual theme includes a background image, which you can remove, or replace with your own image. Further customize the image by choosing scale, position, opacity, and blur settings (Figure 8).
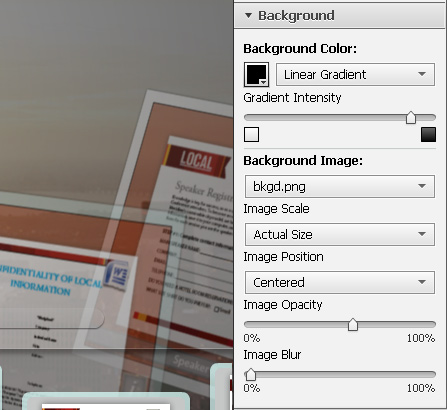
Figure 8: Change or modify the background image and color.
- Each layout included a header area at the top of the window. Click within the header area to activate the Header Properties section of the Layout panel (Figure 9). Here you can pick a preconfigured template including text and/or an image, or click the appropriate buttons to add and configure text or an image manually. You can also specify the color fill for the header. Unlike the header options in Acrobat 9, you can’t use active content like an e-mail or web address in the header.
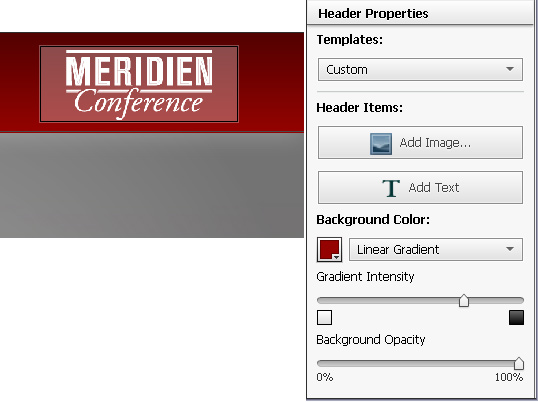
Figure 9: Customize the header for your PDF Portfolio.
- Regardless of the layout you select, you can choose the font applied to the PDF Portfolio in the Portfolio Properties section of the Layout panel. Unlike the limited number of fonts allowed in the Acrobat 9 PDF Portfolio, you can use any font you like, and even embed fonts. For the Grid and Freeform layouts, specify the size of the cards; for the Freeform layout you can also specify whether the cards are angled or straight on the page (Figure 10).
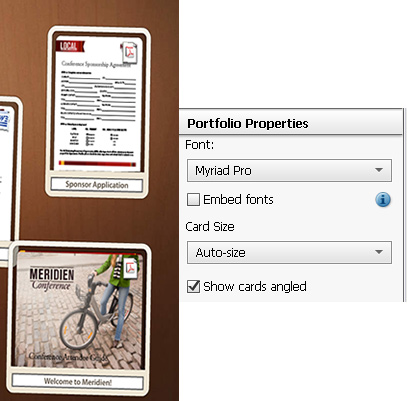
Figure 10: Pick a font and card options for specific layouts.
Note: Have you noticed there’s been no mention of the Welcome page? That’s because the Welcome page has been removed for Acrobat X.
Managing the files’ details
If you like to have control over what information a user sees when they scan your PDF Portfolio, you’ll like the improvements in Acrobat X. You can modify what information is offered in the Details panel, or make some changes directly on the files’ cards.
Modifying information
Click Details to display the panel and the files’ information (Figure 11). Here you can select the columns of information you want to display, as well as customize the content for the files’ cards. Click and drag columns to reorder them, or select a column in the Columns to Display list and click the up or down arrows.
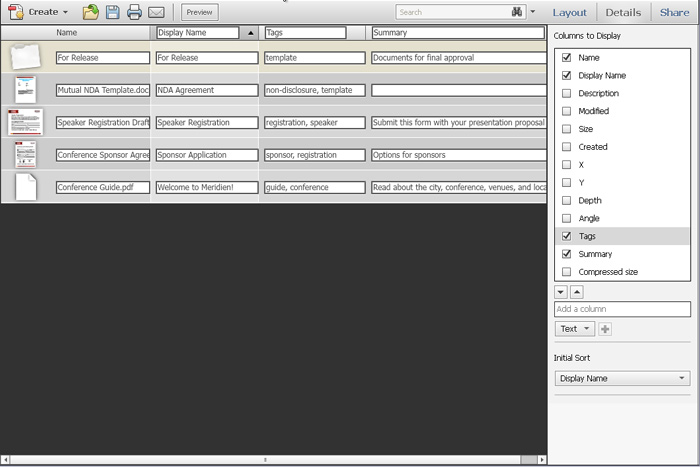
Figure 11: Customize the information included with the file.
Specify the order your files are presented by picking a column from the Initial Sort dropdown list; the Name field is used as the default. As in Acrobat 9, you can add custom columns, configured as text, numbers or dates. One new feature allows you to add tags to your documents, useful for increasing the precision of searches.
Tip: You can reorder the files visually, too, by dragging the cards in the Layout view.
Changing card information
Each document in the PDF Portfolio shows on its own card. You'll see the name of the file at the top, and a thumbnail of the first page (Figure 12).
Rather than having to guess at a file’s contents from looking at the thumbnail, or viewing the File information as in Acrobat 9, you can flip the cards in Acrobat X layouts (right in Figure 12).
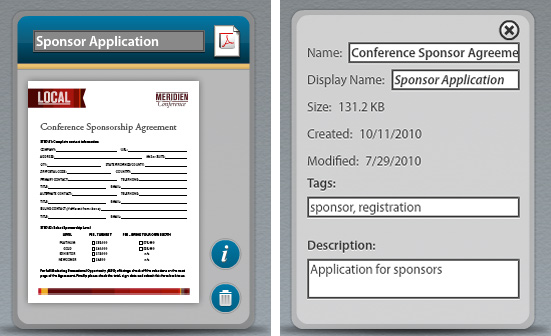
Figure 12: View thumbnails (left) and information (right) for each file.
Click the I button to flip the card over. Here you'll find information about the file. Fields you can modify display an active text field. Any changes made to the information in the layout are automatically included in the files’ details as well.
Previewing your PDF Portfolio
As you’re working on a PDF Portfolio, be sure to preview your work from time to time. You can preview the Layout and Details views, as well as individual files. Click Preview to change the display. The panels disappear, replaced by the PDF Portfolio, showing the working panel (either Layout or Details) active at the time you click the Preview button.
Previewing the layout
The amount of information shown on the PDF Portfolio varies according to the chosen layout. In Figure 13, for example, you’ll see the Description field’s contents shown below the display name to the left of the active card. In a multi-page file, mousing over the card shows up and down arrows to navigate through the thumbnail views. Click the arrow next to the I icon to extract the file from the PDF Portfolio.
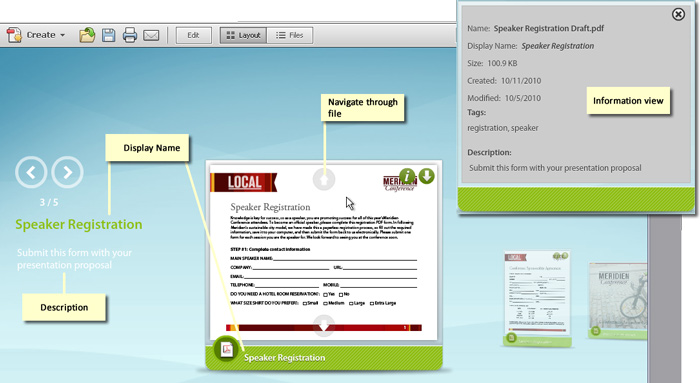
Figure 13: View thumbnails (left) and information (right) for each file.
Click the I icon to flip the card. You’ll see the information associated with the file, as defined on the Details panel. Some fields, including the Size, Created and Modified dates are shown by default, and can’t be changed.
Previewing the files information
Click Files on the program toolbar to show the table modified in the Details view. Only those columns selected in the Details view show on the screen (Figure 14).
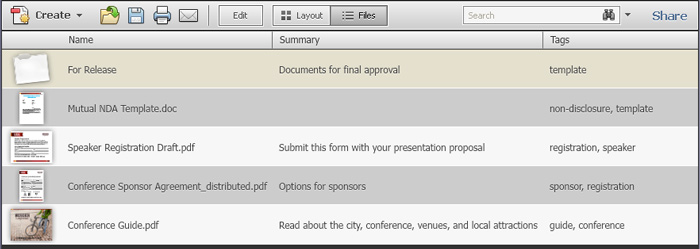
Figure 14: View the Files data in a simple table.
Previewing individual files
Remember how you had to click the Preview button on the PDF Portfolio toolbar in Acrobat 9 to view the files’ pages? And if the file wasn’t a PDF document, you’d see an icon and the file’s name?
In Acrobat X, previewing is simpler and more visual. In Figure 15, you’ll see the Acrobat X version of a preview—the inset shows the same file in Acrobat 9 Pro. This is a Microsoft Word document, showing a preview of the first page. Use the buttons on the popup toolbar below the page to move through the document. You can also extract the file, or view the information about the file from this view. Use the arrows to move through your PDF Portfolio’s documents; click X to close the preview and return to the layout.
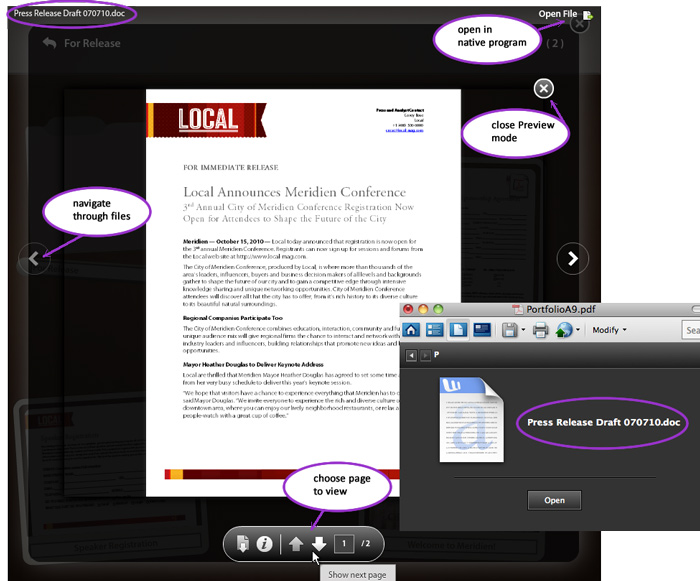
Figure 15: Preview a file in Acrobat X (inset shown in Acrobat 9 Pro).
Products covered: |
Acrobat X |
Related topics: |
Combine Files |
Top Searches: |
Create PDF combine files into one PDF Rearrange PDF pages |
Try Acrobat DC
Get started >
Learn how to
edit PDF.
Ask the Community
Post, discuss and be part of the Acrobat community.
Join now >


1 comment
Comments for this tutorial are now closed.
Carol R.
4, 2012-09-27 27, 2012I am trying to bates-stamp my email portfolio in Acrobat X. How do I do this and ensure the attachments to the emails are also bates-stamped. Every email must be produced in its native form with the older date first in the portfolio.
Comments for this tutorial are now closed.