Starting fresh: Creating a new PDF file


by Donna L. Baker, ACE, Baker Communications
In the past, people developed their own favorite techniques for creating a blank PDF file to use for building on in Acrobat. Throw those workarounds away! Now you can start from a fresh, new PDF page.
If you have been working with Acrobat for a while, you’ll have come up with your own methods for producing a blank PDF document that you store on your hard drive to add into an existing file whenever you need a blank page. In Acrobat 8, the new PDF Editor lets you start a new document, edit it and even add additional content. When you are finished, your document can be locked to prevent others from changing the contents.
Working with the PDF Editor
Acrobat 8 includes a new function called the PDF Editor for creating new files. Unlike other file-creation types — such as creating a PDF from one or more files or a scan — you don’t find the command in the Create PDF task button’s menu.
Start a new file
Follow these steps to start a new PDF file:
1. Choose File > Create PDF > From Blank Page. The Initializing Editor progress bar displays. When the feature is loaded, you see a blank page in the Document pane and a new toolbar (Figure 1). Guidelines identify the margins, and an active cursor displays at the upper-left edge of the page within the margins.
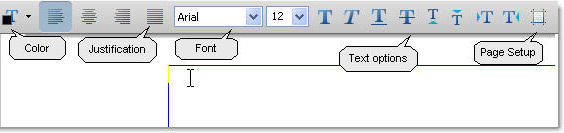
Figure 1: The PDF Editor displays its own toolbar.
2. Type the content you want to add to the page. Choose tools from the toolbar to configure the text color, justification, font and styles.
3. Click Page Setup to open the Page Setup dialog, used to configure the page’s appearance (Figure 2).
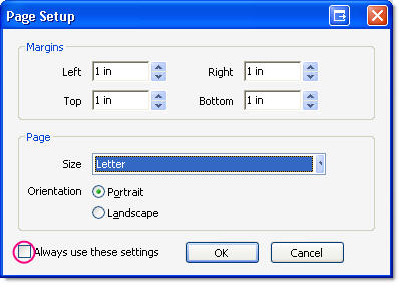
Figure 2: Configure the page layout.
4. Specify the margins, page size and orientation, then click OK to close the dialog box.
Tip: If you find you are making the same changes repeatedly, select the Always use these settings checkbox in the Page Setup dialog box. The settings become your defaults.
5. Save the file as a PDF document.
The saved file can be used as is, combined with other files or exported in different file formats.
Edit and lock the file
For editing, choose Document > Resume Editing. The New Document toolbar and the page’s margin will be displayed.
When you have added text as desired and are finished with the file, you can prevent anyone from making changes to the text by locking it. Choose Document > Prevent Further Edits. In the resulting dialog box, read the message about the uneditable state (Figure 3). Click Prevent Further Edits to open a Save As dialog box and save the file. To allow further changes, click Keep Text Editable to close the dialog box and return to the PDF Editor view.
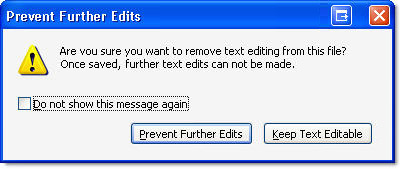
Figure 3: Choose an option for locking the editable status of the file.
Note: The PDF Editor, its toolbar, margin guides and the Document menu commands are only available when the document is created with the New Document command and isn’t locked for editing.
Configure new document preferences
You can specify settings for a new document in the Page Setup dialog box, and make those settings the default for the program. If you prefer, make changes in the program preferences at any time.
Tip: Take a minute to change the preferences if you customarily change to a work- or project-specific font to save a few mouse clicks.
Choose Edit > Preferences/Acrobat > Preferences and select New Document in the left panel to display the settings (Figure 4).

Figure 4: Modify the PDF Editor’s settings in the program preferences.
You can choose these options:
A font and font size; the default is ArialMT at 12pt
Margins; the default is 1.5in left and right, and 1in top and bottom margins
Page type; the default is Letter size with a Portrait orientation. Click the Size drop-down arrow and choose a different page size. Select either Portrait or Landscape as the default orientation.
Use the right tools for the job
A new document created by the PDF Editor isn’t restricted to text. Aside from the toolbar and page-setup features, and the ability to lock the document, the PDF file is the same as any other file. That is, you can add form fields, actions, images, other media and so on as desired (Figure 5).
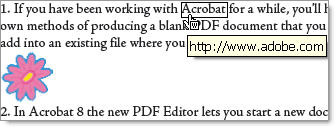
Figure 5: Insert different types of objects as with ‘regular’ PDF files.
A file created by the PDF Editor has some different editing characteristics than other PDF files. Here is what I found through some interesting experimentation:
- When the PDF Editor is active, additional content such as an image or link is hidden from view (Figure 6).
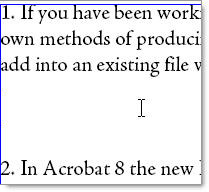
Figure 6: Activating the PDF Editor hides content added to the file, such as the flower image inserted in the blank space.
If you are working in the PDF Editor and select another tool, you have to choose Document > Resume Editing to display the PDF Editor features again.
You can use the TouchUp Text tool on the Advanced Editing toolbar to make edits as you would with a regular PDF file. However, the frame around the line selected by the TouchUp Text tool isn’t displayed. Frankly, I wouldn’t advise it: the PDF Editor wraps text automatically, but you have to manually move text with the TouchUp Text tool.
You can edit content using the TouchUp Text tool in a locked file. Select a line of text with the tool. Unlike using the TouchUp Text tool within the PDF Editor, if you select content in a locked file, you see the customary frame around the active line of text (Figure 7).
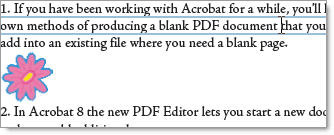
Figure 7: The TouchUp Text tool works as normal in a locked file.
The simplest way to add an image is using the TouchUp Object tool. Select the tool on the Advanced Editing toolbar, and right-click/Control-click on the page to open the shortcut menu. Choose Place Image to open a dialog box to locate and select an image. Resize or position the image as desired on the page (Figure 8).
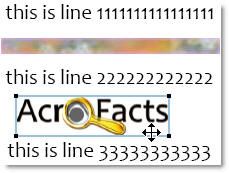
Figure 8: Use the TouchUp Object tool for placing images.
Don’t move text around on the page using the TouchUp Object tool. While it works, it can be rather confusing. For example, lines 3 and 1 of my document (shown in Figure 8) were transposed using the TouchUp Object tool. When the PDF Editor is reactivated, the text is shown again in its original location as it hasn’t been modified within the editor (Figure 9).
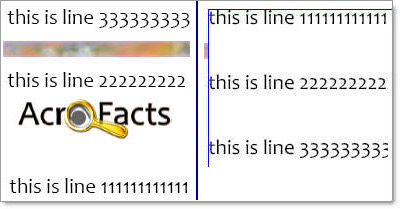
Figure 9: Moving text with TouchUp Object tool (left) isn’t identified in the PDF Editor (right).
Note: Even though the PDF Editor doesn’t show the text as being modified, if the document is printed, the transposed lines are shown.
I’d like your feedback:
Have you ever attempted to build a new PDF file from a blank page in the past? What was your favorite workaround? Have you discovered the new PDF Editor feature? Will you give it a try? I’d like to hear your experiences.
E-mail me!
Try Acrobat DC
Get started >
Learn how to
edit PDF.
Ask the Community
Post, discuss and be part of the Acrobat community.
Join now >
0 comments
Comments for this tutorial are now closed.
Comments for this tutorial are now closed.