


Looking for more help on How to Edit PDF?
- Consult the How to Edit interactive guide.
- Ask a question in our forum.
- You can leave a comment below for the author of this tutorial.
In my opinion, one of the best features of Acrobat 7 is the ability to manage the attachment(s) that can be included with a PDF file—helpful so you won’t lose or forget them, and the recipient won’t have an issue trying to store and retrieve them. What’s especially great is if you move the PDF file on your hard drive, the attached content moves with it.
In an Acrobat or Adobe Reader window, attachments are shown in a horizontal pane across the bottom of the screen, shown in Figure 1. In Acrobat 7 and Adobe Reader 7, a paper clip icon at the bottom left of the program window signals a file attachment.
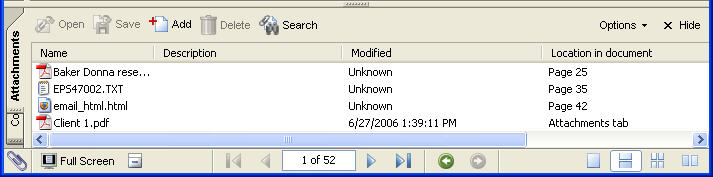
Figure 1: Read about attached content in the Attachments pane.
See larger image
Attachments are added to existing PDF files in Acrobat either as document attachments or as comments attached to a specific location in the file. Attach another document from the Attachments pane following these steps:
Rather than a file attached to an entire document, indicate a specific location where the file is referenced by using a comment following these steps:
Figure 2 shows the Attachment icon on the page. The number of the page on which the comment is placed is shown in the Location in document column of the Attachments pane.
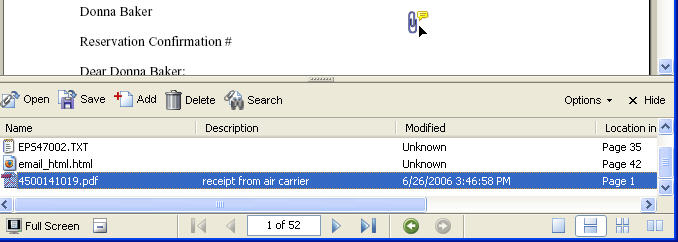
Figure 2: The attached file’s comment icon shows on the page. Information about the file is shown in the Attachments pane.
See larger image
Aside from adding more attachments in Acrobat, you can also:
Document security is always an issue whether you are dealing with securing PDF files, their attachments or both. Acrobat 7 Professional offers an
eEnvelope feature that stores a document and attachments in a secure wrapper, which can be password- or certificate-protected. Neither PDF files nor their attachments are encrypted, so once content is extracted from the eEnvelope, the files are no longer protected.
Acrobat 7 includes three default eEnvelope templates, shown in Figure 3.
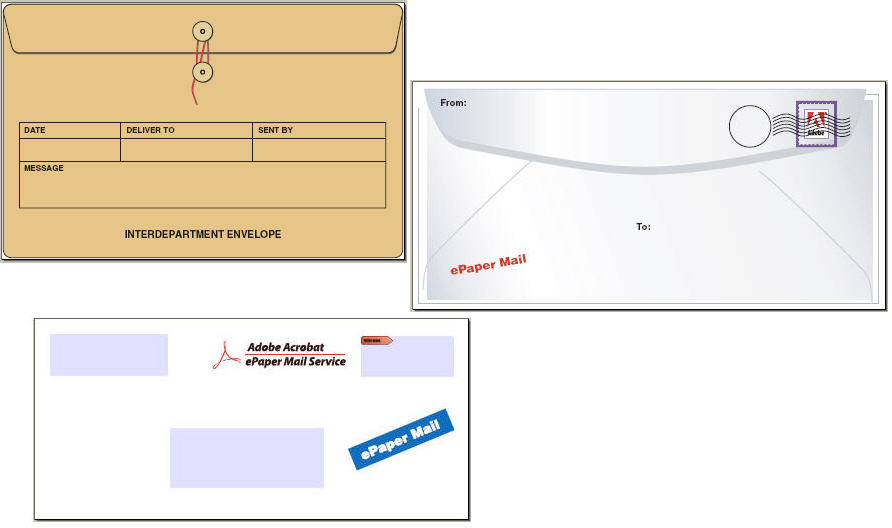
Figure 3: Use one of three default templates for wrapping content in a secure
eEnvelope.
See larger image
Follow these steps to apply an eEnvelope using the wizard in Acrobat:

Figure 4: Choose a security policy to apply to the package.
See larger image
If you are encrypting the file and/or its contents, the Password Security - Settings dialog box opens. Choose the desired options and follow the prompts to secure the files. The final step varies according to the selected delivery option. If you chose to e-mail the eEnvelope, follow the prompts in the resulting e-mail dialog. Otherwise, the file is stored on your hard drive in its encrypted state until
you choose to send it or remove the encryption.
If you decide to use encryption, choose the option best suited for your security requirements and your recipients’ program version. Select from these options:
Rather than using one of the default eEnvelope templates – attractive as they are – it's fairly simple to create your own template to enhance your business or corporate brand. You can either start from scratch, or modify one of the existing templates. There are several stages involved in adding a custom template to your system, including:
The three default templates are a good starting point for producing your own template file. The simplest way to generate a custom template is to create your own template appearance, like the example shown in Figure 5, and replace the original template's page in Acrobat. That way, you don't have to add and program fields, but merely adjust the ones already present in the original templates. Be sure the template file you create is the same size as the one in the default template file.

Figure 5: Create a custom template image to use for a secure eEnvelope.
Tip: If you are a power user, don't bother with an entire page replacement. Create your own logo image and paste it into the existing template file. Be sure to save your custom file with a unique name to prevent overwriting the default file.
Follow these steps in Acrobat to replace the page in the template:
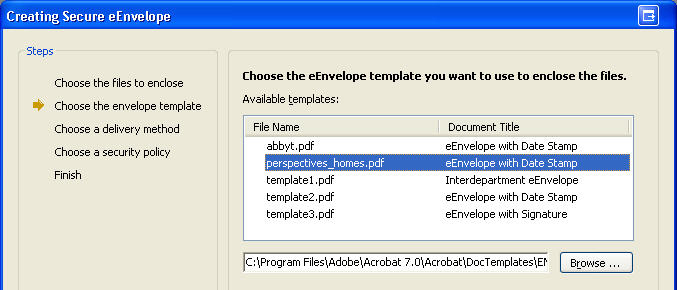
Figure 6: Store the custom template with the default templates to include it in the wizard's selections.
See larger image
The original template file has three fields, shown in Figure 7. The custom template is simplified by using a logo and returnee name, and needs only two of the fields.
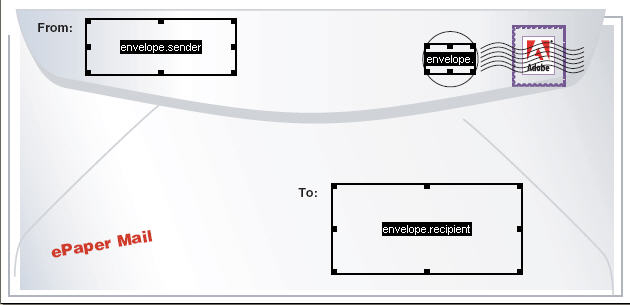
Figure 7: The default template used as a basis for the custom template uses three text fields.
An eEnvelope can be created from Outlook if you have access to Adobe LiveCycle Policy Server. In Outlook, click Attach as Secured Adobe PDF on the Standard toolbar to open the Attach as Secured Adobe PDF dialog box. Proceed through the dialog box, choose the security option and click OK to close it. The document attachment to the e-mail displays as usual, but (secured) appears in the attachment’s name.
Follow these steps to modify the fields on the custom template:
1. Choose Tools > Advanced Editing > Show Advanced Editing Toolbar to display the toolbar.
2. Click the Forms tool arrow on the Advanced Editing toolbar and select the Text Field tool from the list. When the tool is selected, the three text fields on the PDF document are active, indicated by a bounding box and the
name.
3. Delete the envelope.sender field, since the new template uses a name and logo as part of the image.
4. Double-click the envelope.recipient field with the Text Field tool to open the Text Field Properties dialog box.
5. On the General tab, click the Orientation pull-down arrow and choose 0, as shown in Figure 8.
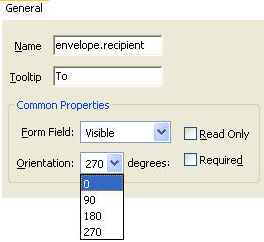
Figure 8: Modify the field’s orientation in the dialog box.
6. Modify the appearance of the field using options on the Appearance tab as desired. The example template uses a border color and fill, as well as custom font size and color, selected in the dialog box as shown in Figure 9.
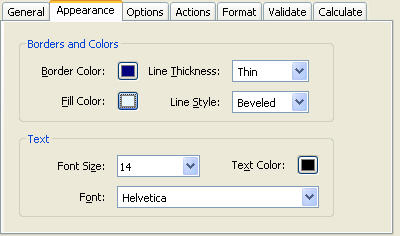
Figure 9: Modify the field’s orientation in the dialog box.
7. Click OK to close the dialog box.
8. Double-click the envelope.date field to open its dialog box and repeat the orientation and appearance selections.
9. Reposition and resize the fields on the template to their final locations, shown in Figure 10.
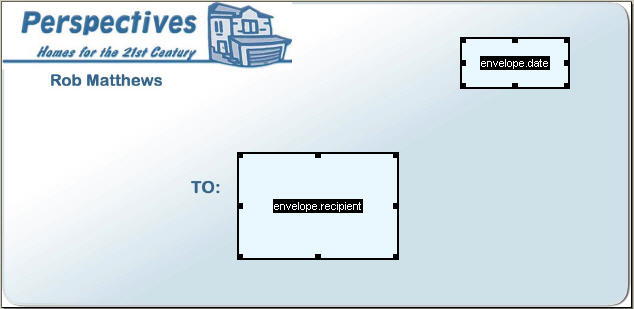
Figure 10: Adjust the fields' display on the template.
See larger image
Related topics: |
Edit PDFs |
Top Searches: |
Edit PDF files convert PDF to Word convert PDF to Excel convert PDF to PowerPoint Rearrange PDF pages Convert PDF to JPEG |
Try Acrobat DC
Get started >
Learn how to
edit PDF.
Post, discuss and be part of the Acrobat community.
Join now >
0 comments
Comments for this tutorial are now closed.
Comments for this tutorial are now closed.