Watermarking a PDF with JavaScript and Acrobat X
Learn how to use the Acrobat watermarking tool to add logos, overlays, backgrounds, headers, footers, special marks and more.
By Thom Parker – April 21, 2011


A watermark on an old-style DTF (dead-tree-format) was literally just that, a shadowy mark on the page created by applying water to the document. Since water has a very different effect on electronic equipment, a watermark on a PDF is quite different. For a PDF, the term watermark means over- or under- laying text and/or images onto a page. The PDF watermark can be used to create the exact effect produced by the old-style watermarking, but it also has many other uses.
Nearly any type of static content (text, image files and pages from another PDF) can be applied to a PDF as a watermark. The Acrobat watermarking tool (Figure 1) allows the user to select the location, page range, opacity, scaling and many other parameters. This rich feature set means that the Acrobat watermarking tool can be used to add logos, overlays, backgrounds, headers, footers, special marks or any other kind of (post-creation) content to a PDF.
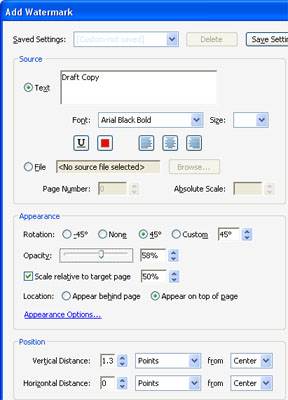
Figure 1 – The watermarking tool provides a wealth of options
But there’s more. When Acrobat creates a watermark, it places the watermark content into an OCG (optional content group), more commonly referred to as a PDF layer. OCGs allow page content to be turned on and off based on parameters such as the zoom level. However, the most useful feature is that OCGs can be turned on and off with a script, as shown in the Creating and Using Layers (OCGs) with Acrobat JavaScript article. This feature allows the form creator to add dynamic content to the PDF with only Acrobat Professional and JavaScript. No external tools are needed.
Automating watermarks
If a watermark needs to be applied to more than one PDF, it can be automated through an Action. However, the watermark settings have to be set by hand. Once set, the watermark is applied to all PDF files using the same parameters. If more flexibility is required-- for example, if different text or images need to be applied to different documents-- then the only solution is JavaScript.
Applying a watermark with a script
The Acrobat JavaScript model provides two watermark functions that have just as many options as the watermarking tool shown in Figure 1. JavaScript is just as rich and can do everything the standard watermark tool can do. In fact, watermarking is one of the most powerful features in the Acrobat JavaScript model. It can be used in a wide variety of ways that go beyond what is practical with the standard watermarking tool, such as scaling and tiling pages.
The two watermarking functions are Doc.addWatermarkFromFile() and Doc.addWatermarkFromText(). There are only two differences between these functions. First, one uses a text string as the source for the watermark content, and the other uses an image or PDF file. The second difference is in how the functions operate. Because Doc.addWatermarkFromFile() accesses the user’s file system, it is considered a privileged function and can only run from a trusted context. The Doc.addWatermarkFromText() function can be run from any scripting context. Other than these differences, both functions apply the watermark with exactly the same rich set of options used by the standard watermarking tool shown in Figure 1.
Here’s a simple script for adding a text watermark to the current PDF page. Run it from either the Console Window or the action on a form button.
this.addWatermarkFromText({
	cText: "DRAFT\n\nCOPY",
	nTextAlign:app.constants.align.center,
	cFont: "Helvetica-Bold",
	nFontSize:36,
	aColor: color.red,
	nStart: this.pageNum,
	nOpacity: 0.5
});
In all, there are 19 different input parameters to this function, but the only required input parameter is cText. All the other parameters have reasonable defaults. In the code above, the first five input parameters are all properties of the text and are unique to the Doc.addWatermarkFromText() function. The other 14 parameters are shared by both watermark functions. In this script, only two are specified-- nStart and nOpacity. The watermark is applied to all pages by default, so the nStart parameter is used to restrict the watermark to the current page. The nOpacity parameter indicates that the watermark will be 50 percent transparent so the text underneath the watermark will still be visible.
Many of the parameters not specified in the script relate to the positioning of the watermark. The defaults for these parameters will center the watermark in the middle of the page at 100 percent size and zero rotation. There are also parameters that relate to the state of the watermark, or to be more precise, the state of the OCG to which the watermark is attached. The bOnScreen parameter determines whether the watermark will be displayed when the PDF is viewed on the computer screen, and bOnPrint determines whether it will be displayed when the PDF is printed. By default, both are set to true.
The following code places the same watermark on the PDF as the previous code, except that the watermark state is set so it is only visible when printed.
this.addWatermarkFromText({
	cText: "DRAFT\n\nCOPY",
	nTextAlign:app.constants.align.center,
	cFont: "Helvetica-Bold",
	nFontSize:36,
	aColor: color.red,
	nStart: this.pageNum,
	nOpacity: 0.5,
	bOnScreen: false
});
The bOnPrint parameter does not need to be specified since the default is true. It is only necessary to turn off the screen visibility.
One very good use for this function in an automation script is for adding customized headers and footers. For example, a footer that includes a copyright or other date. An automation script would ensure that the watermark is always applied with the correct date. Another use is for personalizing documents, where the script builds the watermark from data acquired from an external data source (XML, CSV, etc.). Here is a script that applies a footer to all pages of the current document. Run it from the Console Window.
var cMyText = "copyright \xa9 " + util.printd("yyyy", new Date);
this.addWatermarkFromText({
	cText: cMyText,
	nFontSize:10,
	nHorizAlign:app.constants.align.left,
	nHorizValue: 36, // ½ inch from left
	nVertAlign:app.constants.align.bottom,
	nVertValue: 36, // ½ inch above bottom
});
The first line uses the current date to create a text string. The next line calls the watermark function with some parameters that haven’t been covered yet. The nHorizAlign parameter aligns the watermark to the left side of the page. Therefore, the nHorizValue parameter indicates the distance the watermark is offset from the left side of the page in points. In Acrobat JavaScript, there are 72pts/inch. If nHorizAlign was set to the center of the page, then nHorizValue would indicate the amount of offset from the center. The vertical parameters work in a similar fashion. This script uses those parameters to place the watermark one-half inch from both the left and bottom sides of the page.
Everything discussed so far about positioning is also true for the Doc.addWatermarkFromFile() function. As stated earlier, the only real difference between these functions is that one uses images instead of text. As such, the Doc.addWatermarkFromFile() function is very useful for applying logos, backgrounds, specialty graphics or other types of images repeated on every page.
Another interesting use is for scaling pages. The following automation script creates a copy of the current PDF where the pages are shrunk by 50 percent. Run the code below from the Console Window. Since this particular watermarking function is privileged, the code cannot be run from a script in a document.
var pgRct, oNewDoc;
for(var i=0;i<this.numPages;i++){
	pgRct = this.getPageBox("Crop",i);
	if(!i){
		// Setup
		oNewDoc= app.newDoc(pgRct[2]/2, pgRct[1]/2);
	}else
	{
		// Add Page
		oNewDoc.newPage(i, pgRct[2]/2, pgRct[1]/2);
	}
	oNewDoc.addWatermarkFromFile({
		cDIPath:this.path,
		nSourcePage:i,
		nStart:i,
		nScale:0.5,
		nRotation:this.getPageRotation(i)
	});
}
To verify the change in page size, activate the Rulers (Ctrl-R) or drag a page from the new, scaled document into the old one.
The script works by looping through the original document pages. For each page, it creates a new page in a new document that is half the size of the original page. Then it uses the Doc.addWatermarkFromFile() function to basically copy page content from the original document into the new document, except that the content is scaled by 50 percent in the process. Notice also that the nRotation parameter is used. This parameter is needed to ensure that the inserted page content is properly oriented on the new, smaller pages.
Summary:
The watermark functions are a bit of a misnomer. While they can be used to create a “watermark” effect, they do much more. A better description of these functions is that they inject content into existing PDF pages. Both functions provide a variety of options for controlling how the injected content is positioned and displayed on the target page. In the larger scheme of things, these functions are really general-purpose content-manipulation tools.
Products covered: |
Acrobat X |
Related topics: |
JavaScript |
Top Searches: |
Edit PDF create PDF Action Wizard |
Try Acrobat DC
Get started >
Learn how to
edit PDF.
Ask the Community
Post, discuss and be part of the Acrobat community.
Join now >
0 comments
Comments for this tutorial are now closed.
Comments for this tutorial are now closed.