Digging into the preflight tool chest in Acrobat 8
Learn about preflight fixups for everything from flattening layers to removing embedded files.


The Preflight fixups are one of the greatest tools in Acrobat 8 Pro. Find fixups for everything from flattening layers to removing embedded files. Take it to the next level by building your own profiles for Preflight Droplets—it’s not as daunting as it sounds!
If you have kept up with your AcrobatUsers.com reading, you know that Preflight is far more than a process for evaluating documents for print shop production. You can use profiles for a range of other processes as well, such as producing lists of file elements or fixing everything from line widths to removing data from other applications.
Some of the Preflight profiles are very much like batch processes, which I discussed in an earlier article If you are into automating processes, why not create your own Preflight profile and executable Droplet? Here’s how to do it.
Taking a look inside
Before digging into a custom profile, let’s see what makes up existing profiles. To see the innards of a profile, choose Advanced > Preflight to open the Preflight dialog box. Click Edit on the Preflight dialog box to open the Preflight: Edit Profile dialog box and scroll through the listing at the left of the dialog box to select a profile.

Figure 1 Select an existing profile from the list on the dialog box.
Tip: If you prefer, select a profile from the Preflight dialog box’s list and then click Edit; the two lists are the same.
Although the contents vary from profile to profile they constitute a number of feature areas, listed in Table 1.
Table 1. Components used in profile design
| Profile element | Components covered |
| Document | Acrobat and PDF version, encryption, damage to file |
| Pages | sizes, numbers, orientation, measurement unit |
| Images | resolution for color, grayscale, and bitmaps, compression, OPI |
| Colors | color separations, RGB, device independent color, spot colors |
| Fonts | embedding, subsetting, font type, specified fonts |
| Rendering | transparency, half tone, transfer curve, line thickness, PostScript code |
| PDF/X and PDF/A Compliance | specified compliance or non-compliance requirement, Output Intent for RGB printing |
| Convert to PDF/X or PDF/A | convert to standard, specify Trapped key, select Output Intent, ICC profile, or output condition |
| Custom checks | dozens of options dealing with text objects, color, ink, image objects, annotations, layers, and so on |
| Fixups | dozens of options dealing with renaming options, color modifications, discarding elements, flattening, and so on |
| Summary | outline of all checks and fixups defined for the profile |
Managing the profiles
The Preflight: Edit Profile dialog box offers a toolbar for working with the profile list (Figure 2).
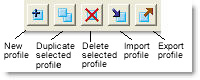
Figure 2 Use the menu in the Edit dialog box to manipulate the profiles.
The toolbar allows you to:
- Create a new profile
- Duplicate a selected profile
- Delete a selected profile
- Import a profile
- Export a profile
Configuring a custom droplet
Each profile has a specific set of commands it performs. You don’t need to restrict your Droplet activities to the listed profiles. Instead, use one of the existing profiles as a starting point and make changes to suit your workflow.
Tip: If you customarily optimize your PDF files, you might want to build a Droplet instead. Read about the PDF Optimizer in a previous article, available at Cleaning up your PDF Documents.
Follow these steps to create a new profile starting from the Convert to sRGB profile:
1. Choose Advanced > Preflight to open the Preflight dialog box. Select Options > Edit Preflight Profiles from the dialog box menu to display the Preflight: Edit Profile dialog box.
2. Scroll through the list of existing profiles and select one closest to what you want to create, such as Convert to sRGB.
Note: If you prefer, click Create a Custom Profile to start from scratch.
3. Click Duplicate the selected profile to create a copy of the profile. In the Name field at the top right of the dialog box, the label (Copy 1) is appended to the profile’s name.
4. Type an identifying name for your custom profile. Include other information such as a purpose, author, or e-mail address for identification as seen in Figure 3.
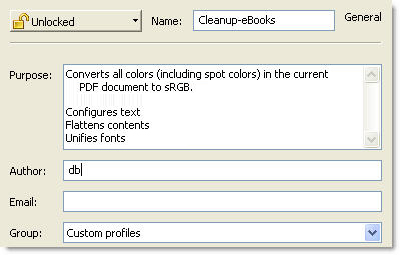
Figure 3 Customize identification information for the new profile.
5. Click the Group dropdown arrow and choose a category. The options include a custom profiles group, used in the example.
6. Select features to include in the profile from the document elements listed at the left of the dialog box as shown in Figure 1. In the example, the profile needs to check the document to ensure the file is compatible with Acrobat 6.0 (PDF 1.5). Select the option from the profile’s list at the left of the dialog box and select a flag for the action from the dropdown list (Figure 4). Choose from Error, Warning or Info; the default is Inactive.

Figure 4 Choose the flag corresponding to the severity of the problem for profile features.
Tip: In the PDF fixups section of the profile, the command to convert files to be compatible with at least Acrobat 6 will be chosen; the Document evaluation doesn’t have to throw the error, but an information flag can be used.
7. Proceed through the other categories to include additional commands. The example uses several flags, including warnings for page size or orientation and line thickness. There are several information flags pertaining to font embedding, image resolution, and uncompressed images.
8. Click Custom checks in the custom profile’s listing at the left of the dialog box to display the options (Figure 5). Select the custom check to use in the right column; click the left arrow to add the check to the custom profile. Click the flag dropdown arrow and choose Error, Warning, or Info as appropriate.
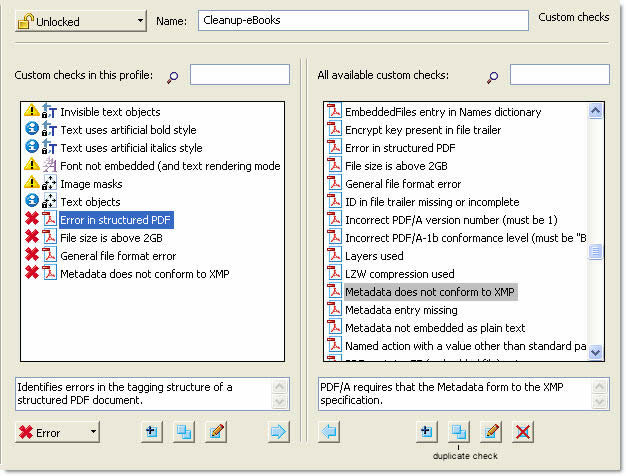
Figure 5 Select custom checks to include in the profile.
See larger image
Tip: If your profile is complex and you can’t find a particular item, type search terms in the fields above the columns to search the fixups in the profile (left) or all those available (right).
9. Click Fixups in the custom profile’s listing to open the fixup list (Figure 6). As with the Custom checks, select a fixup in the right column and click the left arrow below the column to include the fixup in the custom profile.
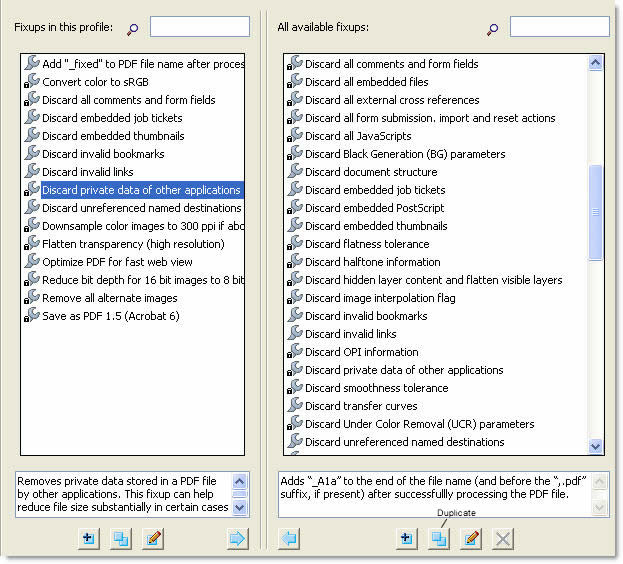
Figure 6 Specify the fixups to perform when the profile is executed.
See larger image
Note: Both custom checks and fixups can be modified or created from scratch; see examples in the next section.
10. Click Summary in the profile’s list at the left of the dialog box to show the components that make up the new profile (Figure 7).
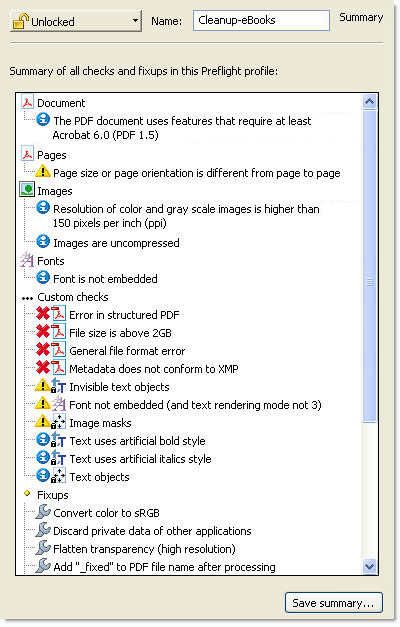
Figure 7 All the features selected are listed in the summary.
11. For future reference, click Save summary to open a dialog box for naming and saving a record of the summary as a PDF file.
12. If desired, apply a lock to the profile to prevent accidental changes. The profile’s icon at the left of the dialog box shows a locked status (Figure 8).

Figure 8 Add a lock to protect the profile’s contents.
Tip: You can password protect the profile to lock it, a good idea if you are exporting or sharing profiles. Select Password protected from the Lock dropdown menu. In the resulting dialog box, type the password, retype to confirm, and click OK.
Customizing a custom check
The checks are added to the profile to evaluate some aspect of the document’s content or structure. You can add more custom checks to the lengthy list of custom checks provided. One of the custom checks tests to see if the file size is larger than 2GB. I’d like to include a custom check that tests for files greater than 1GB.
Plan ahead: If you are building a check that you could possibly reuse at a later date, add the new check to the list of All available custom checks (shown in Figure 5). If you are sure it’s a one-off check, modify the default after adding it to the list of Custom checks in this profile (also shown in Figure 5).
Follow these steps to include another custom check in the All available custom checks column:
1. Select the existing custom check and click Duplicate check below the column to open the Preflight: Duplicate Check dialog box (Figure 9).
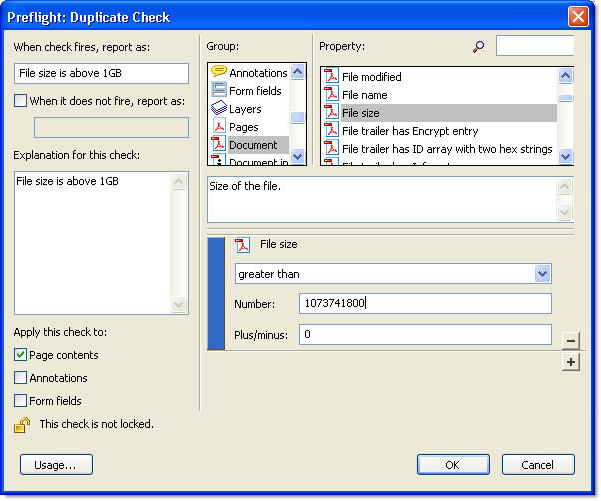
Figure 9 Modify the features for the new custom check.
See larger image
2. Modify the notations to reflect the new values in the left side of the dialog box, including the label in the When check fires, report as: and the Explanation for this check fields.
3. Select the object Group and Property as required. As the example is built on an existing custom check, the Document Group and File size Property are selected.
4. Use the fields and dropdown lists at the lower right of the dialog box to construct the check. In the example, the expression reads:
File size is less than or equal to 1073741800 plus/minus 0
Note: The long character string is the true size of 1GB in bytes.
5. Click OK to close the dialog box and return to the Preflight: Edit Profile dialog box. You see the newly-crafted custom check is now included in the list (Figure 10).
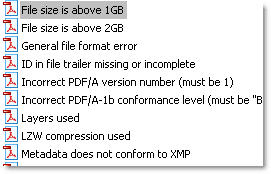
Figure 10 Add the new custom check to the existing list of custom checks for future use.
Tip: For both the Custom checks and fixups, click Usage at the lower left of the dialog boxes to open an information dialog box listing the names of profiles that include the Custom check or fixup.
Modifying a fixup
Fixups are easily customized and configured. As with custom checks, decide if you’ll reuse a fixup after modification or not. This example describes customizing a fixup to include in the list of all available fixups.
Follow these steps to change a simple fixup, in this case, appending a label to the end of a file’s name after processing:
1. Select the fixup you want to start from, and click Duplicate to open a copy in the Preflight: Duplicate Fixup dialog box (Figure 11). Rename the fixup.
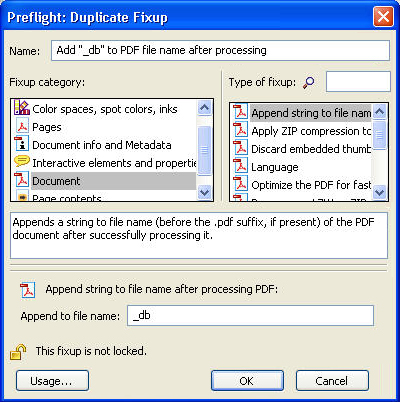
Figure 11 Create new or duplicate fixups to customize according to your workflow and project needs.
2. Choose one of the six items from the Fixup category at the left of the dialog box, such as Document used in the example. The Type of fixup options change to reflect the selected category.
3. Choose the Type of fixup from the right column. In the example, the Append string to file name after processing fixup is selected.
Tip: A description of the fixup is shown below the category and fixup columns.
4. Add content to the fields displayed on the dialog box according to the selected fixup. In the example, the only field is the Append to file name.
5. Click OK to close the dialog box and add the new fixup to the list (Figure 12).

Figure 12 The new fixup is ready to use.
6. Click OK to close the Preflight: Edit Profile dialog box, returning you to the Preflight dialog box.
Create the new Droplet
To use the new profile as a new Preflight Droplet, select it from the Custom profiles on the Preflight dialog box (Figure 13). Choose Options > Create Preflight Droplet. Follow the prompts to designate folders and reports and save the Droplet.
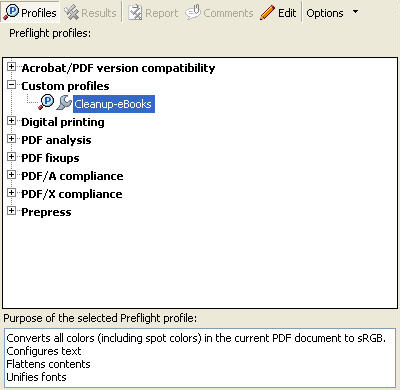
Figure 13 The custom profile, containing basic and custom elements, is complete.
I’d like your feedback:
For those who have built Preflight Droplets, have you ever considered creating your own? Did you know you could customize their contents? Will you give it a try? I’d like to hear your experiences.
E-mail me!
Related topics: |
Print Production |
Top Searches: |
Create PDF print production tools overview |
Try Acrobat DC
Get started >
Learn how to
edit PDF.
Ask the Community
Post, discuss and be part of the Acrobat community.
Join now >
0 comments
Comments for this tutorial are now closed.
Comments for this tutorial are now closed.