Working with preflight in Acrobat 8
Learn all the things you can do with Preflight, including evaluating documents, repairing content and more.


How often do you open Acrobat 8 Pro just to process a file or check its contents? Every week? Every day? Spend a few minutes building an executable file to do the job for you.
If your work doesn't involve high-end printing, you may never give the Preflight tool a second thought. You should. Preflight, although traditionally used for evaluating and preparing documents to hand off to a print shop, also offers a range of tools to use for all sorts of fixes. New to Acrobat 8, Preflight lets you evaluate documents, repair content to meet a standard or other marker, or change content in the document for a specific purpose, such as changing color images to grayscale.
Creating a droplet
A Preflight droplet is an executable file you build in the Preflight window in Acrobat 8 Professional. If you have built a macro in any program, you have worked with the essence of a droplet. Unlike program-based macros, a droplet is a separate executable file that you store on your desktop or hard drive, or share with others. A droplet can be built from the existing Preflight offerings, or you can build your own based on existing profiles or start from scratch.
Note: This month looks at using existing profiles and batch processing. Stay tuned for a follow-up article on customizing a Preflight droplet.
Applying a profile
The Preflight dialog box includes dozens of different methods for modifying a PDF file, ranging from compliance with standards to program versions to a long list of fixes that can be performed automatically.
Follow these steps to apply a profile:
1. Open a file in Acrobat 8 Professional.
2. Choose Advanced > Preflight to open the Preflight dialog box (Figure 1).

Figure 1: Run a Preflight command on an open document from the dialog box.
Tip: Notice that there are two icons in the list. The left “magnifying glass” icon indicates profiles that contain evaluation and analysis activities; the right “wrench” tool indicates profiles that contain commands for modifying the file's contents. Some profiles contain both types of action. The PDF analysis group of profiles doesn't have modification commands, while the PDF fixups group of profiles doesn't have analysis commands.
4. Click Execute to process the document. The results are shown in the Preflight dialog box and can be exported as a separate report PDF file.
Specifying droplet settings
Rather than opening PDF files in Acrobat 8 Professional and selecting the same commands repeatedly, take a few minutes and create a droplet. In this example, a droplet is generated to handle converting a PDF file produced in Acrobat 8 to one compatible with Acrobat 5.
Follow these steps to create the droplet:
1. Choose Advanced > Preflight to open the Preflight dialog box.
2. From the Acrobat/PDF version compatibility list, choose Compatible with Acrobat 5. For each item you select in the Preflight profiles list, Acrobat shows a description of the profile and its outcome in the text area below the profiles (Figure 2).

Figure 2: Construct the droplet and choose management options in the dialog box.
3. Click the Options arrow on the dialog box to open a menu and choose Create Preflight Droplet. The Preflight:Droplet Setup dialog box opens, displaying the profile selected in the main dialog box (Figure 3).
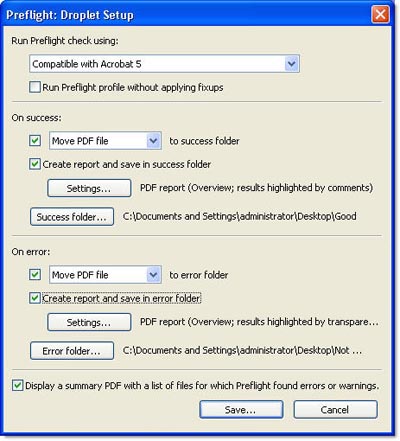
Figure 3: Choose the features for file storage and reporting for the droplet.
4. Select the features you want to include for successful application of the profile, including:
-
Select the “Move PDF file to success folder” checkbox to activate the Success folder button. Click to open a browser dialog and select the folder.
-
Click the “Create report and save in success folder” check box to open the Preflight:Report Settings dialog box (Figure 4). Choose the format for the report from PDF (the default), XML and text reports. For the PDF option, choose what to include in the report and a display option. Click OK to close the dialog box and return to the Droplet Setup dialog box.

Figure 4: Specify the level of detail for the report.
5. Repeat the process to define how you want the droplet to handle files that aren't successfully processed.
6. Click Save. The Save droplet as dialog box opens. The chosen profile is listed as the default name. Name and specify the location to save the droplet and click Save.
Tip: Saving droplet files to the desktop is a convenient way to access them for later use. If you have a collection of droplets, create a folder on the desktop for easy access.
When you change your mind
Prior to Acrobat 8, a droplet file had to be recreated from scratch to change settings. If you change your mind about any of the options—perhaps you want to change the folder locations or the report type--you can edit the profile.
Double-click the droplet's icon to open the Preflight:Droplet Setup dialog box using the same settings as those shown in Figure 3. Make your changes and click Save.
From within Acrobat, choose Advanced > Preflight and choose Options > Edit Preflight Droplet. Locate and select the droplet file. The dialog box shown in Figure 3 displays; make changes as desired and click Save.
Running the droplet
To use the droplet, simply drag a file from a folder to the droplet icon on the desktop (Figure 5). Acrobat opens and processes the file; the finished file is handled according to the settings specified in the Preflight:Droplet Setup dialog box.

Figure 5: Drag a file to the droplet for processing; the output is placed in the applicable folder.
View the report
The Preflight droplet generates a report of the operation. In the report, look for a list of fixes applied, the outcome, and a summary of problems displayed in an overview. A report for a document is shown in Figure 6.

Figure 6: The report summarizes the actions applied and their outcomes.
Choosing a report type
There are several kinds of reports you can generate for a droplet. Choose a report type based on the level of detail desired and how you intend to use the results. For example, if you are testing a layout for an image-intensive newsletter, you may find a PDF Details Report the most valuable. On the other hand, if the file is processed and tracked, an XML report may help integrate the preflight results into an automated workflow.
-
A list of the fixes applied to the document. The sample used six commands ranging from resetting minimum line widths to converting color to black and white
-
A summary of the results lists errors, warnings and information items
-
Document information includes the same type of information you'd find in the document Properties dialog box such as the title, author, PDF version and so on
-
A description of the Environment, including the operating system and Acrobat program version
The Details Report offers detailed descriptions of problem objects chosen in the Preflight:Report Settings dialog box, shown in Figure 3.
Details can be identified using one of three formats:
- Transparent masks display colored masks over areas to identify problems. Masks are useful for multi-image documents, but are of limited value in a text-based report when the error covers the entire page or document (Figure 7).
]
Figure 7: Transparent masks highlight problems, useful on a page containing multiple images.
Tip: The default red mask color can be changed in the Preflight preferences.
- Comments attach a text comment linked to each problem area. The type of comment varies according to the issue identified. A comment may be a Sticky Note to identify an issue applicable to the entire page, or a drawn object identifying a particular element on the page (Figure 8).

Figure 8: A comment explains each identified problem on the page.
- The Layers display separates the file into layers showing objects and errors. The layer structure varies according to the profile selected. Toggle the layer visibility on and off to identify problem areas (Figure 9).

Figure 9: Layers identify objects and errors in the document.
Converting batches of files
You don't need to convert files one by one. Instead, assemble files you want to process in a folder. Select the files and drag them to the icon for processing.
Tip: You have to open the folder, otherwise Acrobat tries to convert the folder itself and produces an error report.
In Acrobat, the Preflight dialog box opens and you see the files listed for processing (Figure 10). A number of different icons display during the processing; their appearance and purpose are listed in Table 1.

Figure 10: File processing and outcomes are shown in the Preflight dialog box
Table 1. Processing icons
| Icon appearance | Indicates |
|
| Document has been processed successfully |
|
| Document has not been processed successfully |
|
| Information is generated, but the profile isn't applied |
|
| File processed, report to be generated |
|
| Waiting to be processed |
A report is automatically named to differentiate it from the file by appending “_report” to the end of the file's name. Figure 11 shows a report generated for a batch of files processed by the Convert to Acrobat 5 profile.

Figure 11: The batch report shows summaries of each file processed and the outcomes.
Highlights of the report (identified on the figure) include:
A. Report title includes the profile used and date
B. A successfully processed file is indicated by a green dot to the left of the file name
C. Information about the processing and disposition of the file is included
D. Each file's name is an active link—click to open the file
E. A file that can't be processed is indicated by a red dot to the left of the name; reasons for failure are shown, in this case, the file is encrypted
I'd like your feedback:
Have you ever used Preflight droplets? What was your experience? Do you think the information in this article may persuade you to give them a try? Can you see how Preflight droplets might have a place in your workflow?
E-mail me!
Related topics: |
Print Production |
Top Searches: |
Create PDF print production tools overview |
Try Acrobat DC
Get started >
Learn how to
edit PDF.
Ask the Community
Post, discuss and be part of the Acrobat community.
Join now >
0 comments
Comments for this tutorial are now closed.
Comments for this tutorial are now closed.