Do the Acrobat shuffle
Acrobat offers different methods to bring content together from different locations and in different formats. Here’s how you can get it together.
by Donna L. Baker, ACE, Baker Communications
PDF Packages
This article doesn’t consider combining specified pages and documents using the PDF Package feature. To learn about creating packages, see the Adobe Help files, or check out these sources:
Combining Documents into a Single PDF
Understand how to combine multiple files from multiple applications into a single PDF document.
Watch [SWF: 1:38 Min.]
Create a PDF Package and control the user experience
Learn what a PDF Package is and how it can be valuable, how to create a PDF Package, and how to use Acrobat to tweak the package to create the exact user experience you want.
Watch [FLV: 15:10 Min.]
One stellar advantage of PDF is the ability to bring together content from myriad sources to produce a single, cohesive PDF document. Acrobat offers numerous ways to swap pages. As you may expect, there are circumstances where one method is better than another--in terms of document contents and your workflow.
In this article, I’m not going to provide much tutorial content (aside from some of the visual techniques), and have assumed you know where to locate and use the features. Instead, my focus is on techniques and tips that can help you streamline your day-to-day Acrobat activities and save time.
Choose a page-wrangling method
It’s important to understand the distinction between the document-paging tasks, and to decide which is best to use as you plan your activity. You can make revisions using program commands or visually from the Acrobat interface. I’ve listed the basic revision options in the following table.
Table 1. Common revision methods
Command | Outcome |
| Delete page | outright removal of pages |
| Insert page | inserting additional pages or files |
| Extract page | separation of pages from file with several options for handling content |
| Replace page | substituting new text, image, and comment content for an existing page |
All page manipulations require you to specify a page or page range in the active document. With the exception of deleting pages, you also specify what page or pages to substitute. Here are over a dozen tips on working with Acrobat page-revision features:
General tips
-
Look for the same commands from the main Acrobat menu, the Pages panel’s Options menu and the right-click context menu. The option you use depends on habit (I right-click everything) and where you are working.
-
Select the page(s) in the Pages panel before using a program command to list the page(s) automatically in the dialog box.
-
Try a hybrid page-selection workflow: In a document containing mainly text, you may need to scroll through the pages to find the content you want to work with. Then select the page thumbnails and drag them into the target document visually.
-
After you finish manipulating pages, use the Reduce File Size or Save As command to rename and save the restructured document in the smallest possible file size.
-
Select thumbnails using common selection methods: Shift-click to select multiple page thumbnails; Ctrl-click/Command-click to add pages to a selection; draw a marquee around a group of page thumbnails.
-
If you are getting a big project underway and know you’re going to be doing some page swapping, save mouse clicks when you save the file initially. Choose File > Properties > Initial View and choose Pages Panel and Page from the Navigation tab dropdown list.
Inserting pages
- Before opening the dialog box for inserting pages, select the page thumbnail that indicates the page to follow the new content. The dialog box defaults to insertion of pages After a specified location. If I select “7,” for example, the inserted content starts before the indicated page. Keep the default setting in mind to save a step in the dialog box.
Replacing pages
-
Acrobat replaces only the text and images on the original page when you replace a page. Links, bookmarks and form fields aren’t changed.
-
By the same token, interactive elements found on the replacement page are not carried with the page content.
-
Comments in a replacement page carry over with the page text and images and combined with existing comments.
Extracting pages
-
Bookmarks or articles found in a page are not extracted with the page content.
-
Any bookmarks or article threading associated with pages are not extracted.
-
Extracted pages are placed in a new document named Pages From [original document name]-[n].
-
In some workflows, it’s easy to keep track of your work by including the default names as part of your project nomenclature. For example, Pages From [annual report] – version_xx contains significant identifying information.
-
If you can’t extract pages, choose File > Properties > Security to determine if the author added security to prevent page extraction.
-
When setting up an extraction, choose Delete Pages After Extracting to remove the extracted pages from the original, effectively splitting the document.
-
To pull page-by-page content, choose Extract Pages As Separate Files when setting up an extraction. Each extracted page is saved using the original file’s name and a number suffix.
-
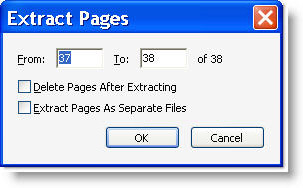
To create a subset of the existing document, don’t select either extraction option in the Extract Pages dialog box (Figure 1).

Figure 1: Specify the method for handling extracted content.
Watch what you’re doing
Depending on your workflow, habits and the characteristics of your documents, you can work from within the Pages panel using the page thumbnails. In all cases, open both the target PDF file and the donor file from which you intend to take the content. To enhance organization, choose Window > Tile > Horizontally to display the pair of documents and their Pages panels.
Note: You don’t need two files for deletion. From the Pages panel, select the thumbnails for deletion and press Delete. Confirm the deletion to remove the content.
Inserting document content visually
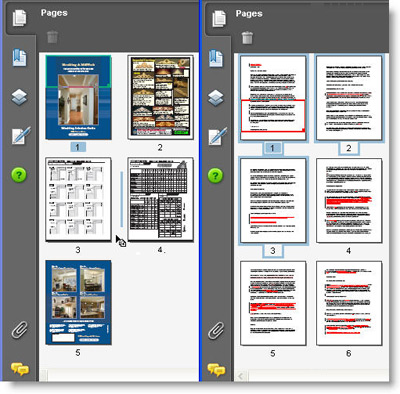
You can drag and drop pages without using any commands or tools. To add pages from one file into another visually, select the thumbnails of the pages you want to move, and drag from the Pages panel in the donor file to the Pages panel in the target file. An indicator line shows your position in the page sequence. Release the mouse when the indicator shows the desired location (Figure 2).

Figure 2: Placement location shown in the Pages panel.
Replacing pages using thumbnails
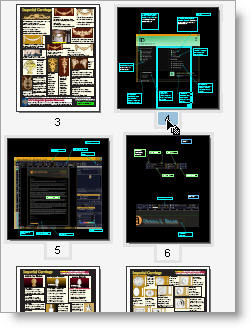
Replacing pages visually is almost as easy as simply inserting pages. Select the replacement pages in the Pages panel of the donor file and drag the thumbnails to the Pages panel of the target file. Drop the thumbnails over the page number box of the thumbnail representing the first page for replacement. If you have set up a page replacement, the corresponding pages are highlighted in the target file (Figure 3).

Figure 3: Placement location shown in the Pages panel.
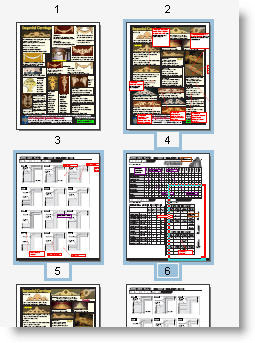
The pages you selected in the donor document replace the same number of pages in the target document, starting at the page number onto which you dropped the new pages (Figure 4).

Figure 4: Completed page replacement.
Making more pages
Aside from the methods covered in this article, you can use other tools and processes in Acrobat to complete a publication. For example:
-
Use the Snapshot tool to capture content from a page and create a new document that can then be used in an existing file. For example, capture all the data from a table except a price list, create a new file from the snapshot, and then replace the page in the existing file.
-
Use the File > New command to create a blank PDF document. Using the TouchUp Object tool, select and then delete or copy existing content from a document to the new document page.
Read how to work with images in different ways in two of my previous articles: “Acrobat image editing 101” and “The art of Acrobat image handling.”
Finishing touches
Once you have finished manipulating the content of the file, you can add cohesive elements such as page numbering, headers/footers, watermarks and backgrounds. For more on how to use these features, look for my previous article titled “All together now — Making a cohesive PDF document.”
I’d like your feedback:
How do you normally manipulate pages in your PDF files? Have you tried the visual methods using the Pages panel? I’d like to hear about your experiences.
E-mail me!
Try Acrobat DC
Get started >
Learn how to
edit PDF.
Ask the Community
Post, discuss and be part of the Acrobat community.
Join now >


0 comments
Comments for this tutorial are now closed.
Comments for this tutorial are now closed.