Need more help with Acrobat DC?
Find tips and tutorials at Acrobat Support.
How to optimize a PDF using Acrobat DC
Learn how to use the PDF Optimizer settings to reduce the size of PDF files.
By Adobe – October 16, 2015

In this tutorial, learn how to use the PDF Optimizer settings in Acrobat DC to reduce the size of PDF files.
- Open the PDF Optimizer dialog box (File > Save As Other > Optimized PDF).
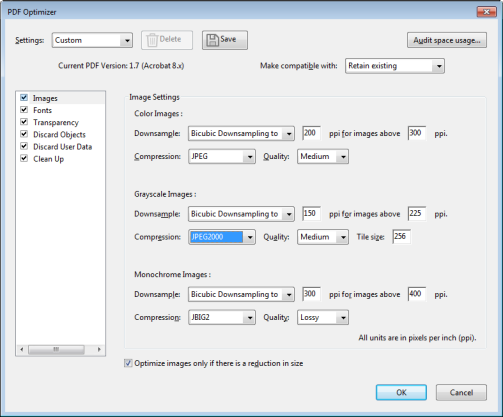
- To use the default settings, choose Standard from the Settings menu, and then skip to step 6. If you change any settings in the PDF Optimizer dialog box, the Settings menu automatically switches to Custom.
- From the Make Compatible With menu, choose Retain Existing to keep the current PDF version, or choose an Acrobat version. (The options available in panels vary depending on this choice.)
- Select the check box next to a panel (for example, Images, Fonts, Transparency), and then select options in that panel. To prevent all of the options in a panel from executing during optimization, deselect the check box for that panel.
- (Optional) To save your customized settings, click Save and name the settings. (To delete a saved setting, choose it in the Settings menu and click Delete.)
- When you are finished selecting options, click OK.
- In the Save Optimized As dialog box, click Save to overwrite the original PDF with the optimized PDF, or select a new name or location.
To optimize several documents at the same time, use the Output options for the Action Wizard.
For more information on optimizing PDFs, see the Adobe Help page on optimizing PDF.
Products covered: |
Acrobat DC |
Related topics: |
Compress PDF online, Scan and Optimize |
Top Searches: |
Compress PDF onlineCreate PDF convert scanned documents to PDFs get started with Acrobat DC |
Try Acrobat DC
Get started >
Learn how to
edit PDF.
Ask the Community
Post, discuss and be part of the Acrobat community.
Join now >
0 comments
Comments for this tutorial are now closed.
Comments for this tutorial are now closed.