How to create a PDF presentation from Photoshop CC and Acrobat XI
Learn how to create a PDF presentation or multi-page PDF using Adobe Photoshop CC.


View transcript
How to create a PDF presentation from Photoshop CC and Acrobat XI
Donna Baker – August 21, 2014
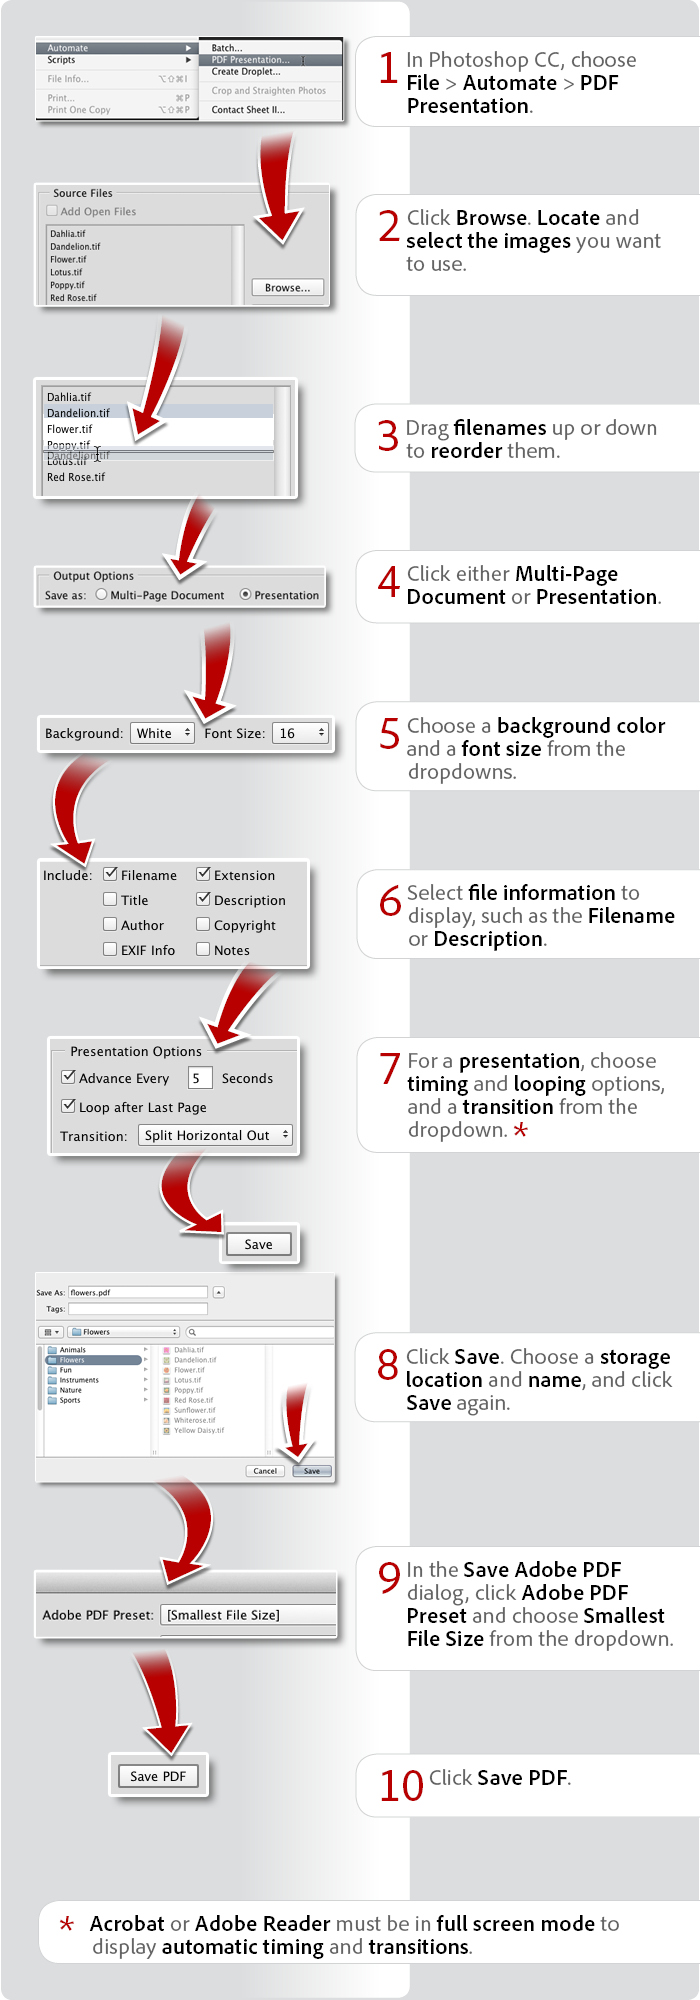
- In Photoshop CC, choose File > Automate > PDF Presentation.
- Click Browse. Locate and select the images you want to use.
- Drag filenames up or down to reorder them.
- Click either Multi-Page Document or Presentation.
- Choose a background color and a font size from the dropdowns.
- Select file information to display, such as the Filename or Description.
- For a presentation, choose timing and looping options, and a transition from the dropdown. *
- Click Save. Choose a storage location and name, and click Save again.
- In the Save Adobe PDF dialog, click Adobe PDF Preset and choose Smallest File Size from the dropdown.
- Click Save PDF.
Acrobat or Adobe Reader must be in full screen mode to display automatic timing and transitions.
Products covered: |
Acrobat XI |
Related topics: |
Create PDFs |
Top Searches: |
Print to PDF create PDF convert HTML to PDF convert scans to PDF convert Word, Excel or PowerPoint to PDF Convert PDF to JPEG |
Try Acrobat DC
Get started >
Learn how to
edit PDF.
Ask the Community
Post, discuss and be part of the Acrobat community.
Join now >
2 comments
Comments for this tutorial are now closed.
Lori Kassuba
7, 2015-02-16 16, 2015Hi John,
If you prefer a video tutorial format, check out this link:
https://helpx.adobe.com/photoshop/using/contact-sheet-pdf-presentation-cs6.html
Thanks,
Lori
John
6, 2015-02-15 15, 2015What about short movie?
What about music or presentation with sound?
Lori Kassuba
3, 2014-12-30 30, 2014Hi Bijutoha,
Are you running a 32-bit operating system?
Thanks,
Lori
Craig
2, 2014-12-29 29, 2014Perfect! Just what I needed. I love the image. It made it really easy to follow. Thanks.
Bijutoha
5, 2014-12-20 20, 2014Unfortunately, I didn’t see any action in Presentation Option, Because it is not working here in my PS CC. Could you say something?
Comments for this tutorial are now closed.